Welcome to Lvnox's Beginner Image Generation Guide
hii bestie! welcome to my image generation guide ✨
In this guide, you will understand how people create art for their bots, thumbnails, or other projects that need AI-generated images.
The purpose of this guide is to help complete beginners get into image generation and get up to speed as fast as possible. This is not an advanced guide — it's made so beginners can start making good results in no time.
We won't talk about local generation here because that needs proper setup, like a good PC with an Nvidia RTX GPU, and then you have to choose between ComfyUI, Forge, or whatever else. That's too much for now. This guide is for people who have never touched image generation before. If you want an advanced guide, I'll make another rentry for that later!
Where can I generate images for free?
There are a lot of options nowadays, but I suggest starting with the most popular and beginner-friendly sites:
These three are the easiest places to start without spending any money.
How does image generation work?
It is actually super simple:
- Pick a model — this decides the art style. Some models make anime, some make realism, some make 3D-looking art.
- Write a prompt — describe what you want. Example:
1girl, pastel pink hair, sundress, flower field, soft lighting. - Hit generate — the website does the magic.
- Reroll or tweak — didn't like it? Change a word and try again.
That's literally it. The rest is just practice.
Words you will see everywhere
| word | meaning |
|---|---|
| model | the trained AI that decides the overall art style, this could be 2D Flat art, 2.5D Art, 3D art, Realism art |
| lora | a small add-on you mix with a model for characters, styles, or details |
| checkpoint | another word for model |
| prompt | the text description of your image |
| negative prompt | things you do not want, likebad hands, blurry, low quality |
| sampling steps | how long the AI thinks. More steps = more detail but slower |
| CFG scale | how strictly the AI follows your prompt |
| seed | a number that controls randomness. Same seed + same prompt = same image |
Let's create your first image on Tensor.Art
I know everything is easier if you learn it on the go, so let's just jump into Tensor.Art and make your first image.
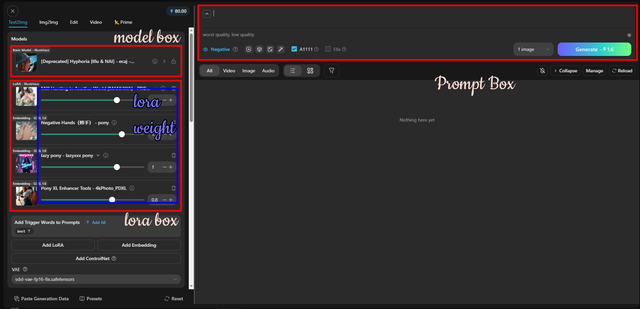
The image creation UI looks like this: there is a Prompt box, a Model box, and a Lora box. Let's go through each one.
Prompt
The prompt is basically what you want the image to be. If you typereaching to the viewer, the character's hands will probably reach toward the viewer.
Prompts are usually trained using Danbooru tags, so it is easier for the model to understand what you want if you use that style.
There are some models like Anima or Z-Image Turbo that understand natural language better when describing the image. But for this guide, we are going to use Illustrous and the Danbooru tag style of prompting to make things easier for you.
Model box
Here you can pick whatever model you like: 2D, 3D, or 2.5D.
The model decides the overall art style, so try a few until you find one that matches your taste.
Lora box
Loras are little add-ons that add specific styles, characters, or fandoms to your image.
For example, there are loras based on games like Genshin Impact, loras that copy a certain artist's style, or loras for manga/manhwa looks.
Lora weight
Lora Weight is how strong the lora affects your image. You can adjust it and do a lot of trial and error, changing it little by little until you get an image you like.
Important to note
There are a lot of settings in there, like aspect ratio, sampling methods, sampling steps, CFG scale, seed, and Adetailer, and all those trinkets and stuff that can be adjusted.
Personally, I don't want to subject a newbie to these kinds of settings. It's counterintuitive for them to understand all of this right away. Instead, I am going to suggest the OCM Method.
The OCM Method
OCM stands for Observe, Copy, Modify.
This is the easiest way to learn image generation without drowning in settings.
1. Observe
Look around the site (or anywhere) for an image you really like. Check its prompt, model, and lora information. Most posts on Tensor.Art, PixAI, and Civitai show exactly what was used.
2. Copy
Copy that prompt, model, and lora setup. Generate it yourself. Don't feel bad — this is how almost everyone learns.
3. Modify
Once you get a result close to what you like, start changing small things. Swap the hair color, change the outfit, adjust the background. Little by little, you will understand what each word does.
That's the whole method. Observing, copying, then slowly modifying. It saves you so much time and confusion.
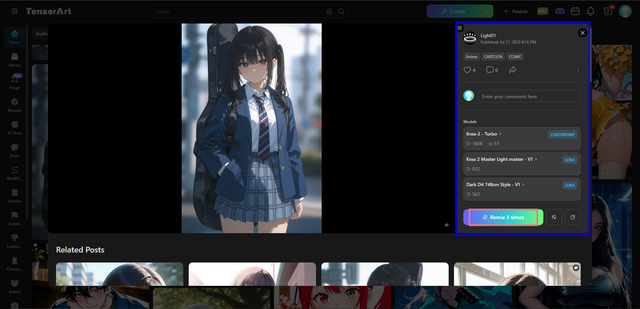
On Tensor.Art, almost any image you see can be remixed. That means you can load someone else's generation into the editor and tweak it as your own.
Maybe you like the style, maybe you like the outfit, maybe you like just one small part — or everything. Remix it, study it, change it, and make it yours.
I honestly think this is the best way to understand image generation fast. Create something first, then polish it later. You don't need to start from scratch every time.
What's next?
In the next rentry, I will explain more intermediate things like the settings inside image generation itself: Danbooru tags and where to find them, the difference between samplers like Karras and Euler, what Adetailer does, and all the other little options.
But this guide already serves its purpose. Its job is to get a newbie from zero to actually making something quickly. Understanding how everything works under the hood can come later.
Final bestie advice
You don't need to be perfect on your first day. AI art is all about trial and error. Generate, tweak, reroll, learn from public examples, and have fun.
The best way to learn is just clicking buttons and seeing what happens.
happy generating bestie 💕✨