Guide by Xeraser, special thanks to Ragnar, Graion Dilach, KittopiaCreator, FevGrave and goldfisher11
If you have any questions or suggestions or if you want to help cleaning and prettying up the guide don't hesitate to contact me.
I also have an Arcade Stage Zero guide.
IMPORTANT
The guide only deals with REPLACING existing tracks. While it (UPDATE!!!) IS possible to add entirely new song slots the process is MUCH more complex and involved and won't be covered here for now but probably ever sometime in the future due to the sheer number of songs already present in-game as of 2.20+
I'm serious, it's NOT worth anyone's time.
UPDATE #2: I've received a private modpack for version 2.40 (which should work on 2.31 too but it's time to move on to 2.40 anyway. IMAGINE being Tsubaki Line-less LMAO) with NEW (NOT replaced) songs with not one but TWO sets of ACB+AWBs. It's theoretically possible to use this guide but on those files instead of game's original files. I can't guarantee it will work but I don't see why it shouldn't. I'll give it a go when I have the time and if all goes well I'll share a proof of concept mod you can use as a base.
Table of contents
What you need
- The following decryption key
0xD5D00A7FE73707AEDCA8A5D9BA528290AB9F6FD994872B9243C722B33D36DEE3(note: this might only be valid for 2.31, for other versions use AESDumpster) to decrypt the.paks - fmodel or umodel/UEViewer (to open the
.paks and extract resources) - A binary editor such as HxD or (online) HexEd.it (to remove and then restore the ACB's header)
- Sonic Audio Tools (to unpack and repack ACB/AWBs)
- VGAudio.Wpf or AtomENCD (to encode songs to HCA)
- PakMaster (to repack files into a
.pak) - The (mostly complete?) song list by ID (for 2.31 but might be valid for 2.20 as well. If you want to help feel free to get in touch with me at shoebillanon on *iscor*, I haven't played enough of the game to know where most Menu BGMs play because I've been busy figuring this shit out.
- A moderate amount of patience.
- Optional?: modified FirstWaveLength .uasset files to extend the song length in 2.31 (also includes simple tools and instructions to automate the conversion to and from .json/.uasset and a script to automatically update the FirstWaveLength value in every file in case these ever become relevant in future game versions) (I'm genuinely not sure if these do anything, if you want to use them drop the
.uassetand.uexpfiles in the same folder as the finalBGM.uexpbefore repacking)
Optional but recommended:
- UAssetGUI (to open
.uassetfiles and modify the song, artist and optionally even album names) - An image editor such as Paint.NET (to edit the album art in case you want to go that far)
- UE4-DDS-Tools (to inject the modified album artwork)
- 350g of spaghetti, 2-3 garlic cloves, 2-3 slices of Neapolitan peasant bread, 10 or more filleted anchovies in oil, olive oil, fresh basil, salt and pepper
WARNING
Don't use Audio Cue Editor (or Eternity Audio Tool) to actually modify the AWB/ACB, it will break every track whose ID is higher than the one you've replaced. I really wish it were THAT easy.
Preparations
- Make a copy of
DAC\WindowsNoEditor\GameProject\Content\CriData\BGM.awb- we won't be modifying the AWB directly. - Open either fmodel or umodel/UEViewer and point them to your DAC Paks folder (
DAC\WindowsNoEditor\GameProject\Content\Paks) - If prompted set the UE version to 4.24 and use the decryption key above (Directory > AES menu in fmodel, umodel should prompt you upon extraction)
IMPORTANT
If using fmodel the .pak you should be
exploring is GameProject-WindowsNoEditor_0_P.pak
Extracting the ACB
- Within your
.pakviewer of choice navigate toGameProject/Content/IND/Sound/ADX_SONG/BGM/and extractBGM.uasset- Right click > Export Raw Data in fmodel, right click > Save packages in umodel and make sure to check "keep directory structure"
- Navigate to the folder where you extracted the assets and change the extension of
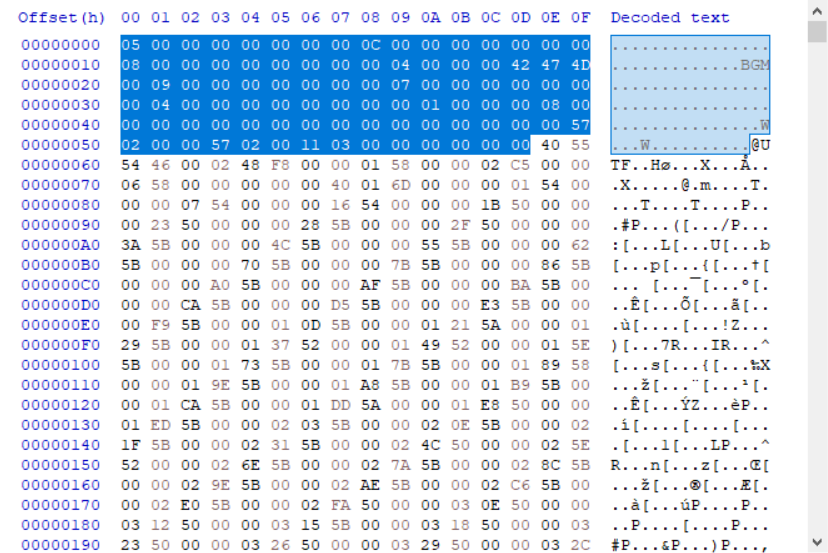
BGM.uexpto.acb - Open the renamed file in a binary editor, select the values before
@UTFand cut and paste them to a new file for convenience, then save both files.
Working with the ACB/AWB
- Copy
BGM.awbandBGM.acbto the main Sonic Audio Tools folder - Drag and drop
BGM.acbonAcbEditor.exe. A folder named "BGM" will be created, it contains every music file in the game.
Warning
At this point it's a good idea to zip up the folder together with the ACB and AWB and store it somewhere so that you can skip a few steps whenever you want to make a new mod.
- Prepare your audio by normalizing it to 0/-0.5/-1db depending on your taste (apparently Season 4 will require louder tracks due to some volume attenuation shenanigans?) and export* it to
.wav, 16-bit, 48kHz
*You need to rename the tracks to match the ones you want to replace. You can do it at any time before repacking but doing it now can save you some time.
Note
While thankfully nothing is hardcoded (meaning that you can exceed the originals' length and filesize) your replacements most likely will stop playing mid-race once they exceed the original songs' softcoded lengths. While it's likely possible to change these softcoded lengths by extracting every A_ONE_x and A_ONE_x_loop .uasset file inside GameProject/Content/IND/Sound/ADX_SONG/BGM/ (you should export the entire folder with umodel since it automatically displays content from all .pak files, simply right click the folder and select "save folder packages". If you use fmodel you need to extract the same folder from both .paks, first the base game one and then the _0_P one in that order.) and then using UAssetGUI to modify the FirstWaveLengthSeconds value for each one to something as long as your song (if not longer) and then repacking all of them back in with the final AWB/ACB. If (and when I test it, I'm burnt-out) this approach actually works I'll link to pre-modified 2.31 .uassets in the "What you need" section so that you can save some time and just incorporate them in your mod.
- After slightly more testing on both IDAS0 and DAC tracks longer than the originals seem to work just fine and won't stop playing mid-race. I'm not quite sure what caused them to stop playing mid-race in DAC during my first tests but I'm gonna assume it's my fault from back when I tried to modify the AWB directly with Audio Cue Editor. I have included the modified files (as well as scripts to automatically modify new ones) in the "What you need" section but they don't seem to do anything in-game.
4. Optional but recommended for songs shorter than ~4.5 minutes or if your songs stop playing mid-race: find a loop point measured in samples.
You can follow this guide to almost automatically find the best loop points for your songs.
- Repeat steps 3 and 4 for every track you want to replace.
- Open your encoder of choice, load up your song, change the target format to HCA and export.
- If you've followed step 4 then it doesn't really matter which one you use. VGAudio is very straightforward and will recognize the loop points embedded in a
.wavfile. AtomENCD (which doesn't recognize embedded loop points) has more options, make sure to select the highest quality for both resampling and encoding, set the rate to 48000 then enable looping and set it to custom so that you can input the loop points manually. You should use VGAudio though. - If you haven't bothered with setting up loop points OR you've set them for every file you can use VGAudio to batch process your files.
- If you've followed step 4 then it doesn't really matter which one you use. VGAudio is very straightforward and will recognize the loop points embedded in a
- Repeat the previous step for every song. Once you have your HCAs you should check your track names one final time to make sure you're actually replacing the ones you want, then move them all to the BGM folder inside the Sonic Audio Tools folder and overwrite them. If you want to check that the loop actually works post-encoding you can use the vgstream plugin for foobar or the web version.
- Once you've replaced the tracks you want simply drop the BGM folder back on
AcbEditor.exeand it should spit out an updatedBGM.awbandBGM.acb - Copy the modified
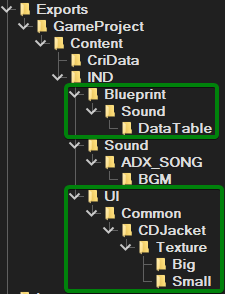
.acbback to the folder you got it from then open it in the binary editor, place the cursor at the very start and paste the header info back and save it. If you forgot to save the header you can get it here. - Your folder structure should look like the one in the screenshot below (minus the CriData folder, you should create it now) if you've been using fmodel. If you're using umodel you will need to create the other folders until the structure matches exactly. The sections highlighted in green are optional (and will be covered immediately below) if you don't plan on modifying the track/artist/album (category) names or the album images. You can get an empty template here.
- Copy the new
BGM.awbto the CriData folder. Don't forget to do this or nothing will change once in-game.
Optional: extracting the track/artist names and album names/images if needed
- Track/artist names:
Within your.pakviewer of choice navigate toGameProject/Content/IND/Blueprint/Sound/DataTableand extractDT_SoundReference_BGM_Race.uasset - Album (category) names:
Within your.pakviewer of choice navigate toGameProject/Content/IND/Blueprint/Sound/DataTableand extractDT_BGMCategory.uasset - Album (category) images:
Within your.pakviewer of choice navigate toGameProject/Content/IND/UI/Common/CDJacket/Textureand extract the entire folder by right-clicking on the folder name and selecting both "Export folder's packages raw data" and "save folder's packages textures" in fmodel or "Export folder content" and "save folder packages" in umodel (export the textures as PNG)
If you find modifying .uasset files through UAssetGUI tedious you can open them then save them as .json and modify them in your text editor of choice. The string you're looking for is CultureInvariantString, two for the song/artist names (they're very close together) and one for the album (category) names. Once you're done simply save the file, open it in UAssetGUI and save it again as .uasset by overwriting the old one.
Optional: modifying the track/artist/album (category) names
- Navigate to
Exports\GameProject\Content\IND\Blueprint\Sound\DataTableand open upDT_SoundReference_BGM_Race.uassetin UAssetGUI (just associate it with the.uassetfile type) then set the UE version to 4.24 on the top right corner. - Expand the "Export Data" and "Table Info" sections, resize the vertical separator so that you can see the "Value 3" column on the right ,select the first A_ONE on the list and scroll with the arrow keys while keeping an eye on the aforementioned column until you find the song whose name and artist you want to rename.
- Once you find what you want simply modify the two fields by double-clicking on them. Do this for every song you've replaced then save the file.
- Optional: in the "value" column the third value from the top has something to do with whether and how the BGM is unlocked. Setting it to -1 unlocks the song from the start. Useful for testing or just cheating.
- To change the album (category) names open
DT_BGMCategory.uassetand follow the same steps, the value you're looking for is in the same Value 3 column, third from the top. You can use\nto start a new line.
Optional: modifying the album (category) images
- Navigate to
Exports\GameProject\Content\IND\UI\Common\CDJacket\Texture\Big - Open the covers you want to change in an image editor and do your thing. Make sure to keep the same dimensions and save it as PNG.
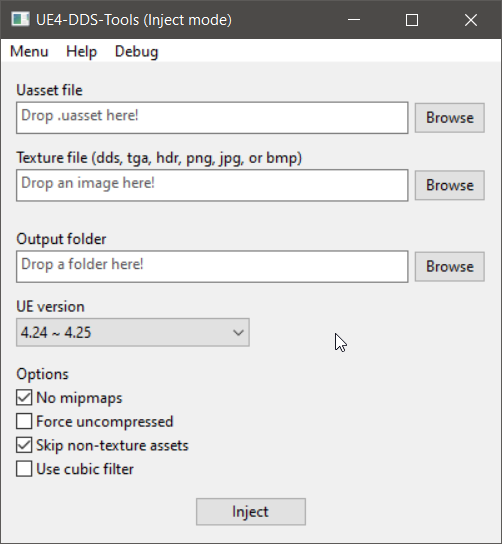
- Open UE4-DDS-Tools and match these settings then simply follow the instructions. For the output folder use the same folder as the input.
- Repeat the same process for the covers in
Exports\GameProject\Content\IND\UI\Common\CDJacket\Texture\Small(obviously just resize the big ones to the same resolution)
Finally packing up
We're almost there.
- Open PakMaster and select an input folder (where you want the final
.pakto be) and an output folder. The output folder needs to be TWO folders before theGameProjectfolder, meaning that if your path looks like thisfmodel\Output\Exports\GameProject\you will need to select theOutputfolder. - Click on the Exports folder and then click
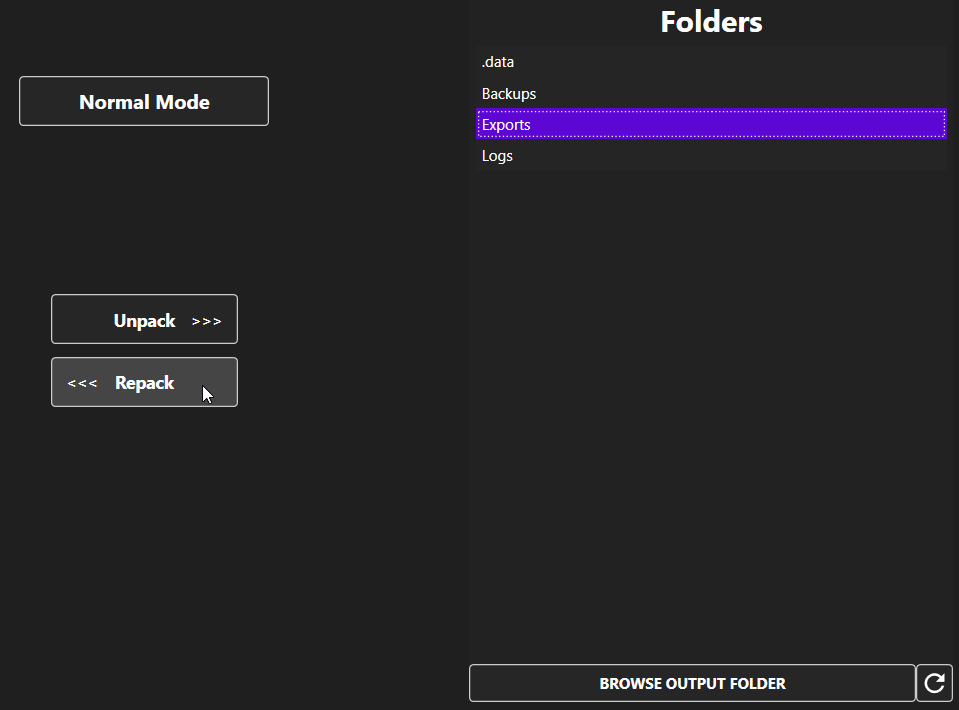
<<< Repack. After a few seconds you should have a file namedExports_Modified_P.pak. - Copy the file to your
DAC\WindowsNoEditor\GameProject\Content\Paksfolder and rename it toGameProject-WindowsNoEditor_x_Pwhere x is a number higher than 0, the higher the number the lower the priority in the load order.
About loading multiple mods
Please note that you can't have multiple (audio in this case) mods that replace the same files at the same time. If you want to merge BGM mods you're gonna have to extract the HCAs from each BGM mod (which will involve extracting stuff from the mod(s)' .pac file but you should already know how to do that by now) and go through all the steps again. You can probably skip a few steps by just using Audio Cue Editor or Eternity Audio Tool to extract the HCAs from the mods you want to merge.
Congratulations, you're done!
Make sure that everything still works fine. Boot up the game, go into the BGM Customize menu and try playing the Hatsune Miku collab songs and/or all the songs you've unlocked. If those still play AND you can hear your replacements then you've done everything right.
Troubleshooting
It didn't work!
If nothing changed and you can't even see your name changes you've most likely repacked the wrong folder. Open fmodel, load your .pak and make sure that the first folder you see is GameProject. If it's Exports or Content it means you've goofed up, go back and read the packing instructions again.
Some tracks stopped working entirely!
I haven't encountered this after finally figuring out that Sonic Audio Tools was the key so take the solutions below with a grain of salt, it might just waste your time.
- If you've used Audio Cue Editor, Eternity Audio Tool or other such tools there's a good chance you didn't read the warning. These tools will not work with DAC for now, you MUST use Sonic Audio Tools.
- If it doesn't work maybe use another HCA encoder.
My song(s) just stopped playing mid-race!
I've tried warning you earlier. The solution (for now) is to cut it up and set a loop point. In theory this shouldn't be the solution but if it works it works.
How do you modify the loop points for the BGM previews?
I don't know, I haven't found that out yet and I'm too burnt-out to research this right now.
Spaghetti alla San Gennaro
Optional but HIGHLY recommended.
- Start cooking the spaghetti.
- Peel the garlic cloves, grab your slices of Neapolitan bread and thoroughly rub both sides with the cloves then dice the bread.
- Toss the cloves in a pan with some olive oil on low-medium heat. Wait until they turn golden then toss the diced bread in. Turn the heat off when the bread turns golden and crispy.
- Grab another pan, add a drizzle of olive oil and turn the heat up to medium. Throw the anchovies in once the oil is sizzling. Let the anchovies cook for 2-3 minutes. Optionally add a pinch of oregano.
- Drain the spaghetti once they're ready (even better if they're ever so slightly al dente) and toss them in the pan with the anchovies, then transfer the diced bread to the same pan (you should also transfer the oil but that's up to you)
- Sauté on high heat for a minute or two.
- Plate and top it off with some fresh basil leaves. Salt and pepper to taste.