Guide by Xeraser. I also have a The Arcade guide.
Table of contents
- What you need
- Optional but recommended for songs shorter than ~4.5 minutes or if your songs stop playing mid-race: find a loop point measured in samples.
- Method 1 (Audio Cue Editor/Eternity Audio Tool)
- Method 2 (Sonic Audio Tools)
- Modifying the song selection texture
- "Repacking" the song selection texture
- Troubleshooting
What you need
Unlike The Arcade you can use Audio Cue Editor.
Method 1:
- Audio Cue Editor (recommended) or Eternity Audio Tool (to edit ACB/AWBs)
Method 2:
- Sonic Audio Tools (to unpack and repack ACB/AWBs)
- VGAudio.Wpf (to encode songs to HCA)
Optional for modifying the song selection texture file:
- A binary editor such as HxD or (online) HexEd.it (to remove and then restore the
.pac's header and footer) - An image editor capable of opening
.ddsfiles. You can use this Photoshop CS6+ plugin (instructions on how to install it are in the zip) - This template (includes the fonts)
Optional but recommended for songs shorter than ~4.5 minutes or if your songs stop playing mid-race: find a loop point measured in samples.
You can follow this guide to almost automatically find the best loop points for your songs.
After slightly more testing on both IDAS0 and DAC tracks longer than the originals seem to work just fine and won't stop playing mid-race. I'm not quite sure what caused them to stop playing mid-race in DAC during my first tests but I'm gonna assume it was ACE's fault (back when I was modifying the AWB directly) and assumed that IDAS0 would behave the same.
Method 1 (Audio Cue Editor/Eternity Audio Tool)
You should normalize your Audio to 0/-0.5/-1db beforehand.
- Backup your
data\SOUND\CRI_DATA\ADX_SONGfolder. - Open ACE (or EAT) and open
data\SOUND\CRI_DATA\ADX_SONG\AVEX.acb - Select any entry to expand it,, right click the [Track 0] that pops down and select Replace.
- Point to your replacement (in
.wav) and click Add without changing any settings other than enabling looping. - Optional: right click the entry again, select Edit Loop and insert your loop point. The third round button allows you to preview the loop by starting the playback 5 seconds before the loop point.
- Save.
- Optional but not really: repeat steps 1-5 with
ADX_SELECT.acbto modify the loops that play during the song selection screen. If you don't you'll have to write down which songs you've replaced and with what. Cut up your tracks to match the originals' length. - Optional: repeat steps 1-5 with
EVENT.acbto modify the menu music, jingles and generally any piece of music that's not a race BGM.
Method 2 (Sonic Audio Tools)
You should normalize your Audio to 0/-0.5/-1db beforehand.
- Backup your
data\SOUND\CRI_DATA\ADX_SONGfolder. - Copy your
AVEX.acbandAVEX.awbof choice to the Sonic Audio Tools Folder - Drag and drop the
.acbonAcbEditor.exe, this will extract every track in a separate folder. - Use VGAudio, change the encoding to HCA and select your input file. You can also batch-convert files and if you've saved loop points internally with Wavosaur those should be retained during the batch conversion.
- Output the file(s) directly in the new folder and overwrite the track(s) you want to replace (or save them somewhere else then rename and overwrite manually)
- Once you're replaced all the tracks you want to replace simply drag and drop the folder on
AcbEditor.exe - Copy the new
.acband.awbback to theADX_SONGfolder. - Optional but not really: repeat steps 1-6 with
ADX_SELECT.acbto modify the loops that play during the song selection screen. If you don't you'll have to write down which songs you've replaced and with what. Cut up your tracks to match the originals' length. - Optional: repeat steps 1-6 with
EVENT.acbto modify the menu music, jingles and generally any piece of music that's not a race BGM.
Modifying the song selection texture
- Install the fonts I provided then open the template in PS.
- Editing should be straightforward enough despite how janky the template is, make new text layers and disable the old ones.
- The font closest to the game's is the slightly thinner "DB" one.
- The size for the Artist text is 18 pt, the size for the Song text is ~21 pt
- I don't know the settings for the Outer Glow fx, play around with it.
- Play around with the text tracking (VA icon in the text properties panel) if needed, most song/artist titles use a different tracking setting for each word and are thus separate text layers.
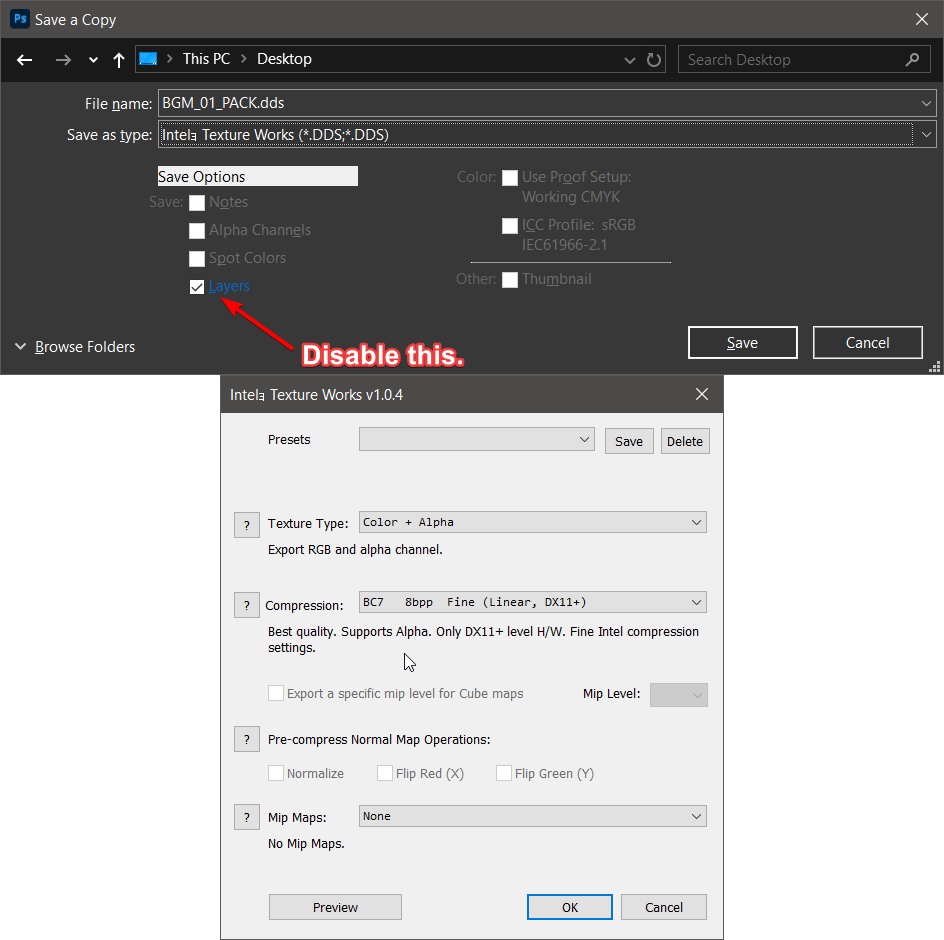
- File > Save a Copy as Intel Texture Works (
.dds) with the settings below. Make sure that the "UI" layer is on and that all the text layers have a transparent background. DO NOT change the name.

"Repacking" the song selection texture
- Open up
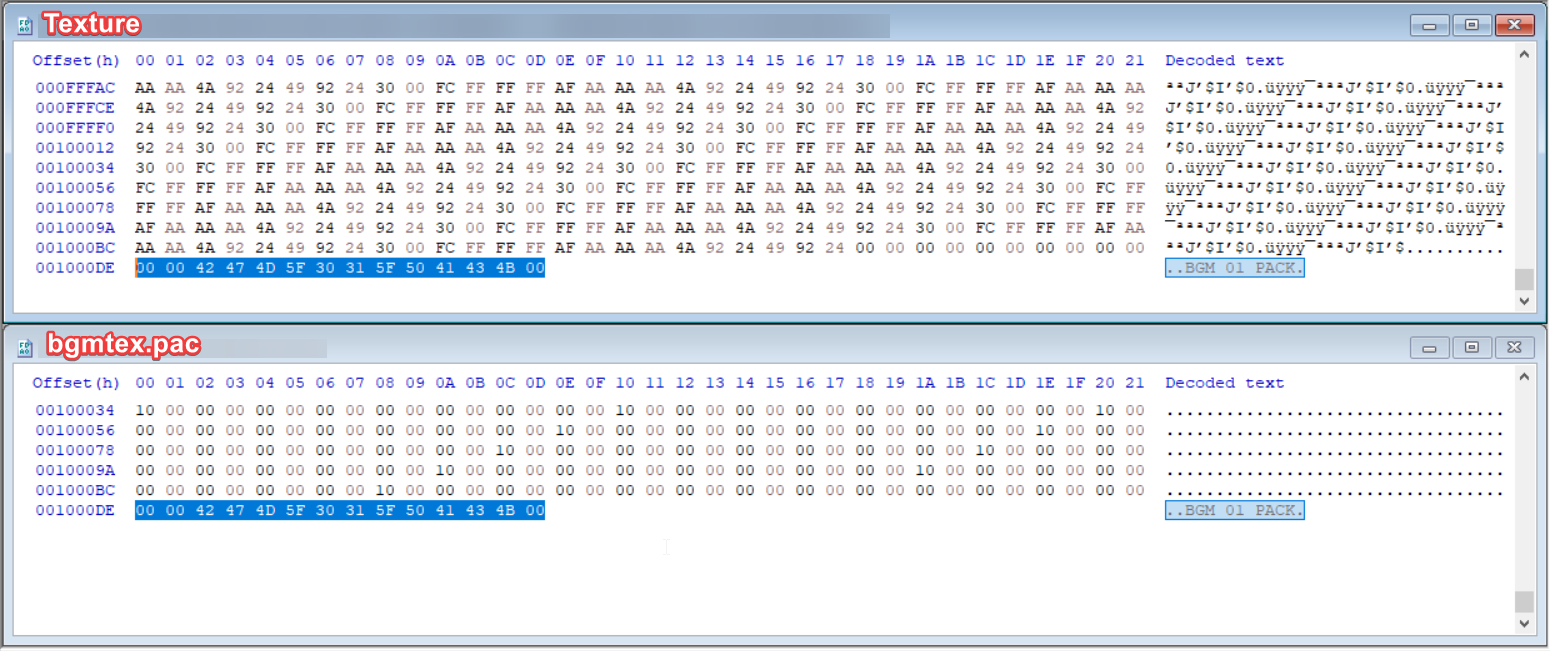
\data\flash\data_jp\common\bgm\bgmtex.pac(make a backup for later) and the texture in a binary editor. - Select the first four rows of offsets in
bgmtex.pacand copy them (if you want to be sure just right click > Select block, set the Start-offset to0and End-offset to3F) - Switch to the texture file and paste at the very start of the file. The letter "D" in "DDS" should be at offset 40 now.
- Navigate to the end of both files.
- In the
.pacfile select from offset1000D0to1000EBand copy. - In the texture file paste what you copied at the very end then start deleting empty bytes (
00) before "BGM" until the file ends at the same offset (1000EB) including the last empty byte. The files MUST end at that offset and the bytes MUST match. Check the image below. - Save the modified texture file, rename it to
bgmtex.pacand replace the one in\data\flash\data_jp\common\bgm\. - Boot up the game, go to the course selection and cycle the songs, if all went well you should see your new texture in action.

Troubleshooting
Some tracks stopped working entirely!
- Maybe ACE fucked up, use method 2 instead.
My song(s) just stopped playing mid-race!
The solution (for now) is to cut it up and set a loop point. In theory this shouldn't be the solution but if it works it works.
My new texture is fucked up!
- You forgot to disable some layers before exporting.
My new texture isn't working!
- You didn't follow the "repacking" steps correctly.