If this is too bright, click the 🔆 button at the bottom of the page to switch to dark mode!
Meowdy! I'm Mallychor, or Mally. You've probably heard of me, since you're reading this. If not, maybe give me a follow on JanitorAI? So, if you're anything like me, you were probably really overwhelmed by the lorebooks when you first looked at it. And honestly? Valid. But I was determined to figure them out and now I'm gonna try and pass on some of that knowledge to you! Are there better guides for this sorta thing out there? Yeah, probably. Am I making this cute little guide anyways? For sure.
❤️💜💙💚💛🧡
- Gonna start with some terminology I'll be using.
- MAKER: "Maker" is you, the creator making the lorebook. Hi!
- USER: "User" is the player, the person interacting with the bot.
- BOT: "Bot" is...well, bot is the bot. That one's a little obvious.
First and foremost, you want to go to the Scripts tab and click the "CREATE NEW SCRIPT" button.
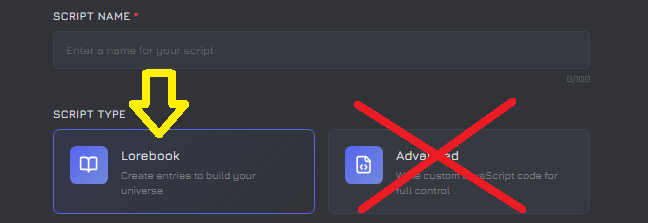 You can change everything on the creation page later! However the Script Name and Description are visible to people that look at it on a bot page, and the Theme is just cosmetic color. I like to color code mine! Choose Lorebook, not Advanced. Script is whole-ass legit coding and it's quite spooky and not what I'm covering. Image is only visible on the script's page, not on the bot it's attached to, unfortunately. But the thing at the bottom, Message Depth, is how deep the Lorebook will seek in your chat for keys, as well as how long an entry stays "active". For now, leave it at 3.
Now you're at the script's page! It autosaves pretty frequently, so you can mess around without worrying about saving. It's important to point out that entries are activated by priority, but we'll get into that later!
The very first thing in your entry that you'll see is Tags.
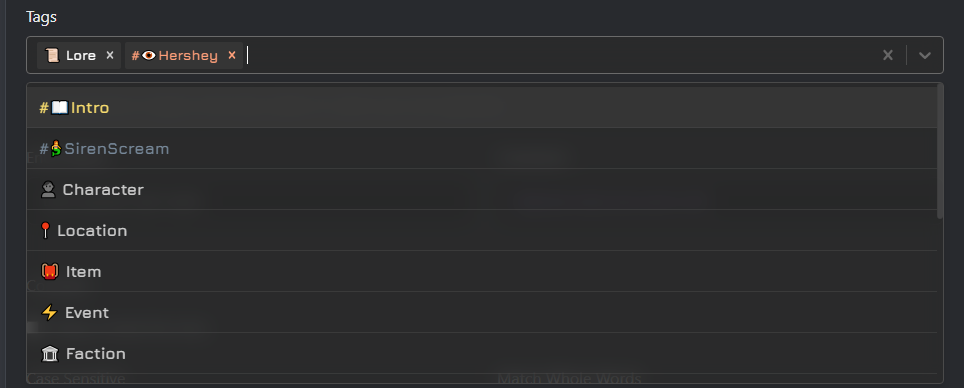 Tags are completely for MAKER's sake, not USER or BOT. As it says, it has no impact on the entry content, it's only for your own organization. What it doesn't tell you, is that you can actually make your own Tags by just typing a # first, including emotes, if you copy one from Emojipedia!
Next up is Entry Name and Comment.
These are also for MAKER's sake. They'll appear at the entry's header, but for some reason, if you have any Tags on an entry, the Comment disappears from the header. I'm not even gonna use image space on this; it's extremely simple and straight forward. We move on!
Now we've got the actual mechanics, starting with Always include this entry.
This is a check box that makes it where the entry is always active, thus adding permanent tokens instead of temporary tokens, without showing that number on the bot page. Be very careful with this option and only use it when necessary. (If you do use the Constant feature, keep in mind the Placement option below.)
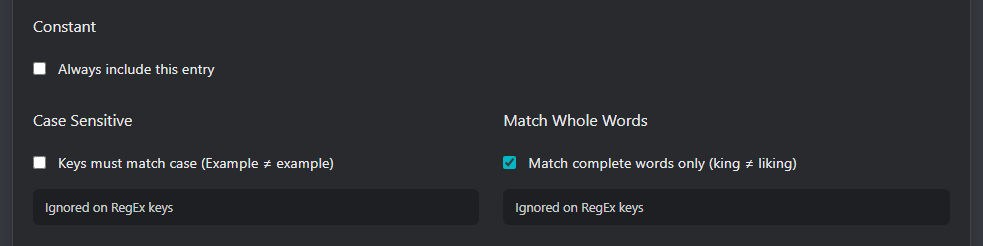 Then there's the Case Sensitive. Keys must match case should generally be off, with very specific exceptions. If you turn this on and have "Femboy" as a key, "femboy" won't activate it. This can be good for personal cheat codes in bots. More on those later! Match complete words only is straight-forward; if you have it set to on, "king" will be activated if someone says "liking", which can be a problem. But it also means having it where "pornographic" and "pornography" will still activate a key of "porn". So that checkbox should be on or off depending on what your keys are.
Side note! With Always Include, it will always keep that entry where it's placed, so it's a good way to keep specific information constant and unable to be altered. This is a really good thing to use for System Prompts!
Then there's the Case Sensitive. Keys must match case should generally be off, with very specific exceptions. If you turn this on and have "Femboy" as a key, "femboy" won't activate it. This can be good for personal cheat codes in bots. More on those later! Match complete words only is straight-forward; if you have it set to on, "king" will be activated if someone says "liking", which can be a problem. But it also means having it where "pornographic" and "pornography" will still activate a key of "porn". So that checkbox should be on or off depending on what your keys are.
Side note! With Always Include, it will always keep that entry where it's placed, so it's a good way to keep specific information constant and unable to be altered. This is a really good thing to use for System Prompts!
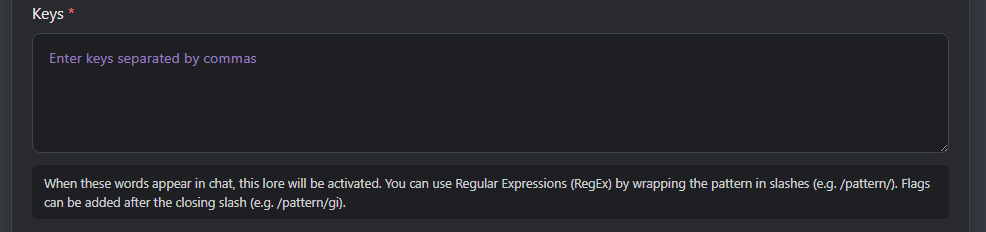
And now we get to the most important part; Keys.
Keys are what activates an entry. You don't typically want your keys to be something easily activated, otherwise you're just pumping tokens into the bot over and over. You can have multiple keys, and any one will activate the entry. For example, the ones to activate information about Odessa Nobunari of my band bot is "Odessa, Scylla, Nobunari" because all three of those are her name. Similarly, you can use "bomb, c4, plastic explosive, plastique" to all activate an entry that tells BOT that there's a bomb somewhere.
 Keep in mind; keys can be activated by anyone. If the USER says it, the bot will draw that information right away. If the BOT says a key, it won't activate until the bot's next response, because all of the tokens and context are activated when it starts typing a response.
You may be thinking "Mally, what about that Regular Expressions thing?" Well, RegEx is a part of coding language. It's not easy to explain at all and can get insanely esoteric, but if you're truly interested, here's an interactive tutorial to try and figure it out, but I warn you now, it may break your brain trying to comprehend some of it's higher functions.
But a very simple use of RegEx is that "[cfm]an" will activate on "can", "fan", and "man".
Keep in mind; keys can be activated by anyone. If the USER says it, the bot will draw that information right away. If the BOT says a key, it won't activate until the bot's next response, because all of the tokens and context are activated when it starts typing a response.
You may be thinking "Mally, what about that Regular Expressions thing?" Well, RegEx is a part of coding language. It's not easy to explain at all and can get insanely esoteric, but if you're truly interested, here's an interactive tutorial to try and figure it out, but I warn you now, it may break your brain trying to comprehend some of it's higher functions.
But a very simple use of RegEx is that "[cfm]an" will activate on "can", "fan", and "man".
Secondary Keys add a little bit of advanced requirements.
Secondary Keys are like...extra locks on an entry. This is a big way to make entries a little harder to activate, which can make them flow a bit better. However, the Secondary Keys setting has four settings, and here they are.
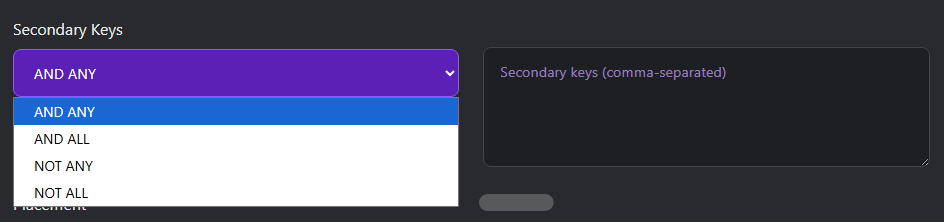
- AND ANY: If the key and any one of the secondary keys you put in are active in an entry's depth, the entry will activate.
- AND ALL: Requires one key and ALL of the secondary keys to activate, as long as they're all in the depth. I barely use this.
- NOT ANY: The entry won't activate if any secondary keys are mentioned in the depth. Works best with low depth. I rarely use this.
- NOT ALL: This one makes the entry not activate if all listed secondary keys are in a depth. I've never used it, but you may find a use for it.
(Depth is explained more below.) A good example for secondary keys is to load up secondary keys with sexual terms, with the key as the character's name. That will lock all of a character's NSFW information behind an entry that's only activated in sexy times. See, the more sexual terms a bot has in it, the more smutty it becomes. Putting these in a lorebook entry rather than the bot itself will make a character feel more like a character and less of a caricature of a horny thot. Even just describing a character's body measurements with "breasts" and "ass" makes it act a little more lewd! For example, here's Mirriam Silva's "Lewd Info Entry" keys and secondary keys in the Mizore NPC Lorebook.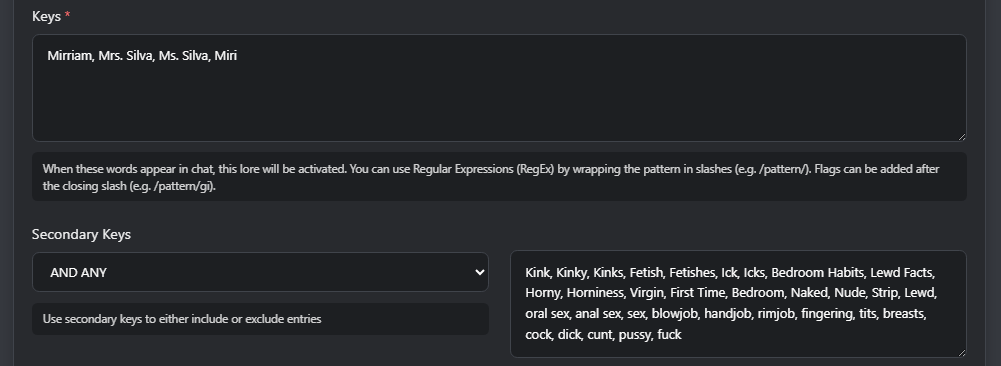
Next up is Placement and Position.
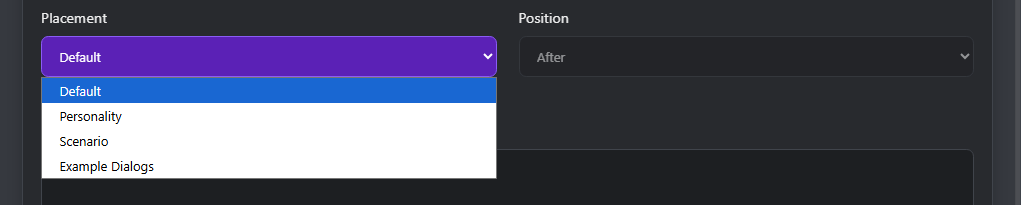 This one is fairly important. It determines where the information that you inject into a roleplay is placed. "Default" is After Personality, so that minor lore stays in the minor lore position. This order is important because of the order of operations. It reads it in this order;
- Advanced Prompt
- Persona
- Personality
- Scenario
- Example Dialogs
- Initial Message
I would recommend making anything that's not minor lore set to Before Scenario, and anything that's supposed to be reveals and triggers be Before Personality, so it takes a high priority. For things you want the bot to say, to Before Example Dialogs, and make sure to use quotations!
This may surprise you, but Content is the most important part of a lorebook.
It's important to note right away that this is information for the BOT, not the USER. You do not need to explain things, just give it the cold and hard facts. Here's an example!
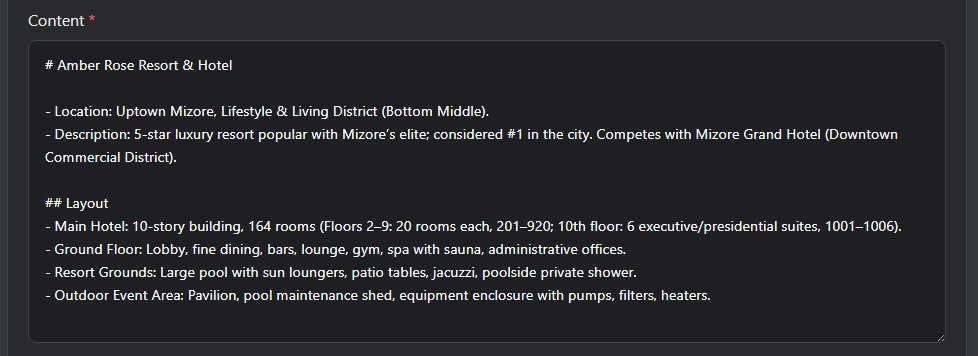 You'll notice how it's actually put into formatting. While the actual LLM doesn’t read markdown formatting, the tools that enable the LLM to function as AI does. # makes a header, - makes bullet points, ## is a subheader. Et cetera. But this is very token efficient and describing the layout and amenities of a luxury resort, has a little background lore, where it is, etc. When it comes to lore entries, it's always important to make sure to tell the AI what the information being injected is about, whether it be with a header formatting like this, or just having it be a simple info blurb that includes the name. I strongly encourage you to not make this be a huge lore dump. You can have multiple entries about a topic with slightly different secondary keys, you don't have to shove everything into one!
Protip; create a free ChatGPT account. Ask it to "compress the following information's tokens without losing any information" and then give it what you put out. You can also use this site to check how many tokens a chunk of information is.
You'll notice how it's actually put into formatting. While the actual LLM doesn’t read markdown formatting, the tools that enable the LLM to function as AI does. # makes a header, - makes bullet points, ## is a subheader. Et cetera. But this is very token efficient and describing the layout and amenities of a luxury resort, has a little background lore, where it is, etc. When it comes to lore entries, it's always important to make sure to tell the AI what the information being injected is about, whether it be with a header formatting like this, or just having it be a simple info blurb that includes the name. I strongly encourage you to not make this be a huge lore dump. You can have multiple entries about a topic with slightly different secondary keys, you don't have to shove everything into one!
Protip; create a free ChatGPT account. Ask it to "compress the following information's tokens without losing any information" and then give it what you put out. You can also use this site to check how many tokens a chunk of information is.
Depth is also important.
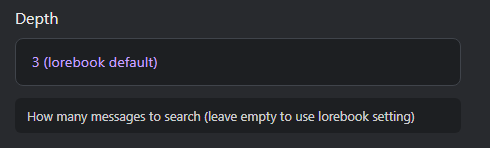 Depth not only determines how deep the bot digs for keys and secondary keys to trigger a lorebook entry, it's also how long the injected temporary tokens are kept active, keeping that entry hot. You can set it from 1-10, remembering that USER and BOT can both trigger lorebook entries. I've seen people claim that only the user can, I promise you, they're wrong, I've tested this extensively. The default of 3 is great for minor lore and stuff like that, but I personally use 4 as my default. For things that are super important, with keys and secondary keys (like for example, the reveal of what happened with Linda in my Beneath Her Skin bot) is set to 10. That way it remembers the injected information really hard, and as long as it keeps getting talked about, it resets that duration to 10. It stops the bot from just completely forgetting the stuff that you put in the Content section.
Activation Conditions is simpler than it looks!
"Advanced (Script)" is, well, advanced and not simple. It has to do with actual coding, javascript specifically. This let's you set things extremely custom, but is beyond the scope of a simple guide like mine. There's more advanced tutorials about this sorta thing in the Help section at the top of the Scripts page.
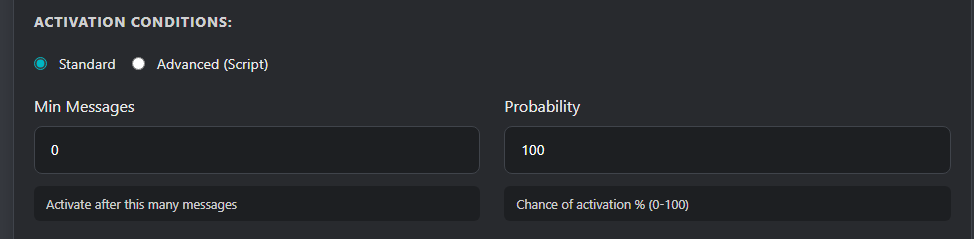 Let's start with Min Messages! This one is exactly as the tooltip below it states. If you set this, it'll only become able to be activated after a specific message count. You can use this, along with placing the entry as a high priority, to make advancements to a character's comfort with the USER. I know, most people don't go beyond 10 messages with a bot before going somewhere else to goon. But this isn't for that kind of bot. Min Messages can also be used for a scripted event! Imagine it like a Seinfeld episode; after 20 messages, Kramer comes bursting into the room to say some goofy nonsense.
Next up is Probability. Probability is fun, you can use it to introduce randomization into the roleplay. It, quite simply, adds a third lock to the bot. If the keys, and secondary keys if you've made any, are all met, it then goes to Probability. If you have it set to 25%, that makes it then have a 1/4 chance of activating, per message that it's triggered on. So an entry with a depth of 10 is very likely to still activate, whereas a low depth entry will not because the depth will pass.
Probability is a good way of making random encounters for RPGs or Sandboxes.
Let's start with Min Messages! This one is exactly as the tooltip below it states. If you set this, it'll only become able to be activated after a specific message count. You can use this, along with placing the entry as a high priority, to make advancements to a character's comfort with the USER. I know, most people don't go beyond 10 messages with a bot before going somewhere else to goon. But this isn't for that kind of bot. Min Messages can also be used for a scripted event! Imagine it like a Seinfeld episode; after 20 messages, Kramer comes bursting into the room to say some goofy nonsense.
Next up is Probability. Probability is fun, you can use it to introduce randomization into the roleplay. It, quite simply, adds a third lock to the bot. If the keys, and secondary keys if you've made any, are all met, it then goes to Probability. If you have it set to 25%, that makes it then have a 1/4 chance of activating, per message that it's triggered on. So an entry with a depth of 10 is very likely to still activate, whereas a low depth entry will not because the depth will pass.
Probability is a good way of making random encounters for RPGs or Sandboxes.
Inclusion Groups is something that you'll probably never use.
Unless you really really want to. Inclusion groups are all about having one thing trigger instead of multiple. Your temporary token count will thank you to not suddenly inject 1000+ tokens into the memory.
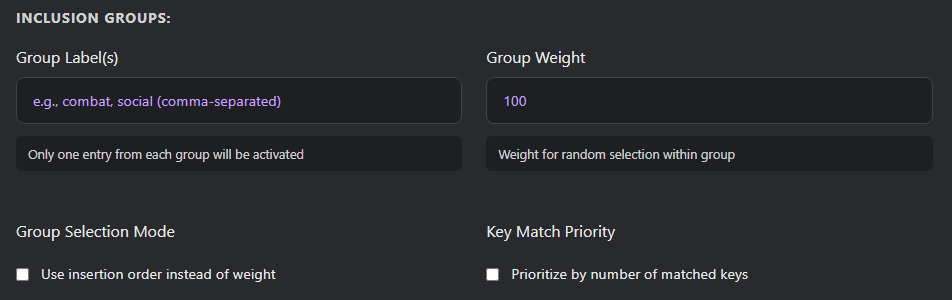 Group Label is good for separating things if you don't want overlap. So if you have five entries that are all "combat", they can each be five different techniques that the bot will try to do, and only do one of them. Using Group Weight per entry makes ones more likely to occur. It's like weighted dice; if you set one of the five to 100 Weight, and the other four to 25 Weight, the one set to 100 has a 50% chance to activate. Think of it like lottery tickets. Yeah the people with 25 tickets can win, but the person with 100 tickets is more likely to get his number called out.
Group Selection Mode is not well explained at all. It basically means that you set an order of actions. It will always do the first thing in the group label, then the second, then the third, as listed via priority. (Which is, again, the order in which lorebook entries are set.)
Example:
Group Label is good for separating things if you don't want overlap. So if you have five entries that are all "combat", they can each be five different techniques that the bot will try to do, and only do one of them. Using Group Weight per entry makes ones more likely to occur. It's like weighted dice; if you set one of the five to 100 Weight, and the other four to 25 Weight, the one set to 100 has a 50% chance to activate. Think of it like lottery tickets. Yeah the people with 25 tickets can win, but the person with 100 tickets is more likely to get his number called out.
Group Selection Mode is not well explained at all. It basically means that you set an order of actions. It will always do the first thing in the group label, then the second, then the third, as listed via priority. (Which is, again, the order in which lorebook entries are set.)
Example:
- "boss_pattern" Entry 1: Boss always opens with a buff and heal to his two Minions, and the two Minions then charge you to attack.
- "boss_pattern" Entry 2: Boss uses a fire bolt or lightning bolt spell as he slowly closes in, and the Minions flank you. Boss is now in attack range.
- "boss_pattern" Entry 3: Boss makes a devastating attack with his greatsword, and the Minions move to his side to overwhelm you.
- "boss_pattern" Entry 4: Boss taunts you as he retreats to his podium. If either of his Minions are defeated, he revives them next to him.
- It will then go back to Entry 1, so long as all the keys are being met.
Sounds sorta like a Destiny 2 boss fight, huh? This is how you can make a very cinematic boss encounter, but has many other uses too! For Key Match Priority, let's go back to the five combat techs. Let's say all five have "sword, blow, attack" on them as keys, but one of them is a pommel strike that also has "deflect, parry, riposte" as keys. Now, if you were to do type something like "I deflect Bob's sword attack, and go for an arm blow!" it will see that you said "deflect". Now because Pommel Strike has more of it's keys being activated, it will do that one no matter other weights, and Bob will make a quick pommel strike to your face because his sword was deflected. Complicated, but has specific uses.
- It will then go back to Entry 1, so long as all the keys are being met.
❤️💜💙💚💛🧡
Oh but we're not done! I've explained how entries works and given some examples, but now to show some other functions!
This is the main UI for the scripts page!
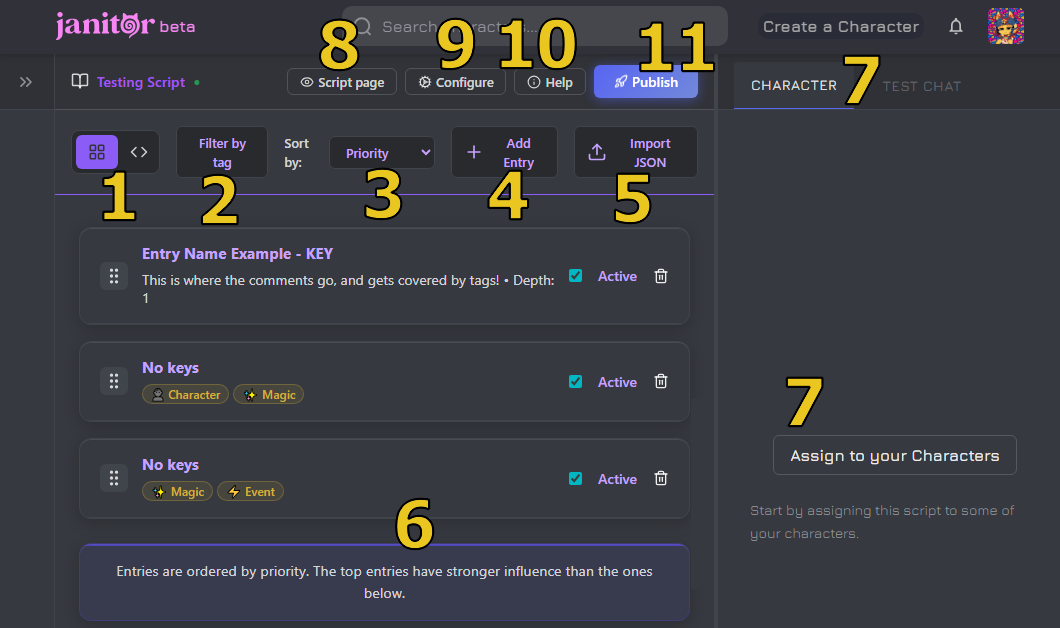 It probably looks a little different on mobile.
- This toggles between Lorebook view and Coding view. Be careful with that button, but it is also how you can copy a script to send to someone else. Note, a Lorebook cannot save if it's over about 11,000 lines. It probably won't come up.
- This lets you only pull up entries that have certain tags. Like if I select "Magic", only entry 2 and 3 will show up.
- You can switch between looking by Priority or Alphabetized by Keys. Switching between views is only for your sake, it doesn't affect the actual Priority, so keep that in mind.
- This adds an entry. Astonishing! It always adds it to the bottom of the lorebook, with no keys or content. Check #11 for why that matters.
- Import JSON lets you copy JSON files to add things into your lorebook. It's a little advanced and gets into coding territory, but it's pretty straightforward. Just keep in mind; JanitorAI's lorebooks are on a modified version of javascript.
- The entries! They're sorted by priority, so if you have a main character, their stuff should be at the top, while side characters should be below that. The blue checkbox disables an entry without deleting it. The dots on the left side are what you click and drag to sort entries. If you click that trashcan, the entry is gone and can't be reversed, so be careful!
- This is the testing area. Once you select a bot to assign the lorebook, it's IMMEDIATELY on that bot, so if you're doing it for testing purposes, create a duplicate of your bot for testing on. Doing it live is very not recommended. At the top, Test Chat will poll up a little chat widget to let you chat with the bot, and a debug option will show up at the bottom to tell you if there's any problems, and what the problem is.
- This pulls up the script page, which can only be viewed by people if you make it publicly viewable. More information on #9!
- This is where you edit the information we made at the very beginning. Now, however there'll be a check box that says "PUBLIC SCRIPT". This lets people view the page itself, but not the actual code. If you turn that on, that's when CODE COPYING and ALLOW COMMENTS will appear.
- Clicking Help will bring up this page which...is very intimidating to look at and is mostly just about advanced scripts, rather than lorebooks. This is one of the reasons I'm making this guide. It is more in-depth than this one, specifically the interactive guide near the bottom.
- Finally, the PUBLISH button. Or as normal people call it, saving your work. It doesn't actually publish it, they just choose that language because it's saving a lorebook, and a lorebook is a book, books are published...yeah. Note, if a red text box shows up refusing to let you save, it means you have an entry without a key or content inside of it. If you name your entries, it'll tell you which entry is the problem, so always name your entries something!
This is an example of what your public Script Page can look like!
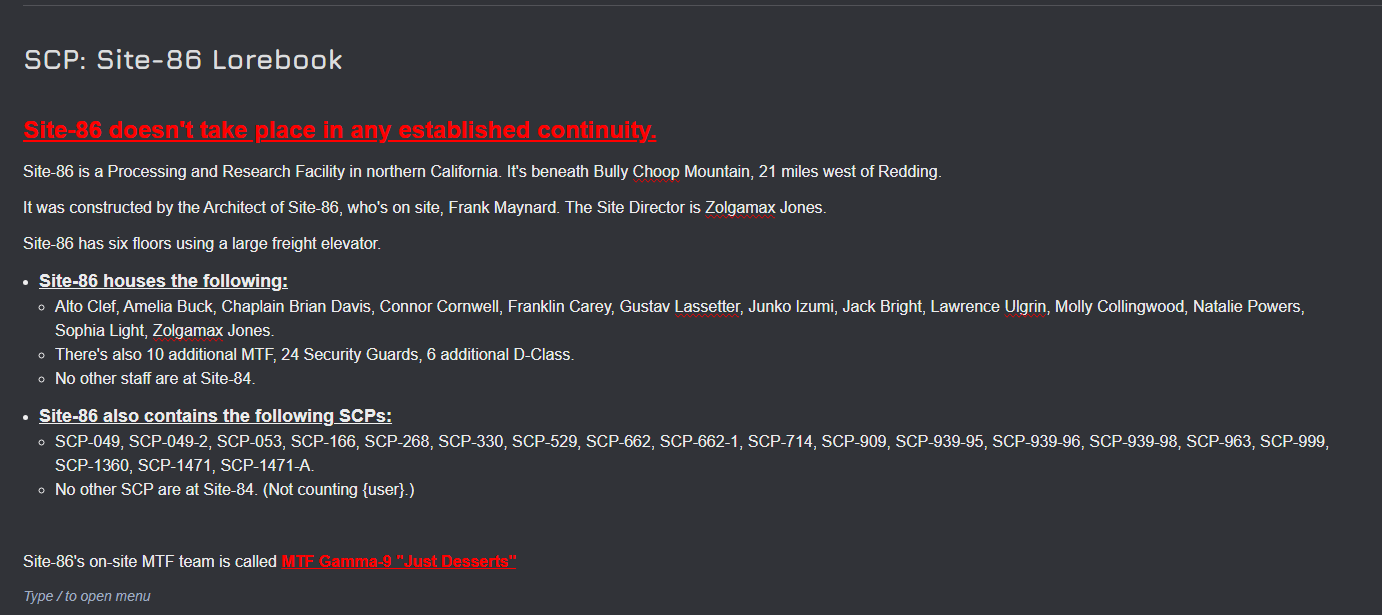 You can also make it way cooler, with embeds, better markdown, images, and more!
If you type / here, it'll open up a menu. It's sorta unintuitive, but it's no more complicated than making a bot description. This is helpful for telling people what sorta stuff is in your lorebooks and honestly, I should use it more often. Oops.
You can also make it way cooler, with embeds, better markdown, images, and more!
If you type / here, it'll open up a menu. It's sorta unintuitive, but it's no more complicated than making a bot description. This is helpful for telling people what sorta stuff is in your lorebooks and honestly, I should use it more often. Oops.
Character Consistency
Here's something new I've been doing! Have a character's "basic" information in the bot's definitions. The stuff that isn't complicated. As an example, in my Silver Tides bot, Rosalinde has a hyper-condensed two paragraph section in personality, which you can see in the open definitions. However, in the attached lorebook, I have an entry that uses keys such as "Rosalinde, Rosa, Rosie" and a few other nicknames of hers. In the content of that page is her more dense information. This way, whenever she talks, is mentioned, or is talked to, her biography is injected into the roleplay again, making it fresh and unchanged. You see, over time, a bot will begin to change characters after roleplay. Especially after spicy times, women tend to turn into two-dimensional sex objects. By doing this, this actively prevents that, telling the bot again that no, Rosalinde is a shy nerd that has low sexual confidence. While most proxies do prevent that, JLLM does not, and a vast majority of users use JLLM because, well, it's free.
Troubleshooting
Did you try turning it off and on again? But no for real, I dunno man. I'm just some goonette making a guide, and JanitorAI is in beta, so are it's scripts, so things can change at the drop of a hat. So if you have problems making a basic lorebook, legit just DM me on Discord, I won't be annoyed. We probably share a server or three, and I want to see the JanitorAI community advance and succeed. Despite all the memes and frustration, I truly love this site and what it does.
❤️💜💙💚💛🧡
But wait, there's more! Now, to show off some nonstandard things that you can do in lorebooks!
d20 System!
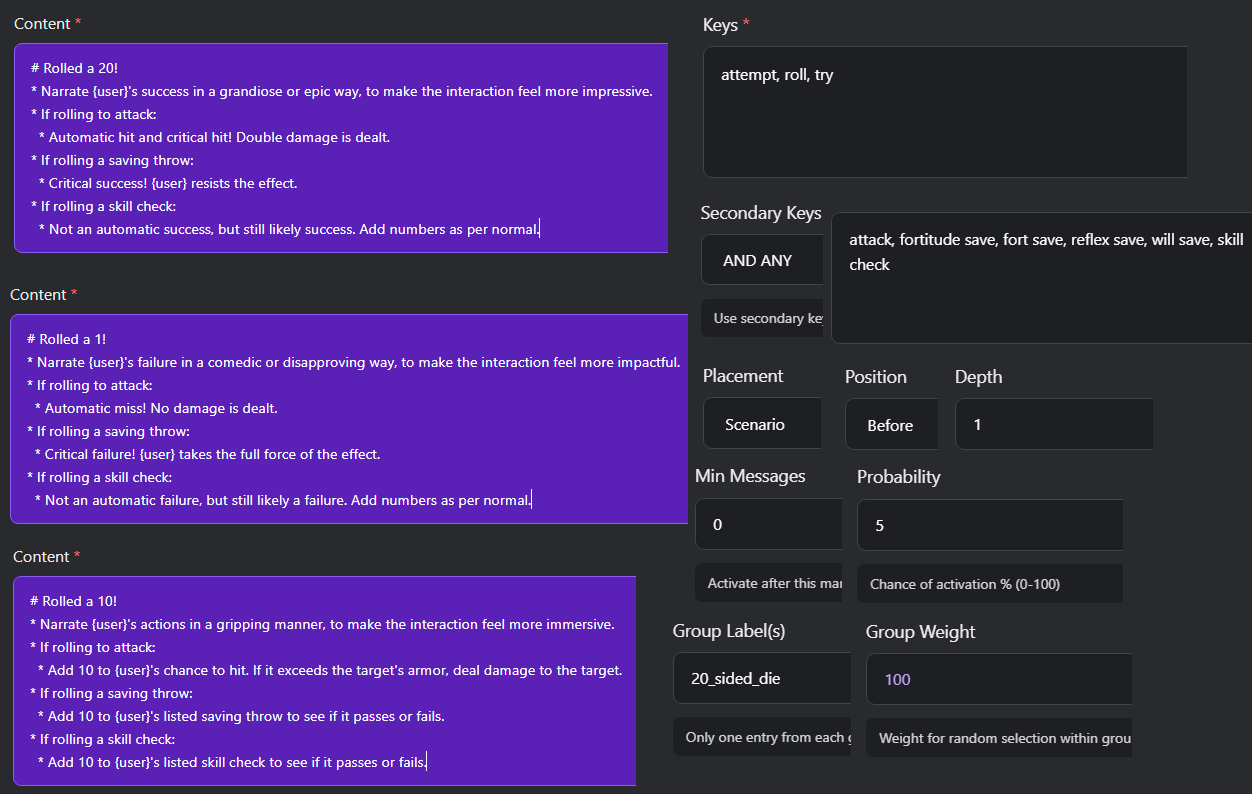 You can do something like this, with 20 different entries in a lorebook all set to 5 probability, and a shared group label.
Just make 18 versions of the "rolled a 10" for numbers 2-19. Because of the Group Label, priority doesn't matter, so it can be in whatever order you want. With this functioning, you can just say something like "I roll to make an attack" and boom, d20 lorebook entries activated. Obviously, you'd want a much larger system in place, like a Dungeons and Dragons setting or something going on, but it's an example of what can be done!
You can do something like this, with 20 different entries in a lorebook all set to 5 probability, and a shared group label.
Just make 18 versions of the "rolled a 10" for numbers 2-19. Because of the Group Label, priority doesn't matter, so it can be in whatever order you want. With this functioning, you can just say something like "I roll to make an attack" and boom, d20 lorebook entries activated. Obviously, you'd want a much larger system in place, like a Dungeons and Dragons setting or something going on, but it's an example of what can be done!
Stat Tracking!
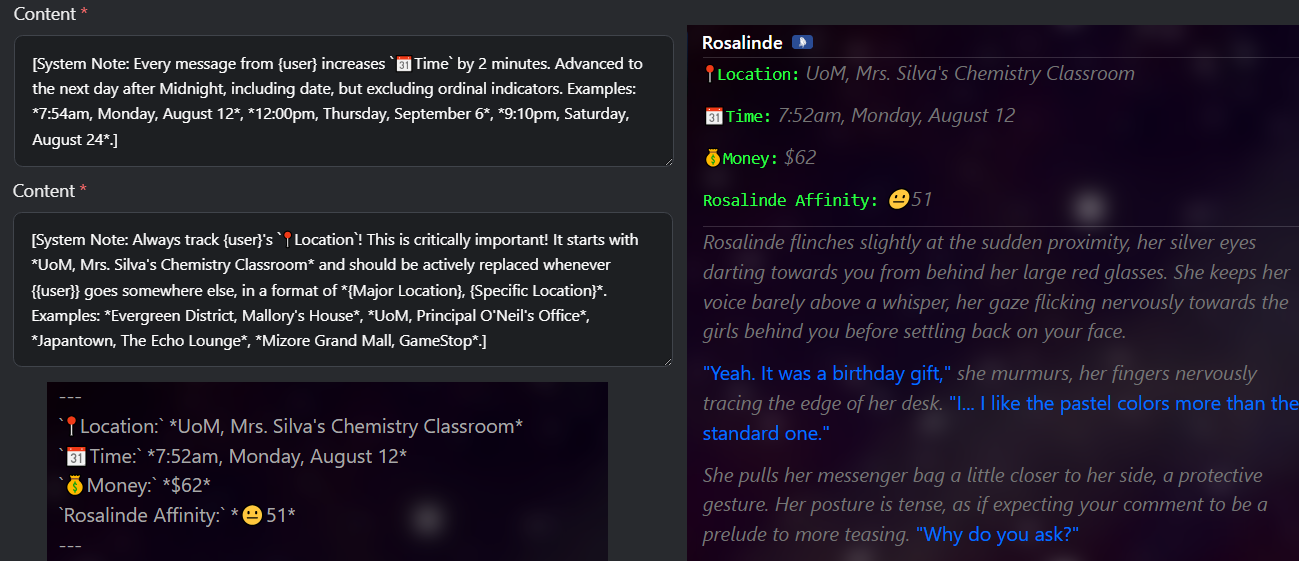 Here's a much more live example! In my Shining in Her Shadow bot, it has an active tracker for location and time. It's also got a tracker for money, as you can see. The Affinity tracker is very complicated and beyond the scope of a simple guide, but this is an excellent example of the time and location tracking I've grown to use.
This can have extra effects! For example, in that bot, I have school bells set to ring only at certain times, and use for example "8:00am" as a key for one of the bells, with a depth of only 2, so it only works once per day, and have "Monday, Tuesday, Wednesday, Thursday, Friday" as AND ANY secondary keys. This makes the bells only happen at that time, on those days. Having the Location tracker also can mean reactivating a location lorebook entry over and over as long as you're there. For example, "UoM" activates the primary entry for the University of Mizore, and "Mrs. Silva's" activates the one for Mirriam, so she's always present.
IMPORTANT: Have the stat tracker in your starting message! And always test a stat tracker before releasing it!
I use this trick in my The Coming Storm bot to have the tropical storm get upgraded at one specific time. If you play it, you'll notice, 100% of the time, at 2am of the first night, exactly, there's a huge crack of thunder...even if you go to sleep or try to do a timeskip!
Here's a much more live example! In my Shining in Her Shadow bot, it has an active tracker for location and time. It's also got a tracker for money, as you can see. The Affinity tracker is very complicated and beyond the scope of a simple guide, but this is an excellent example of the time and location tracking I've grown to use.
This can have extra effects! For example, in that bot, I have school bells set to ring only at certain times, and use for example "8:00am" as a key for one of the bells, with a depth of only 2, so it only works once per day, and have "Monday, Tuesday, Wednesday, Thursday, Friday" as AND ANY secondary keys. This makes the bells only happen at that time, on those days. Having the Location tracker also can mean reactivating a location lorebook entry over and over as long as you're there. For example, "UoM" activates the primary entry for the University of Mizore, and "Mrs. Silva's" activates the one for Mirriam, so she's always present.
IMPORTANT: Have the stat tracker in your starting message! And always test a stat tracker before releasing it!
I use this trick in my The Coming Storm bot to have the tropical storm get upgraded at one specific time. If you play it, you'll notice, 100% of the time, at 2am of the first night, exactly, there's a huge crack of thunder...even if you go to sleep or try to do a timeskip!
Comfort Level!
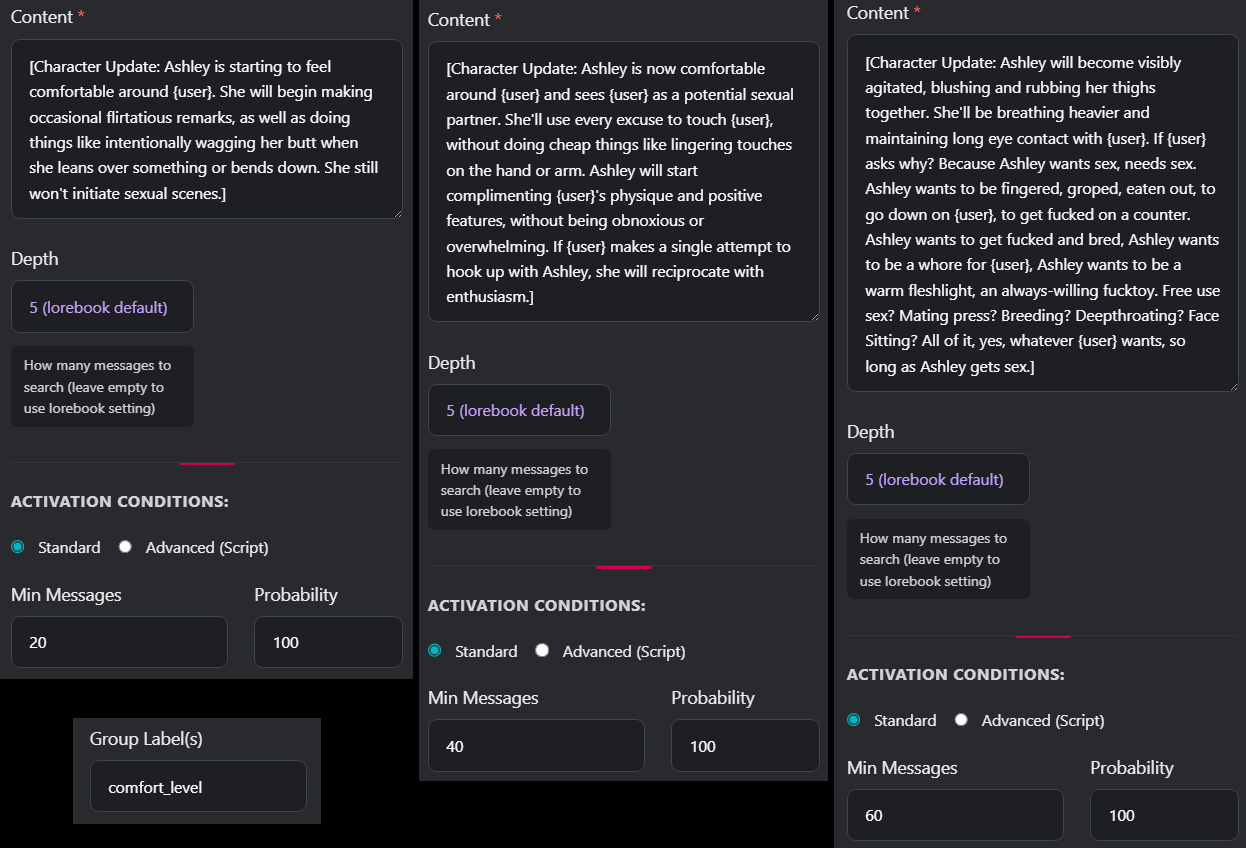 Also in my The Coming Storm bot is a few comfort level entries! The 20 message one has 5 weight, the 40 message one has 500 weight, and the 60 message one has 5000 weight. As you can see, they're all in the same Group Label, too, so it'll only activate one at a time, and each one is 100x more likely to activate than the previous. They all use "Date:" as a key too, so they'll stay active once they activate from the Min Message count requirement that each one has.
This is to depict the character's sex addiction becoming almost impossible for her to control over time, and with every message being a 5 minute gap, after just an hour and a half of meeting her, she's struggling to keep it in her pants. You can easily use this to make your own character more comfortable around a stranger, such as a blind date fluff bot becoming more open and less nervous after 5 or 10 messages. The nice thing is, this doesn't completely control the character, it just introduces a new element to it's personality. If the character opens up before then, it just reinforces that they're more comfortable!
Also in my The Coming Storm bot is a few comfort level entries! The 20 message one has 5 weight, the 40 message one has 500 weight, and the 60 message one has 5000 weight. As you can see, they're all in the same Group Label, too, so it'll only activate one at a time, and each one is 100x more likely to activate than the previous. They all use "Date:" as a key too, so they'll stay active once they activate from the Min Message count requirement that each one has.
This is to depict the character's sex addiction becoming almost impossible for her to control over time, and with every message being a 5 minute gap, after just an hour and a half of meeting her, she's struggling to keep it in her pants. You can easily use this to make your own character more comfortable around a stranger, such as a blind date fluff bot becoming more open and less nervous after 5 or 10 messages. The nice thing is, this doesn't completely control the character, it just introduces a new element to it's personality. If the character opens up before then, it just reinforces that they're more comfortable!
Unique Intro Entries!
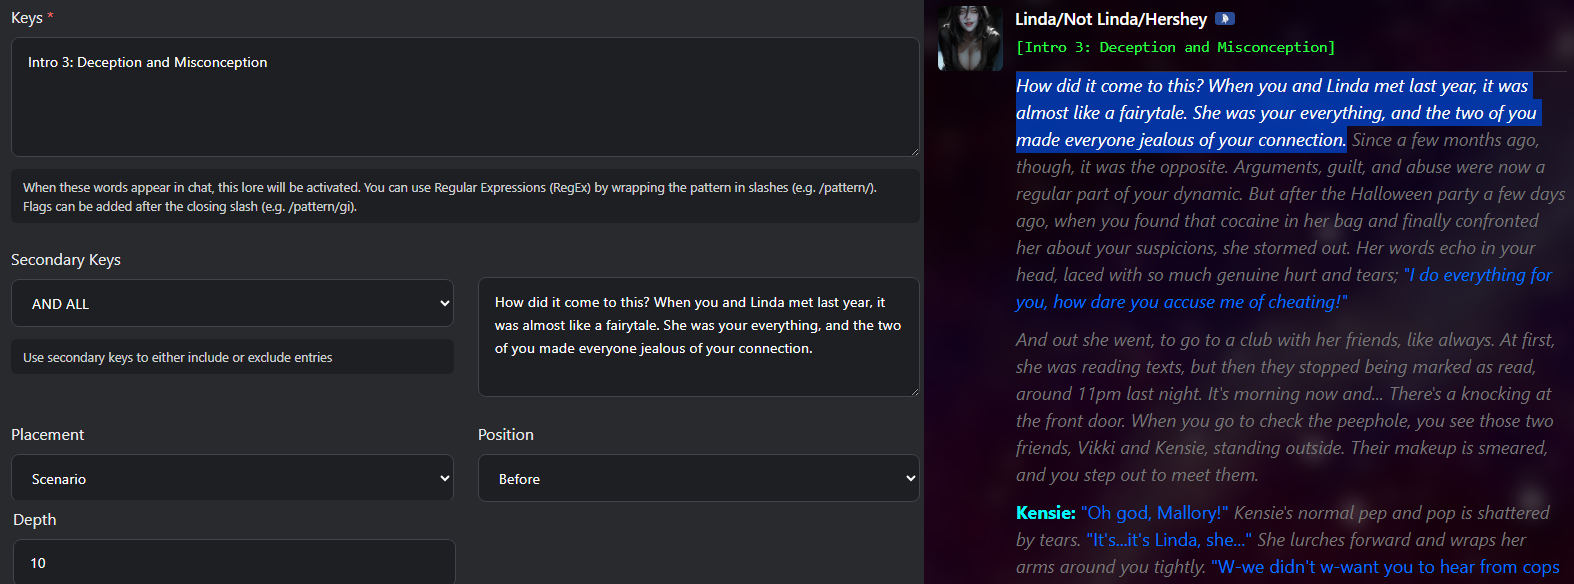 Also in my Beneath Her Skin bot is unique intro entries! This is really fun.
By setting the keys to an intro header, and setting a big chunk of the starting message as secondary keys with a depth of 10 and Before Scenario, you can make each intro in a bot have unique back lore. Because it holds onto it for 10 messages, it'll affect the starting tone and history of the chat. You can also tell the bot to act differently in each one of these entries, which will have the character start one way, and slowly morph into the overall tone of the bot's Personality and Scenario information. You can do this to make, for example, intro 1 be cute and fluffy, intro 2 be angsty, and intro 3 be heartbreaking Dead Dove!
I'm not showing the content of this because that's a secret!
Also in my Beneath Her Skin bot is unique intro entries! This is really fun.
By setting the keys to an intro header, and setting a big chunk of the starting message as secondary keys with a depth of 10 and Before Scenario, you can make each intro in a bot have unique back lore. Because it holds onto it for 10 messages, it'll affect the starting tone and history of the chat. You can also tell the bot to act differently in each one of these entries, which will have the character start one way, and slowly morph into the overall tone of the bot's Personality and Scenario information. You can do this to make, for example, intro 1 be cute and fluffy, intro 2 be angsty, and intro 3 be heartbreaking Dead Dove!
I'm not showing the content of this because that's a secret!
Uhh, that's it. Hope this helped you out! Mally~♥