HOW TO EDIT YOUR PROFILE ON JANITOR.AI VISUAL LEARNER EDITION


So you want a cool theme on your profile but have nowhere to start?
 Looking at piles of code and have no idea what to do?**
WHO AM I? Hi, I'm Oishiidesu. 3 weeks ago, I was just like you. Profiles were starting to pop up everywhere and I had no idea. I asked friends and they helped me along the way. (Thank you Iorveth, Maddie, and Happyegg!). But staring at lists of code gave me a headache, plus I'm a visual learner. 3 weeks later to now, I am a bit more comfortable with coding. But I still hate staring at lists of code. So it's video time!
LINK TO RESOURCES LunaxLee's pile of code, Another Resource BIG THANK YOU TO LUNA FOR BEING SO QUICK WITH GATHERING CODES! This guide wouldn't exist without you and the other creators listed help.
made by oishiidesu!
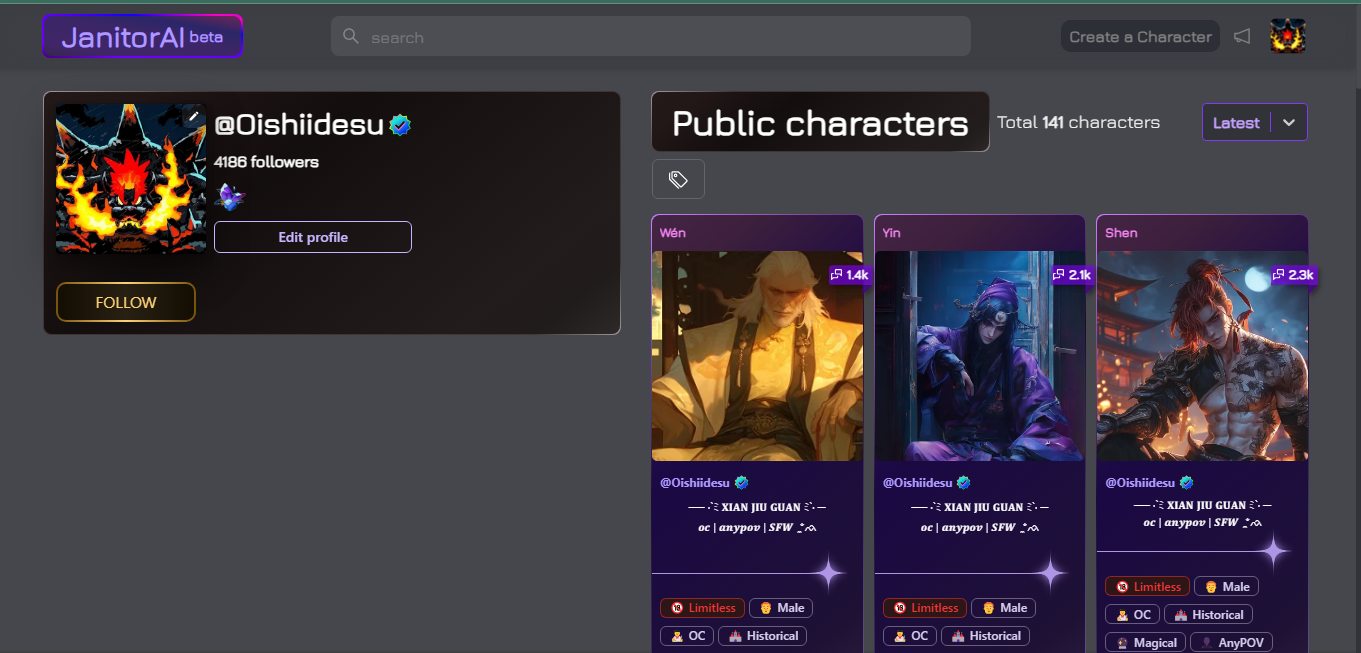
What do I start with first? So! This is what your profile may look like.
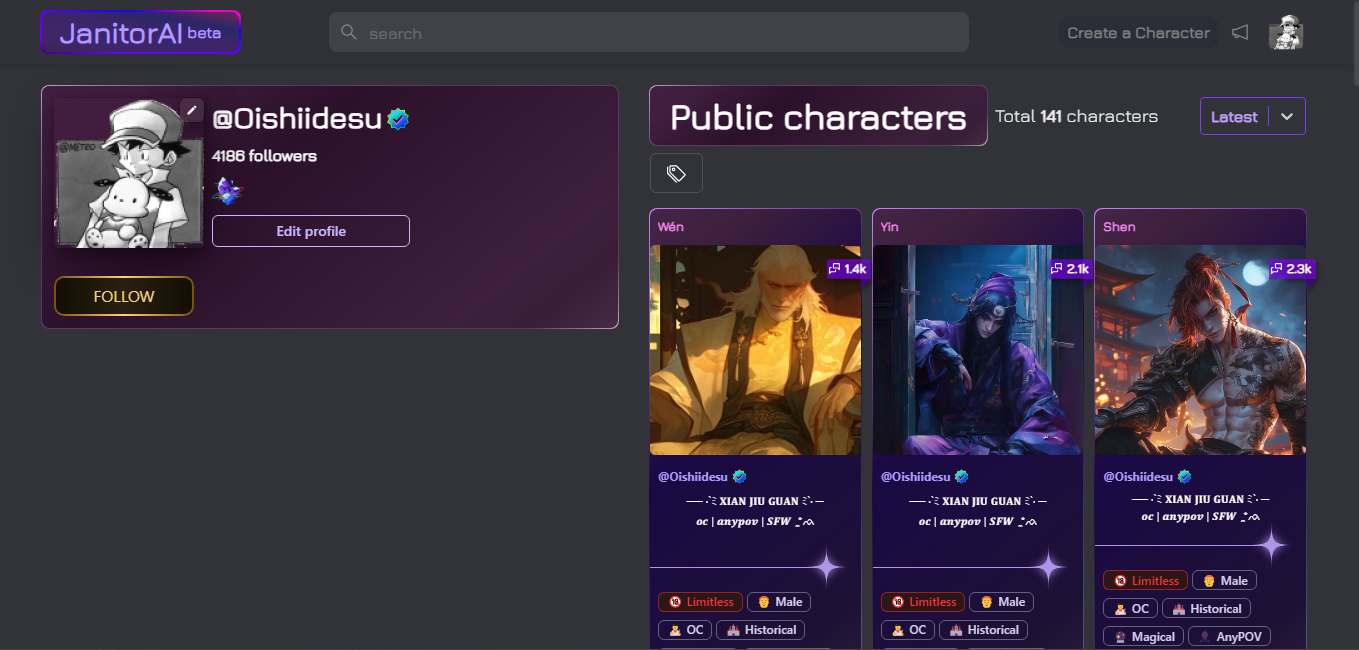
Yeah, it doesn't really look that... coherent.
THE FIRST STEP
So! The first thing we're going to do is pick a theme. Long before we even touch a website, we have to look at the following:
______________
1. Icon
2. Background
3. Color hex codes!
_________
So, onto pinterest!
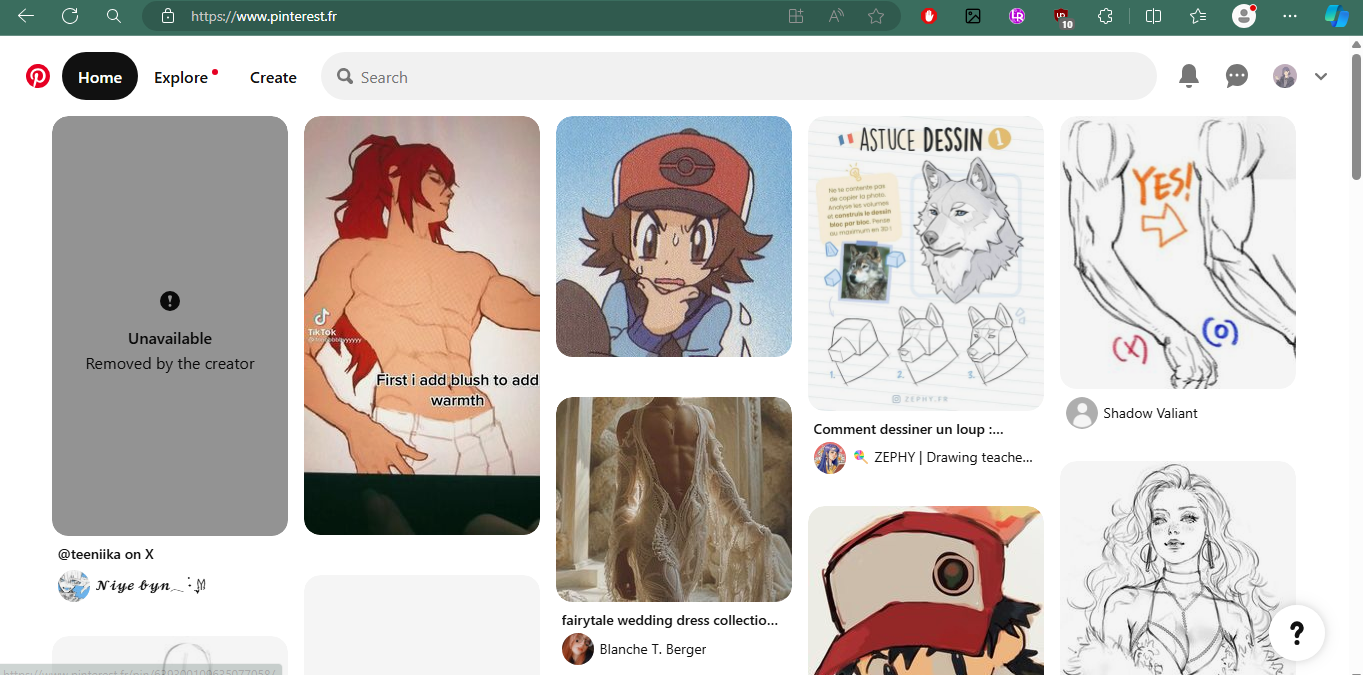
I want my theme to be bowser, but I want a certain look. So I look up bowser and the color I want.
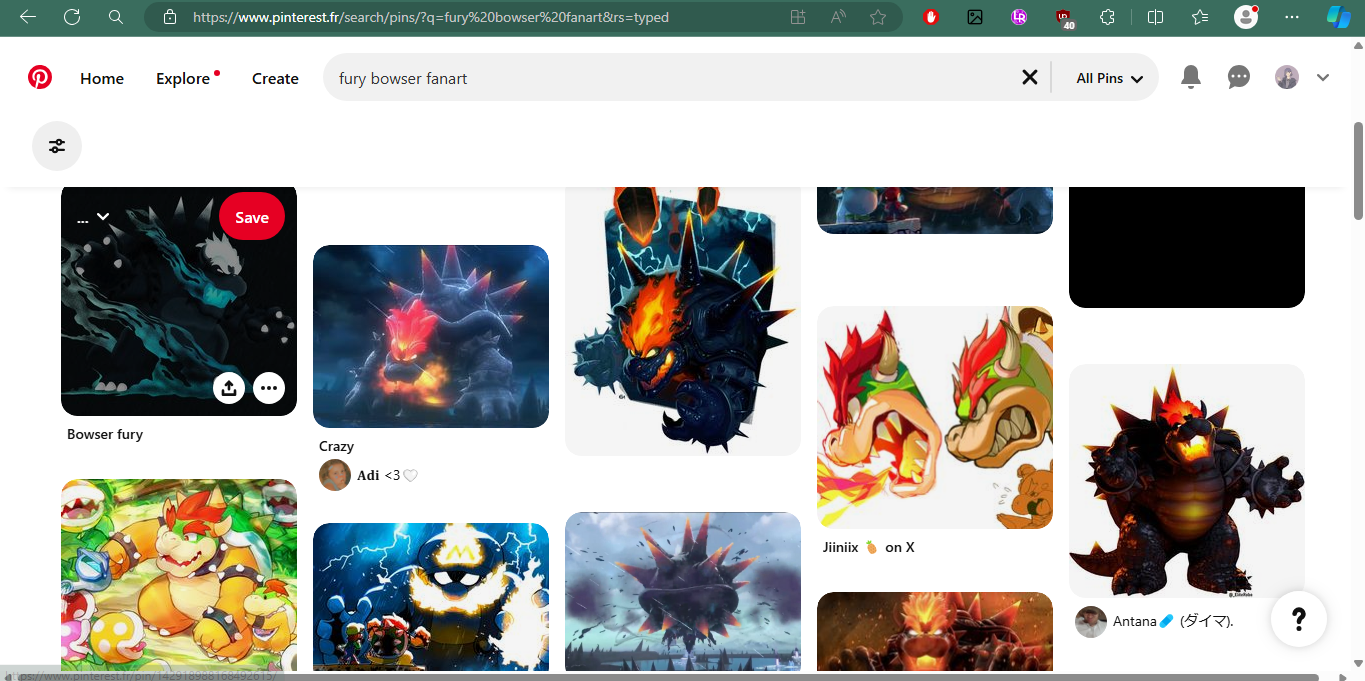
I like one of these! So I'm going to pick it and put it on my profile.
Here is a video of how to change your icon!
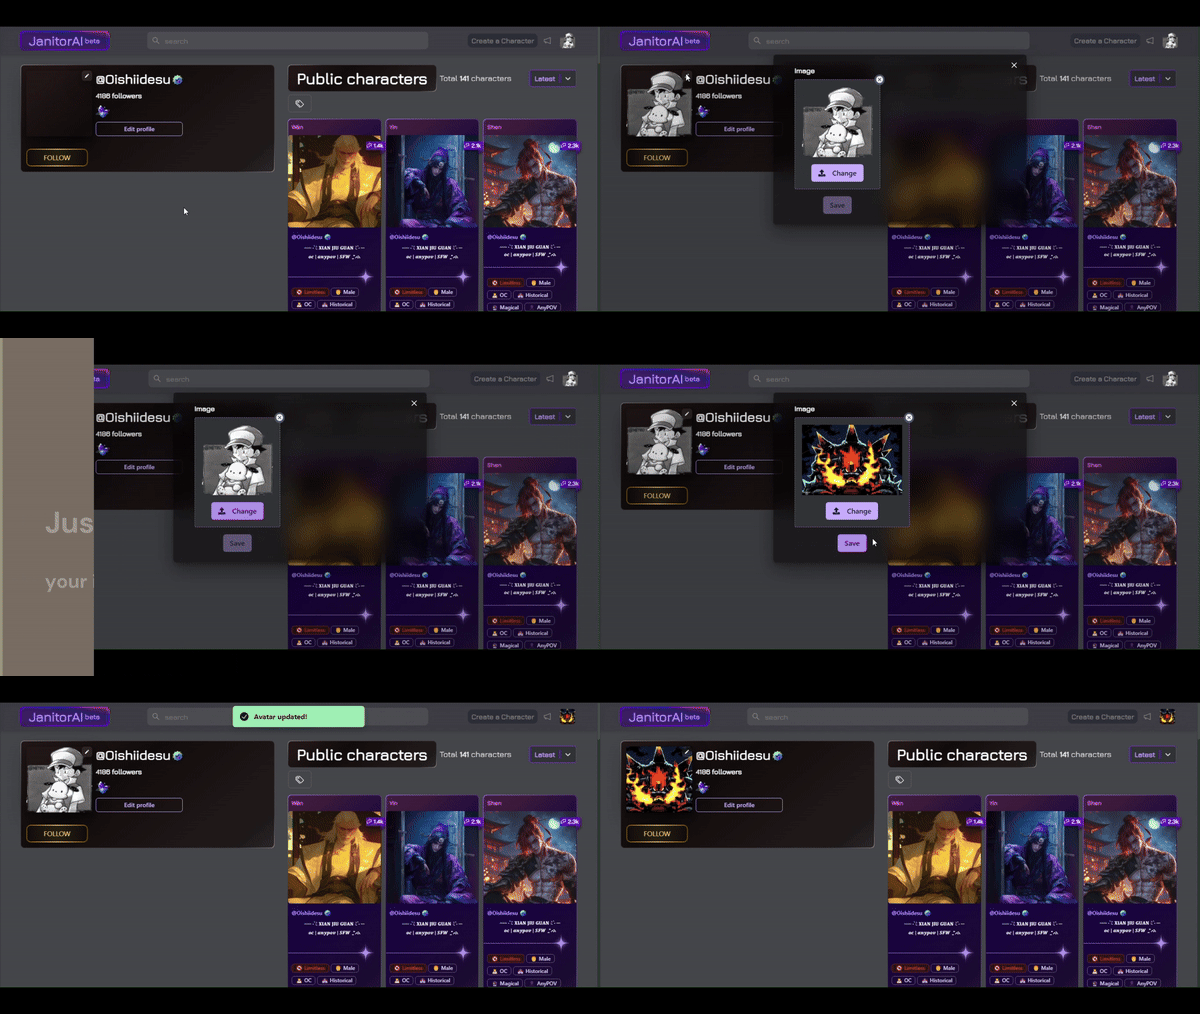 Ahh... this looks better.
 Now, we need to put this picture into my favorite website ever to get our profile theme hexes. Cooloso!
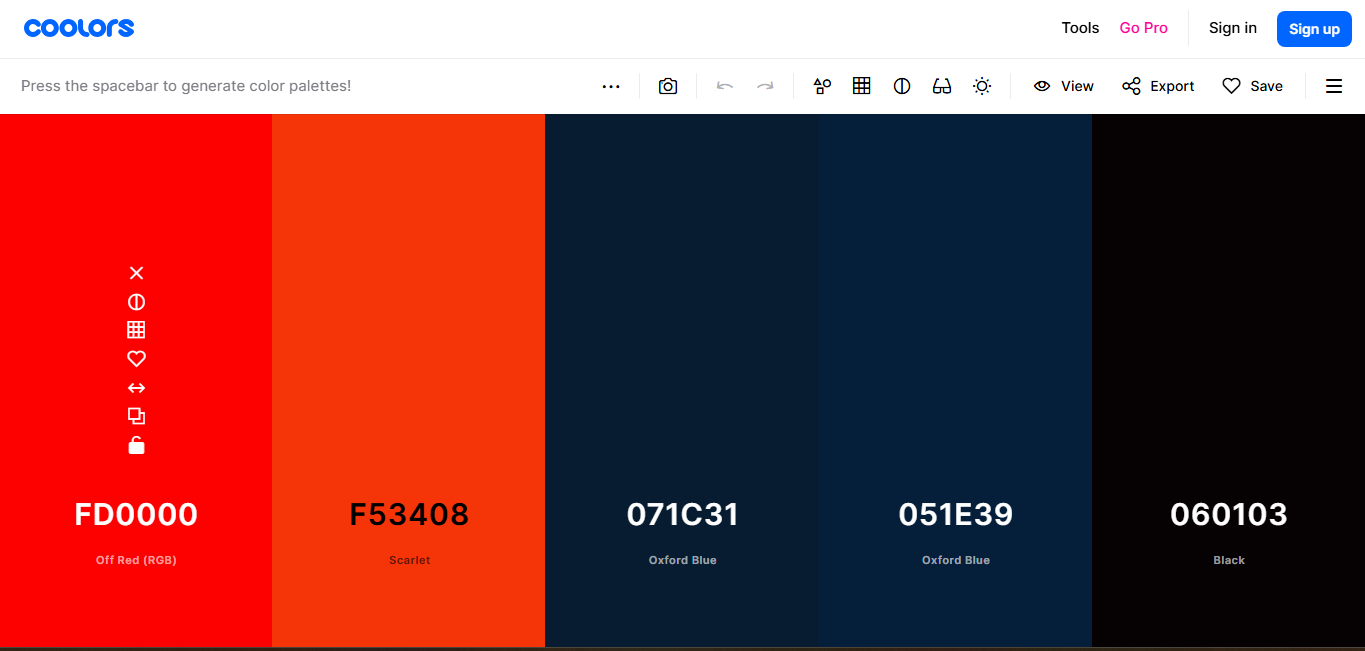 This is the colors we are going to use for our profile. Using this website helps me find out what colors are in the photo so everything is seamless!
Using this hex, I'm going to change the background of the profile to a different color.
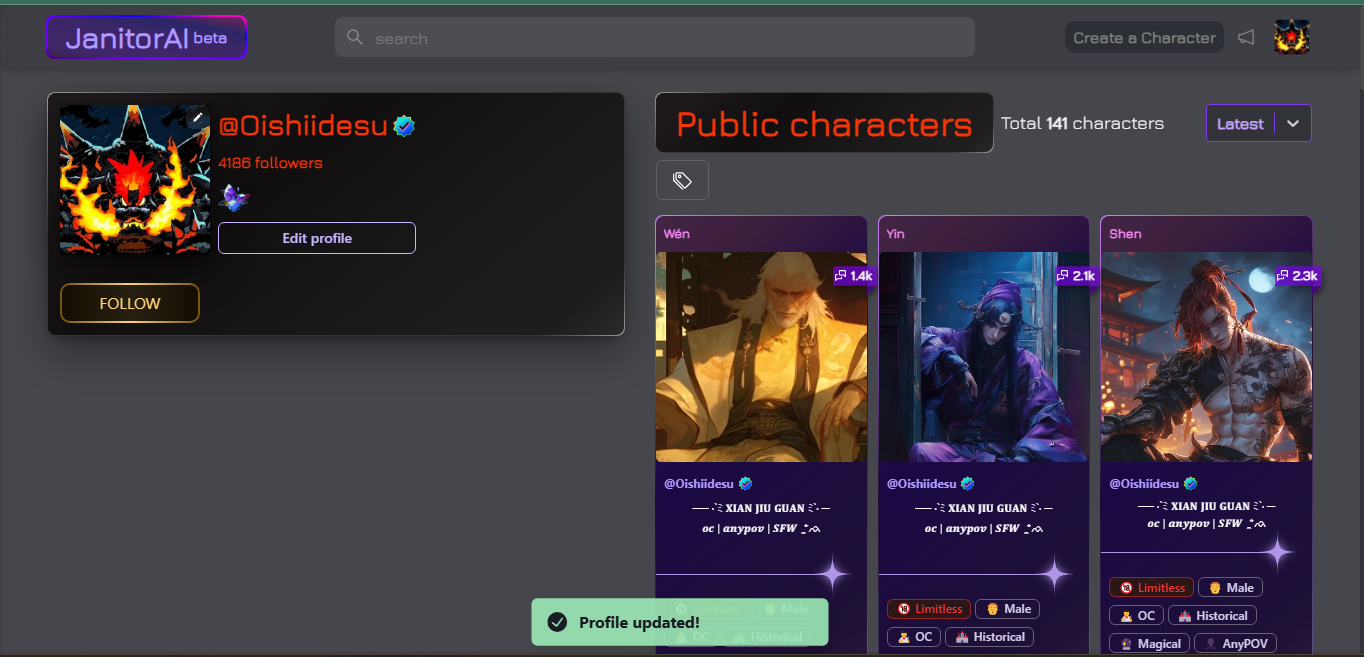 See how good it looks already? (HINT! Make sure the text is readable, I chose the brightest color in the picture for the text and the darkest for the background.
Now it's time to pick a background! You can choose a simple color, or you can use an actual background picture. (HINT! Make sure it coordinates with the colors on your icon!) (HINT 2! If you can't find a good background picture, try to just look up images with the two colors in it! Doesn't have to be from a certain fandom, OR you can put it into photoshop and use an overlay to make the colors the same.) (HINT 3! Make sure to use your search engine and make sure the image is LARGE, so it isn't pixelated!)
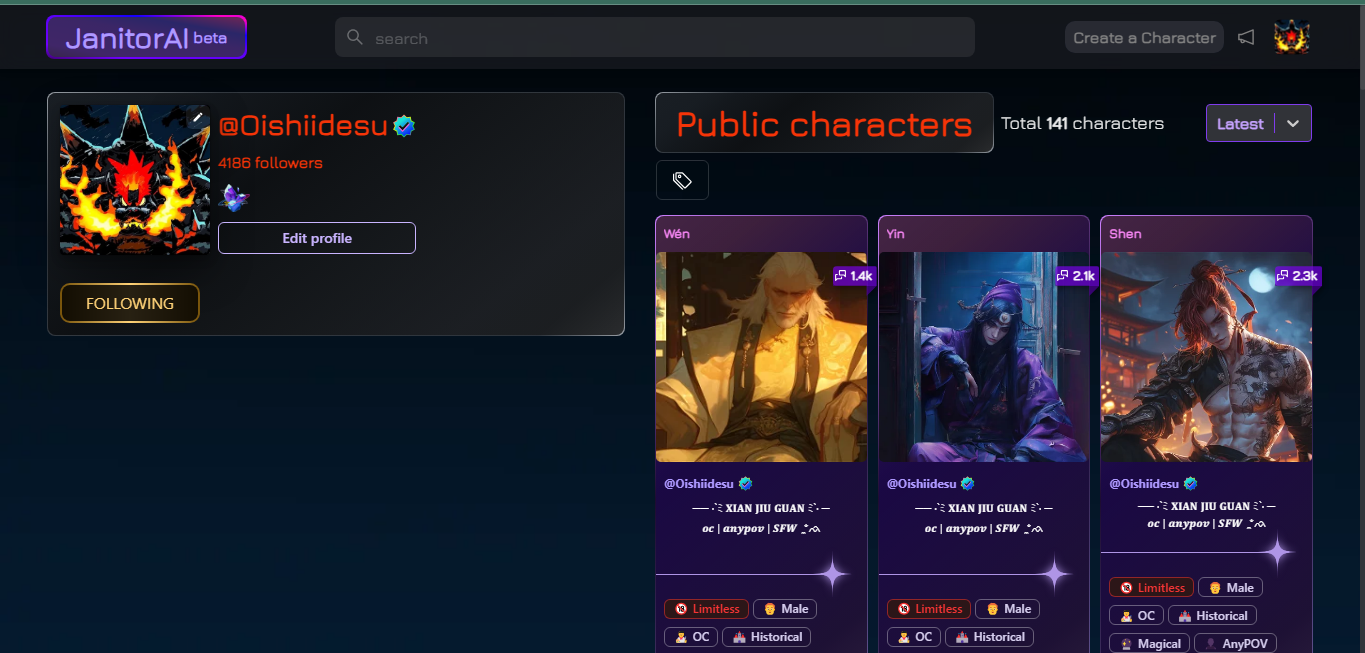 There we go! I couldn't find a good background, so I made my own on Photopea. I took the two colors in the back of my icon and made it a gradient.
NOW ONTO THE CODING...
Me? I like to work from the top down, so we're going to start with the Janitor Ai logo and the other corresponding elements.
To do this, we have to find their specific .css (or try out Lunaxlee's guide to find them, but sometimes they don't work because we have unique .css)
Here is a video on how to find a specific class
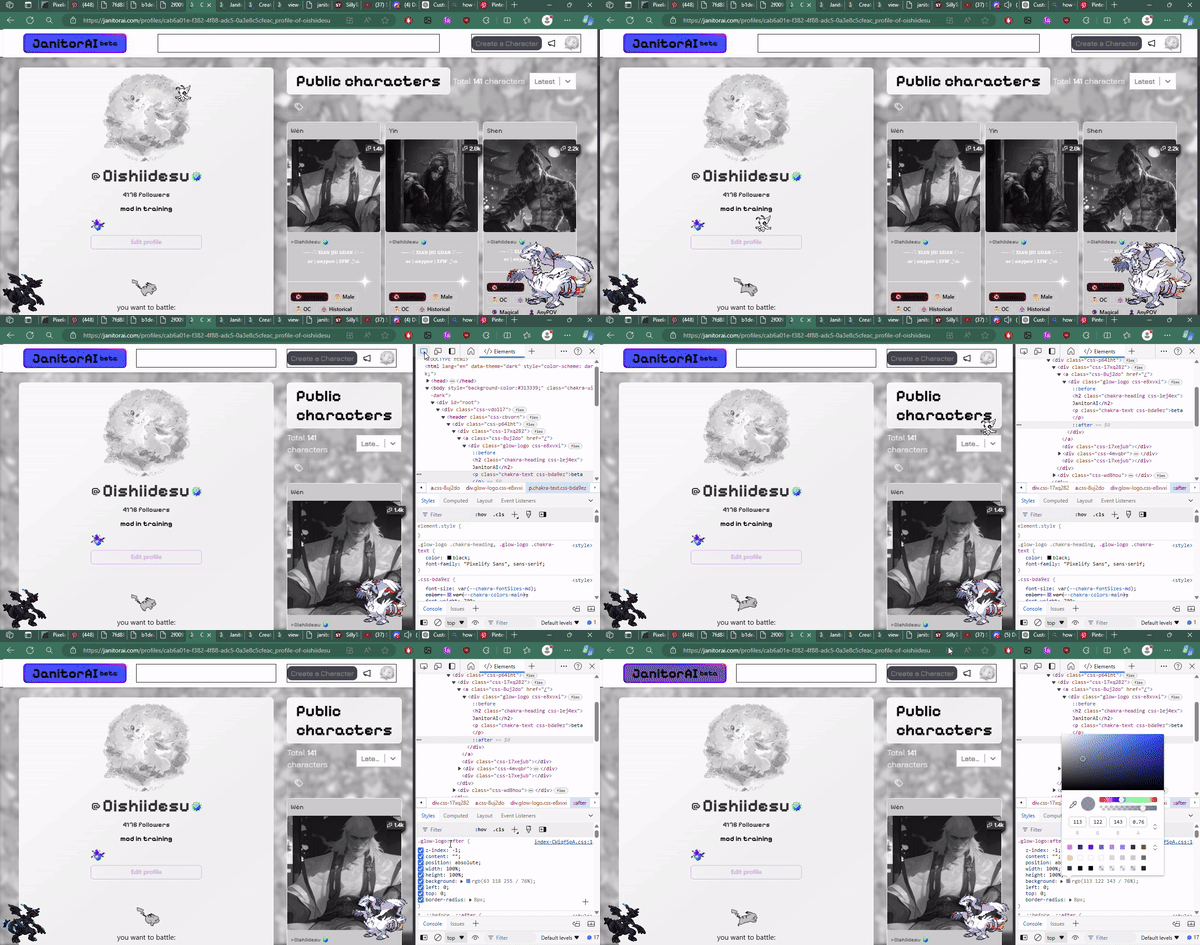 (HINT! See at the bottom right where it shows the <style>? You can copy and paste it into your About Me to directly edit it!)
ALL CODE GOES INTO YOUR ABOUT ME SECTION IN YOUR PROFILE SETTINTGS
->__________
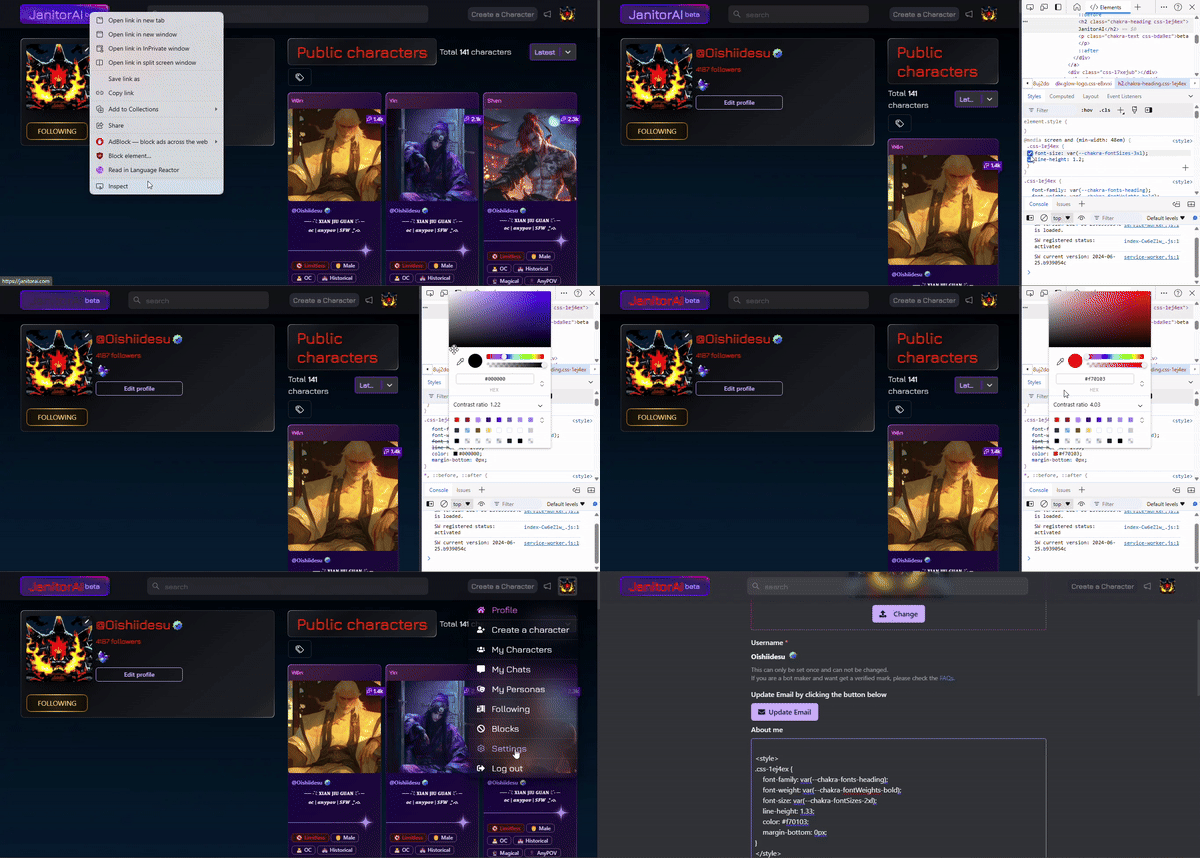
HOW TO EDIT THE JANITOR AI LOGO
<style>
.css-1ej4ex {
    font-family: var(--chakra-fonts-heading);
    font-weight: var(--chakra-fontWeights-bold);
    font-size: var(--chakra-fontSizes-2xl);
    line-height: 1.33;
    color: #f70103;
    margin-bottom: 0px;
}
</style>
Here is the code above, and the gif below. Make sure to do the inspect and find JanitorAi's specific class using the video above!
__________
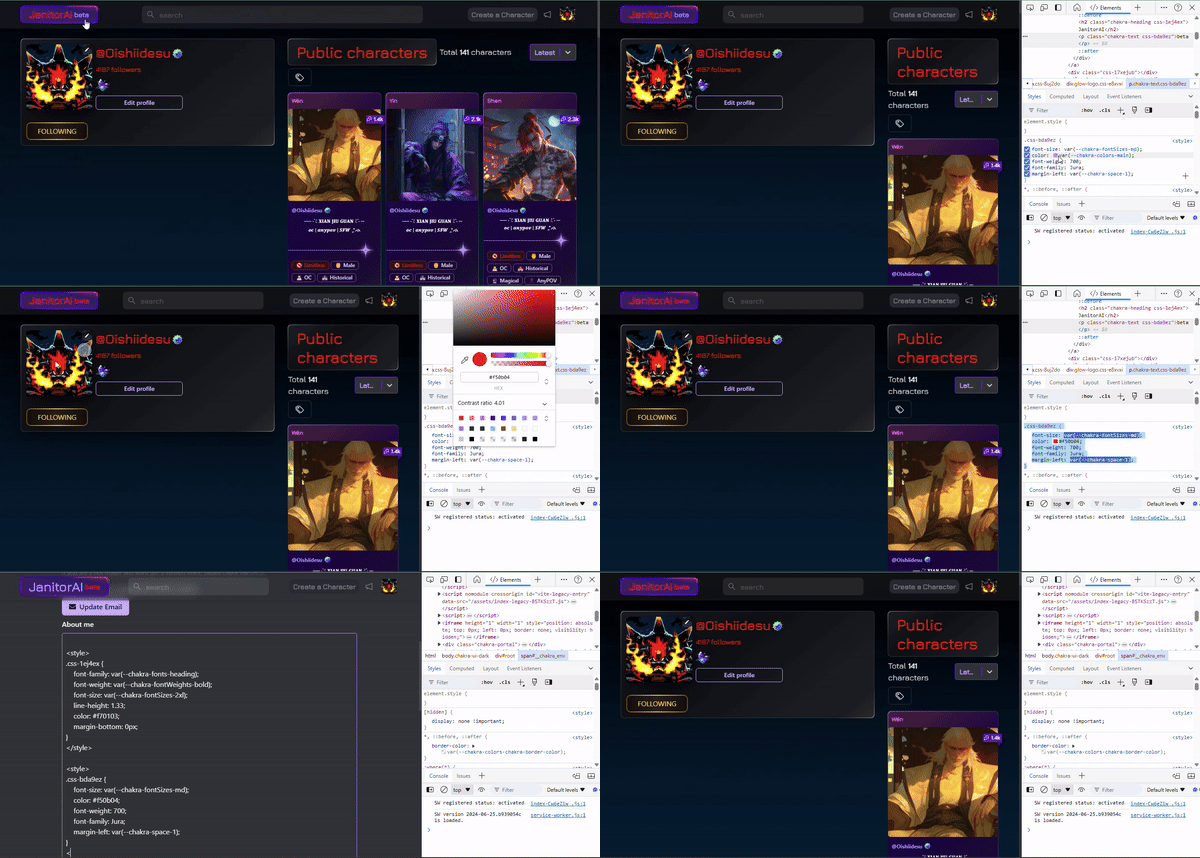
HOW TO EDIT THE JANITOR AI (BETA) LOGO
<style>
.css-bda9ez {
    font-size: var(--chakra-fontSizes-md);
    color: #f50b04;
    font-weight: 700;
    font-family: Jura;
    margin-left: var(--chakra-space-1);
}
</style>
Here is the code above, and the gif below. Make sure to do the inspect and find JanitorAi's specific class using the video above!
__________
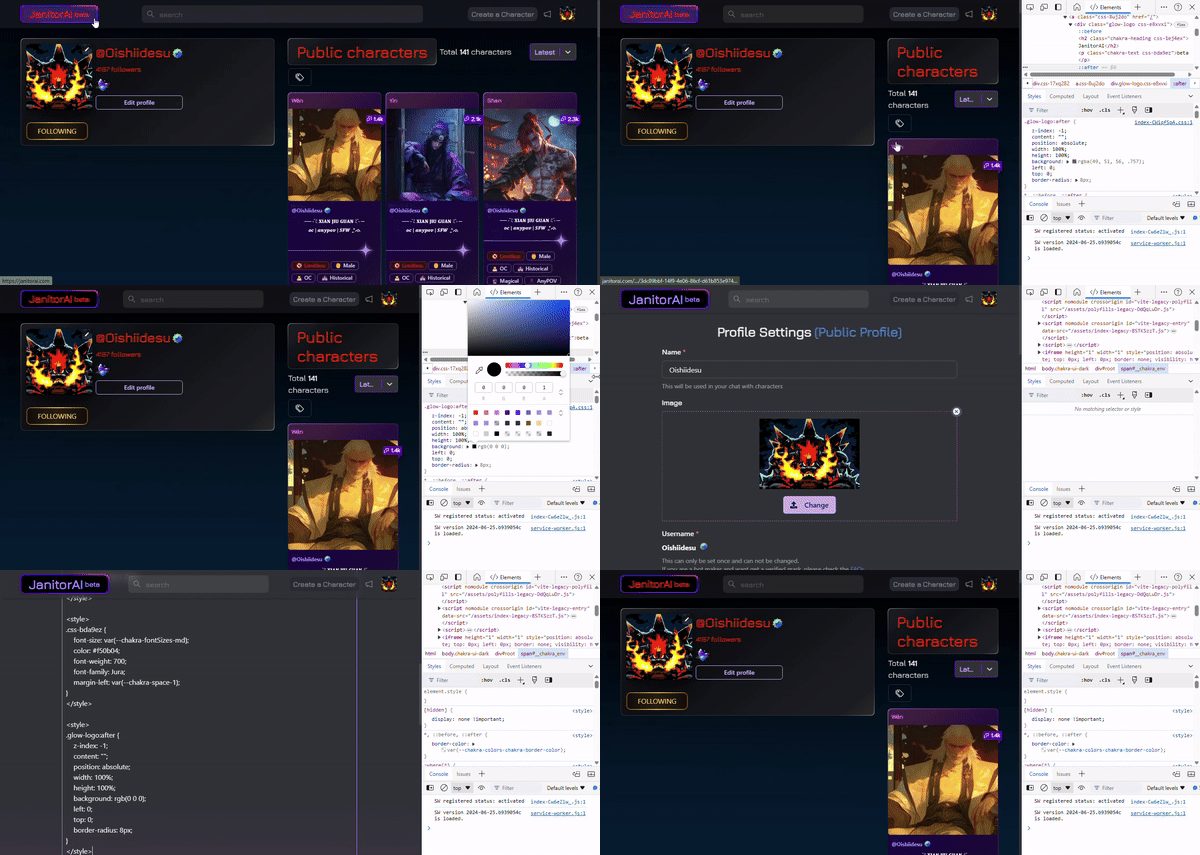
HOW TO EDIT THE BACKGROUND OF THE JANITOR AI LOGO
<style>
.glow-logo:after {
    z-index: -1;
    content: "";
    position: absolute;
    width: 100%;
    height: 100%;
    background: rgb(0 0 0);
    left: 0;
    top: 0;
    border-radius: 8px;
}
</style>
Here is the code above, and the gif below. Make sure to do the inspect and find JanitorAi's specific class using the video above!
__________
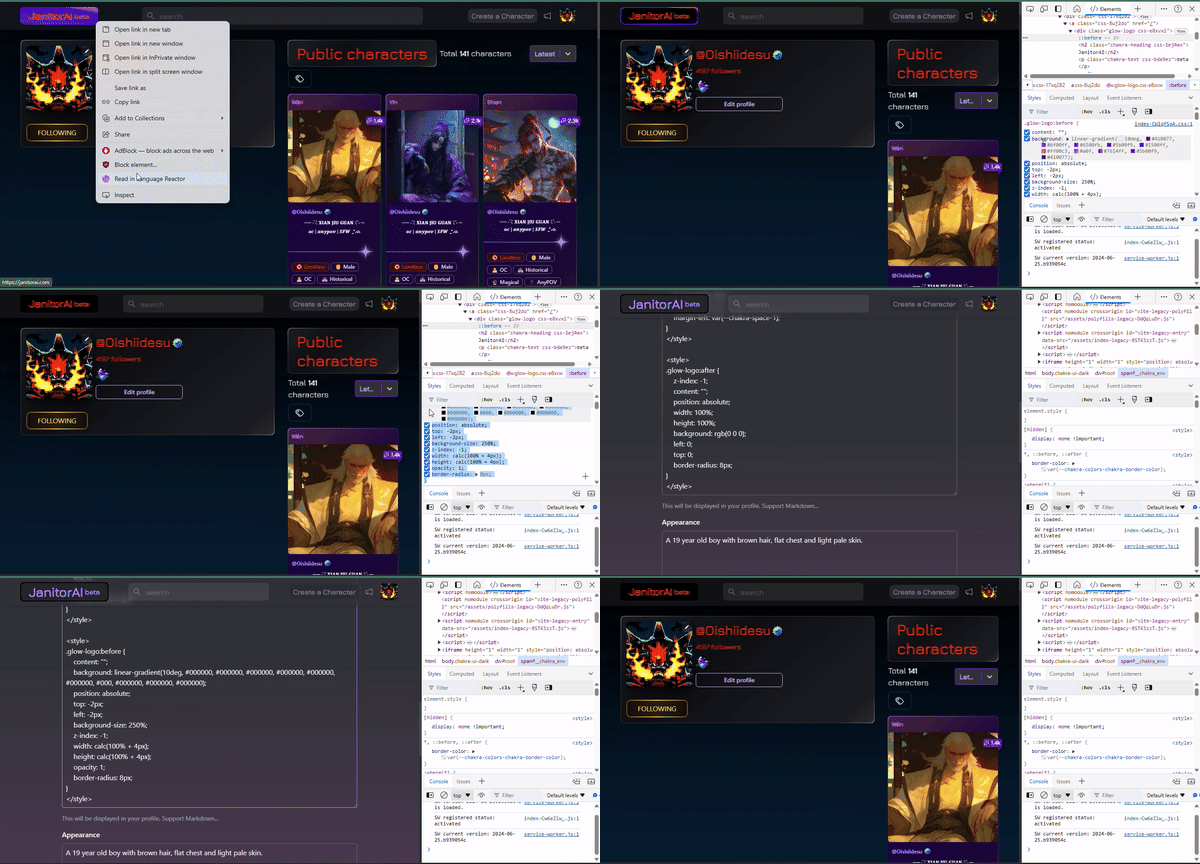
HOW TO EDIT THE EDGES OF THE JANITOR AI LOGO
<style>
.glow-logo:before {
    content: "";
    background: linear-gradient(10deg, #000000, #000000, #000000, #000000, #000000, #000000, #000, #000000, #000000, #000000);
    position: absolute;
    top: -2px;
    left: -2px;
    background-size: 250%;
    z-index: -1;
    width: calc(100% + 4px);
    height: calc(100% + 4px);
    opacity: 1;
    border-radius: 8px;
}
</style>
Here is the code above, and the gif below. Make sure to do the inspect and find JanitorAi's specific class using the video above! (I changed all the colors into black. Mess around with the border too if you want!
__________
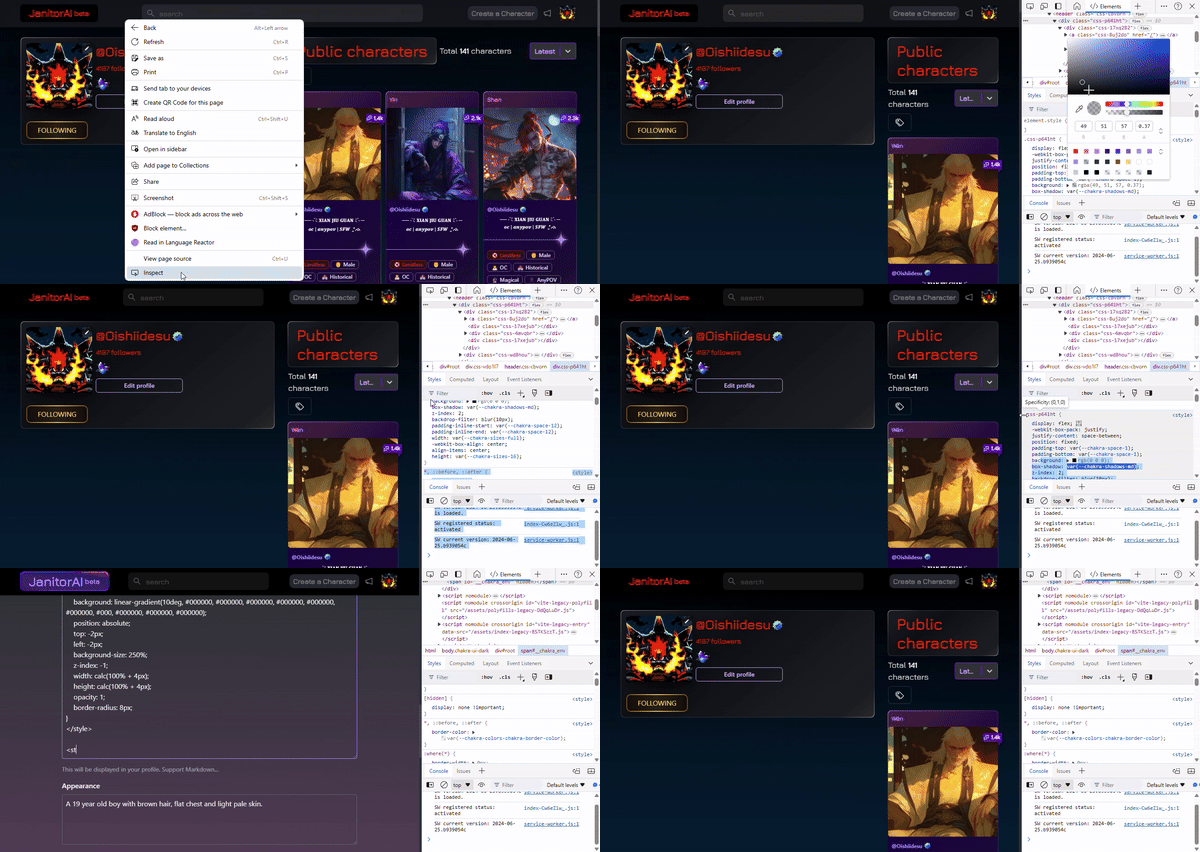
HOW TO EDIT THE HEADER
<style>
.css-p641ht {
    display: flex;
    -webkit-box-pack: justify;
    justify-content: space-between;
    position: fixed;
    padding-top: var(--chakra-space-1);
    padding-bottom: var(--chakra-space-1);
    background: rgb(0 0 0);
    box-shadow: var(--chakra-shadows-md);
    z-index: 2;
    backdrop-filter: blur(10px);
    padding-inline-start: var(--chakra-space-12);
    padding-inline-end: var(--chakra-space-12);
    width: var(--chakra-sizes-full);
    -webkit-box-align: center;
    align-items: center;
    height: var(--chakra-sizes-16);
}
</style>
Here is the code above, and the gif below. Make sure to do the inspect and find JanitorAi's specific class using the video above!
__________
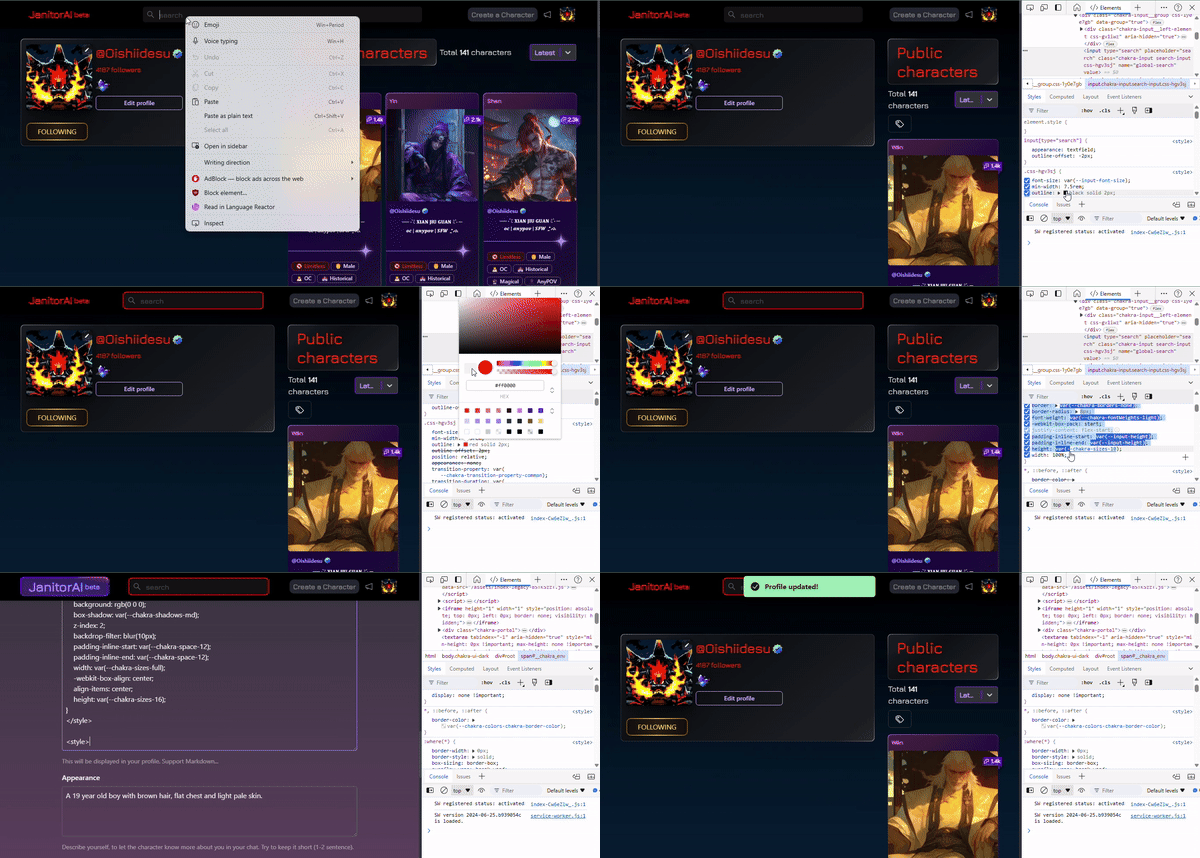
HOW TO EDIT THE SEARCH BAR
<style>
.css-hgv3sj {
    font-size: var(--input-font-size);
    min-width: 7.5rem;
    outline: #fe0102 solid 2px;
    outline-offset: 2px;
    position: relative;
    appearance: none;
    transition-property: var(--chakra-transition-property-common);
    transition-duration: var(--chakra-transition-duration-normal);
    --input-font-size: var(--chakra-fontSizes-md);
    --input-padding: var(--chakra-space-4);
    --input-border-radius: var(--chakra-radii-md);
    --input-height: var(--chakra-sizes-10);
    background-image: inherit;
    background-position: inherit;
    background-size: inherit;
    background-repeat: inherit;
    background-attachment: inherit;
    background-origin: inherit;
    background-clip: inherit;
    color: var(--chakra-colors-whiteAlpha-800);
    background-color: var(--chakra-colors-whiteAlpha-200);
    border: var(--chakra-borders-none);
    border-radius: 8px;
    font-weight: var(--chakra-fontWeights-light);
    -webkit-box-pack: start;
    justify-content: flex-start;
    padding-inline-start: var(--input-height);
    padding-inline-end: var(--input-height);
    height: var(--chakra-sizes-10);
    width: 100%;
}
</style>
Here is the code above, and the gif below. Make sure to do the inspect and find JanitorAi's specific class using the video above!
__________
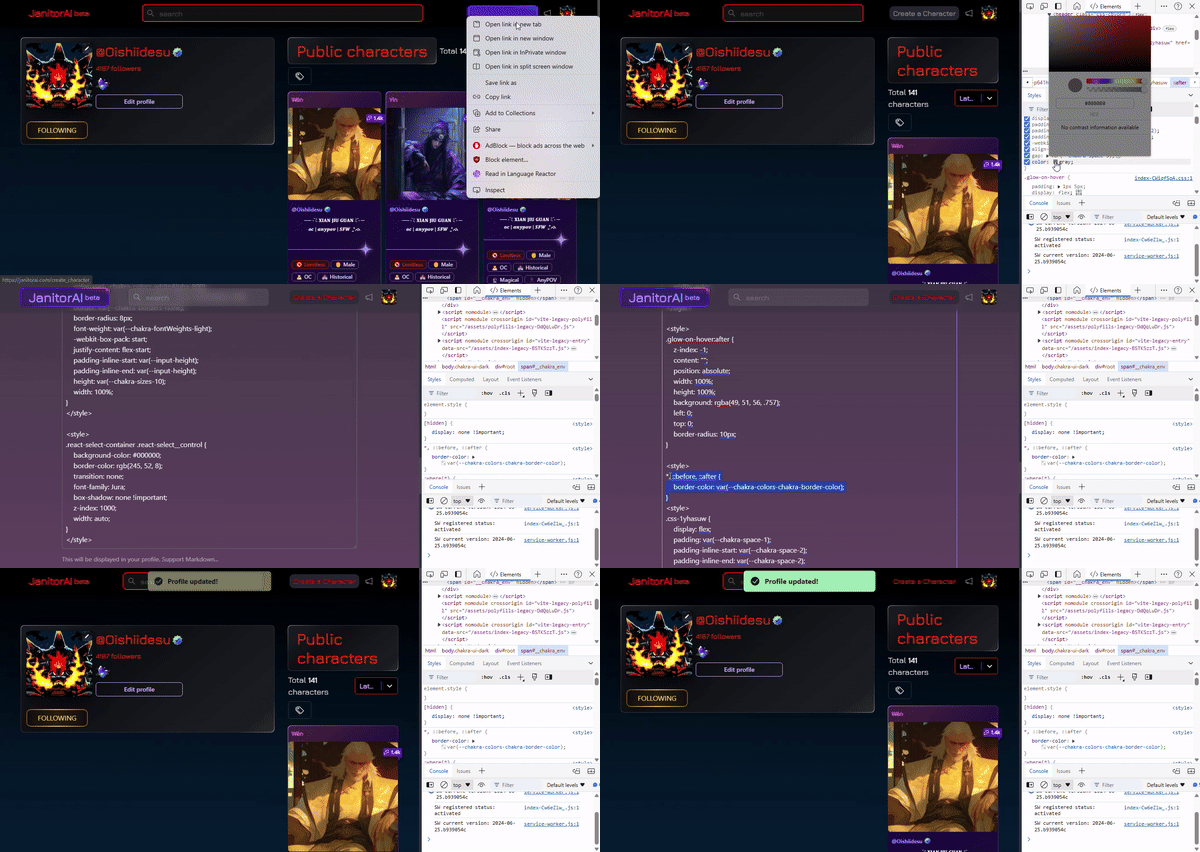
HOW TO EDIT THE CREATE A CHARACTER
-> <style>
.glow-on-hover:after {
z-index: -1;
content: "";
position: absolute;
width: 100%;
height: 100%;
background: rgb(0 0 0);
left: 0;
top: 0;
border-radius: 10px;
}
</style>
<style>
.css-1yhasuw {
    display: flex;
    padding: var(--chakra-space-1);
    padding-inline-start: var(--chakra-space-2);
    padding-inline-end: var(--chakra-space-2);
    -webkit-box-align: center;
    align-items: center;
    gap: var(--chakra-space-3);
    color: red;
}
</style>
<-
Here is the code above, and the gif below. Make sure to do the inspect and find JanitorAi's specific class using the video above! (NOTE: I messed up the colors and went back to fix them, the code is still perfectly fine, just make sure you add the right colors!)
__________
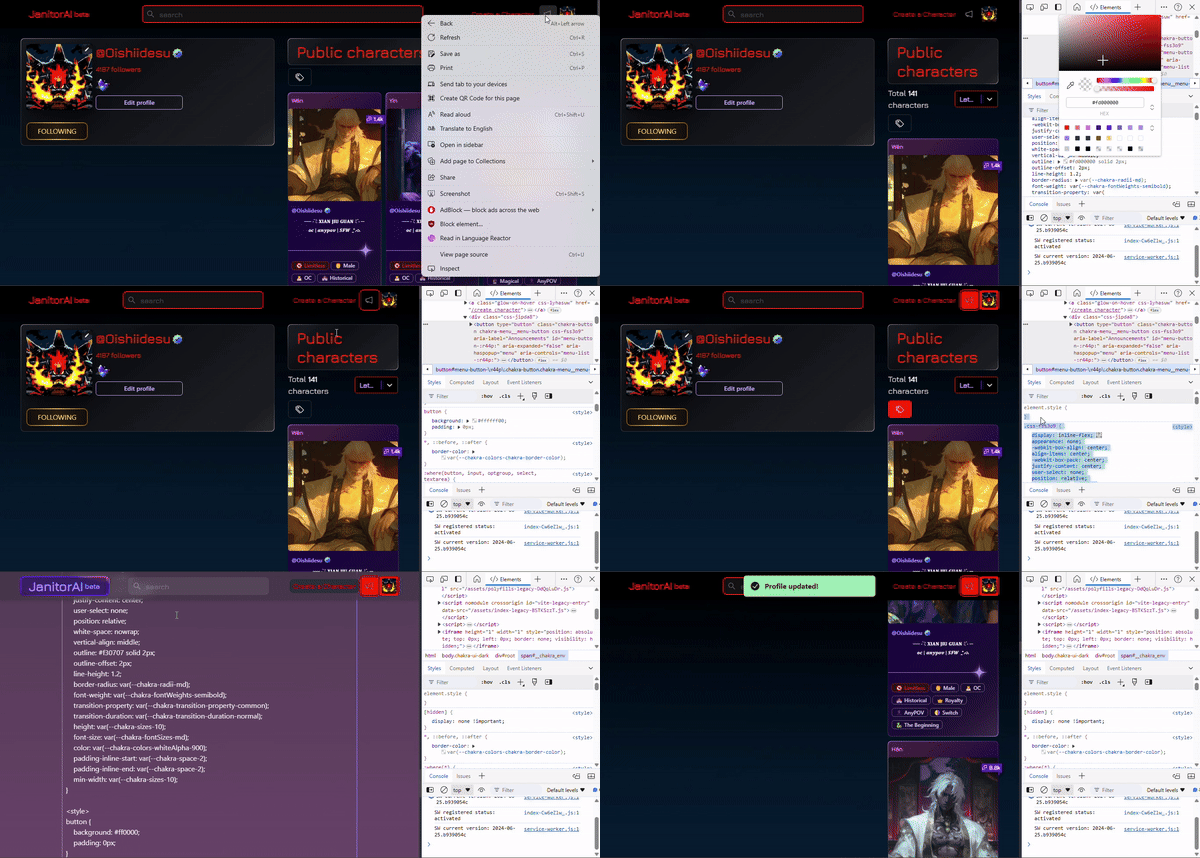
HOW TO EDIT THE ANNOUNCEMENT/ICON/TAG BUTTON (ADD A BORDER OR A BACK COLOR)
<style>
.css-fss3o9 {
    display: inline-flex;
    appearance: none;
    -webkit-box-align: center;
    align-items: center;
    -webkit-box-pack: center;
    justify-content: center;
    user-select: none;
    position: relative;
    white-space: nowrap;
    vertical-align: middle;
    outline: #f30707 solid 2px;
    outline-offset: 2px;
    line-height: 1.2;
    border-radius: var(--chakra-radii-md);
    font-weight: var(--chakra-fontWeights-semibold);
    transition-property: var(--chakra-transition-property-common);
    transition-duration: var(--chakra-transition-duration-normal);
    height: var(--chakra-sizes-10);
    font-size: var(--chakra-fontSizes-md);
    color: var(--chakra-colors-whiteAlpha-900);
    padding-inline-start: var(--chakra-space-2);
    padding-inline-end: var(--chakra-space-2);
    min-width: var(--chakra-sizes-10);
}
</style>
<style>
button {
    background: #ff0000;
    padding: 0px;
}
</style>
Here is the code above, and the gif below. Make sure to do the inspect and find JanitorAi's specific class using the video above!
__________
HOW TO CHANGE LATEST, TRENDING, ETC
<style>
.react-select-container .react-select__placeholder, .react-select-container .react-select__single-value {
    color: RED;
}
</style>
<- COLOR
__________
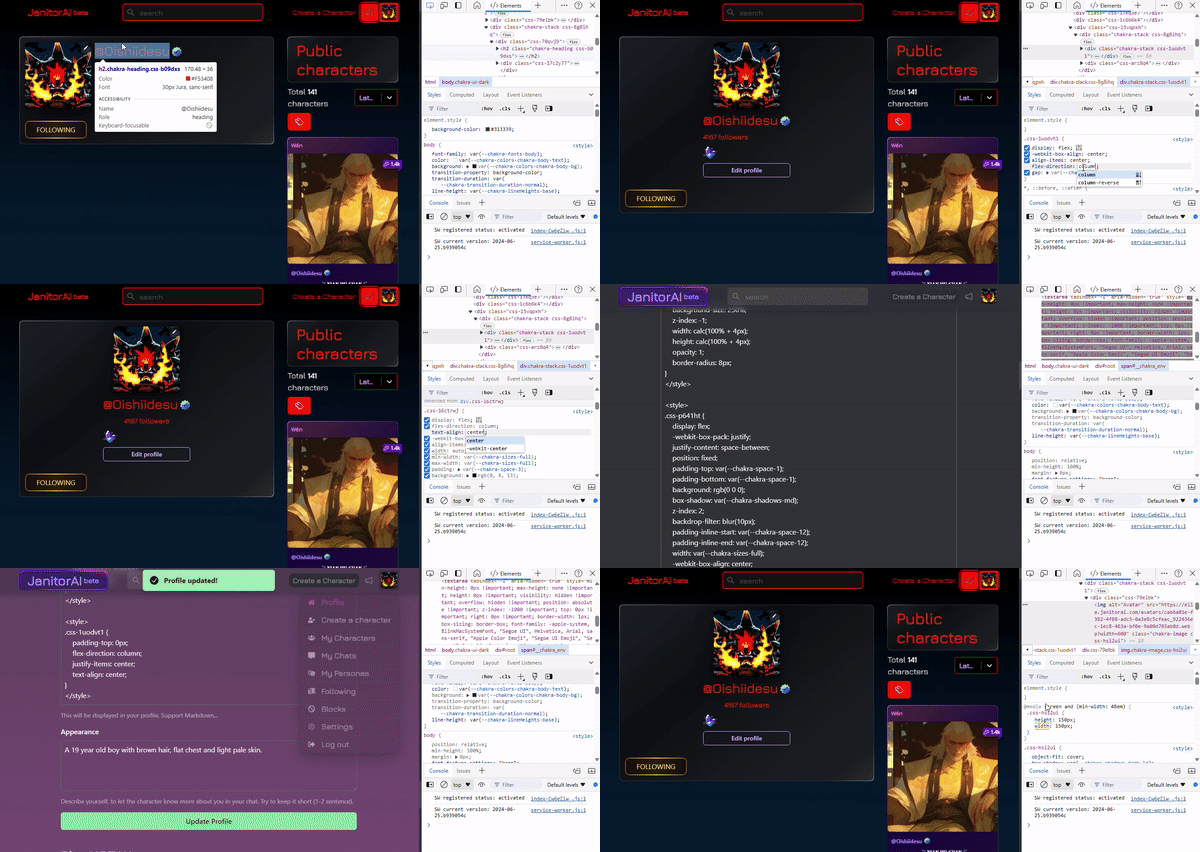
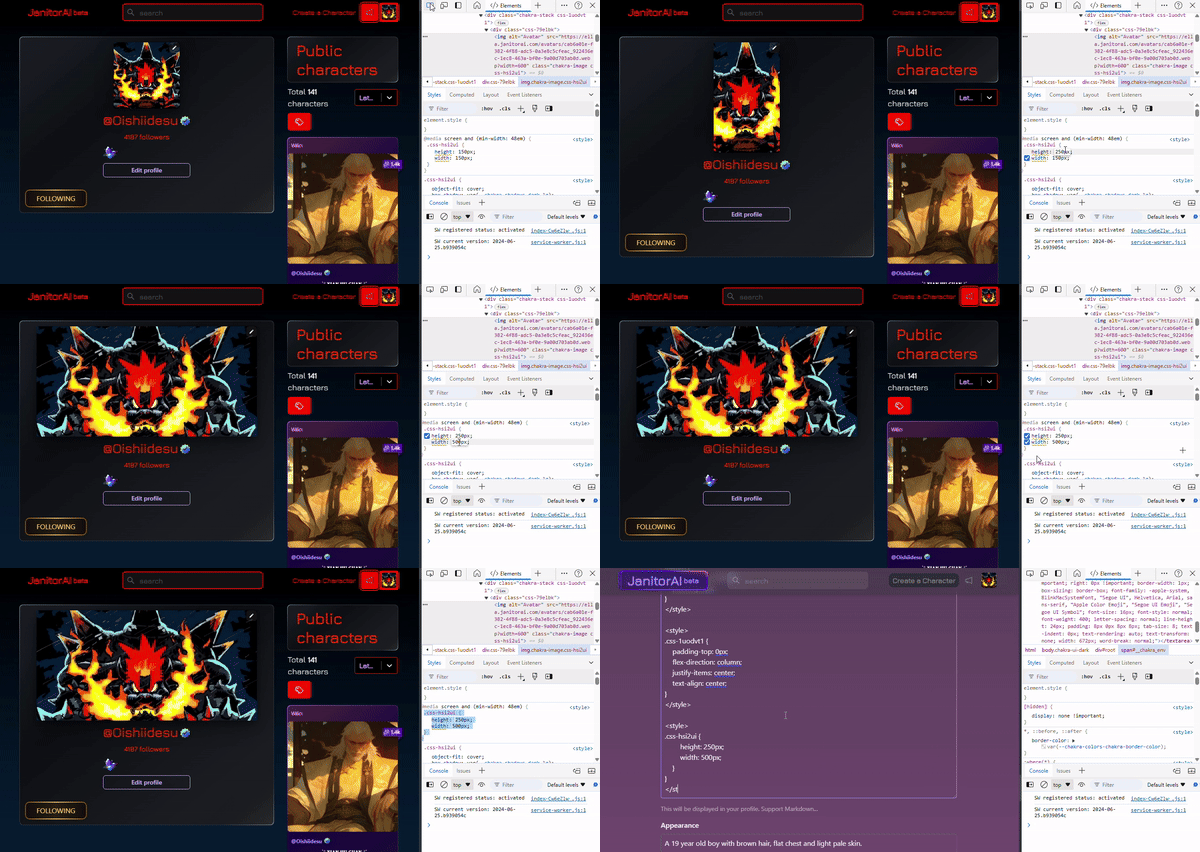
HOW TO EDIT THE ICON
<style>
.css-1uodvt1 {
    padding-top: 0px;
    flex-direction: column;
    justify-items: center;
    text-align: center;
}
</style>
<style>
.css-hsi2ui {
        height: 250px;
        width: 500px;
    }
}
</style>
Here is the code above, and the gif below. Make sure to do the inspect and find JanitorAi's specific class using the video above! Use the top video to center your icon, and the bottom to change the dimensions of it!
__________
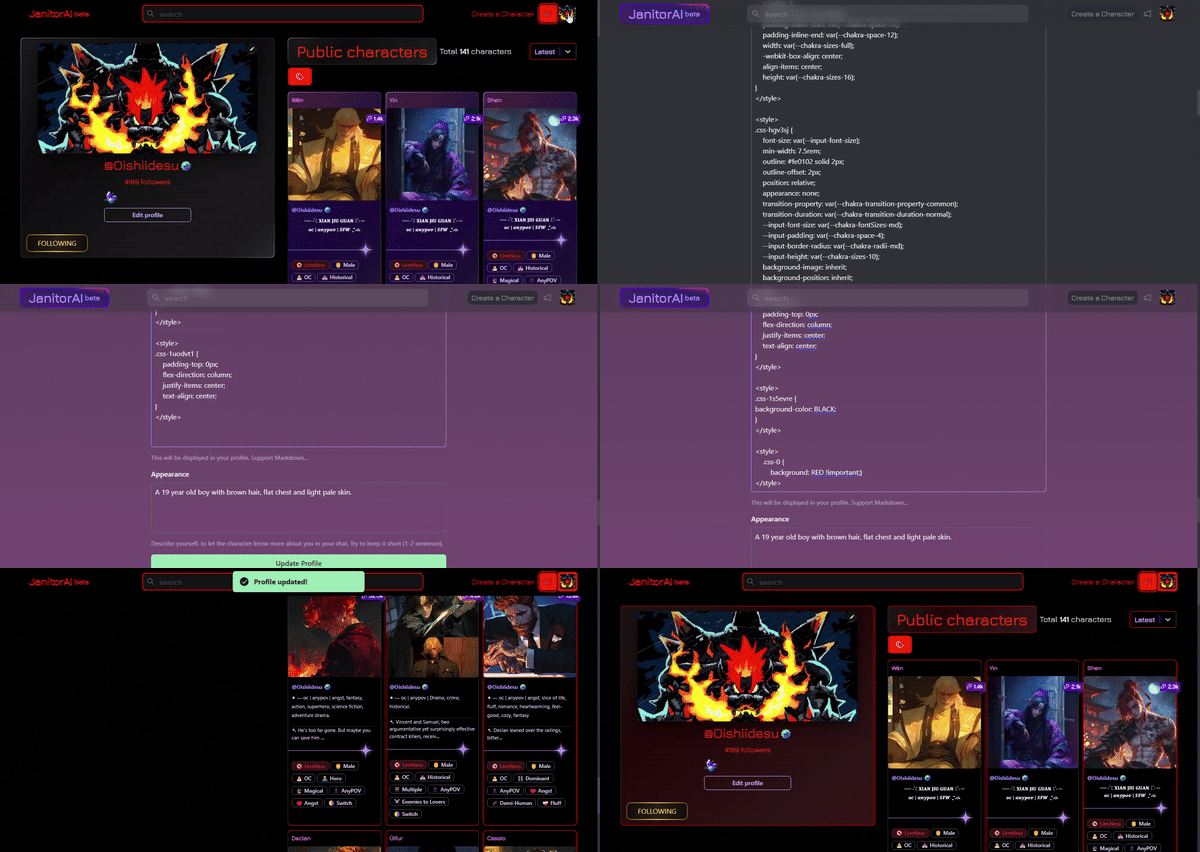
HOW TO EDIT BOT CARD COLOR AND BORDER
<style>
.css-1s5evre {
background-color: BLACK;
}
</style>
Card
<style>
    .css-0 {
        background: RED !important;}
</style>
Here is the code above, and the gif below. Make sure to do the inspect and find JanitorAi's specific class using the video above! Use the top video to center your icon, and the bottom to change the dimensions of it!
 -> more detailed code and owner found by Luna's guide
__________
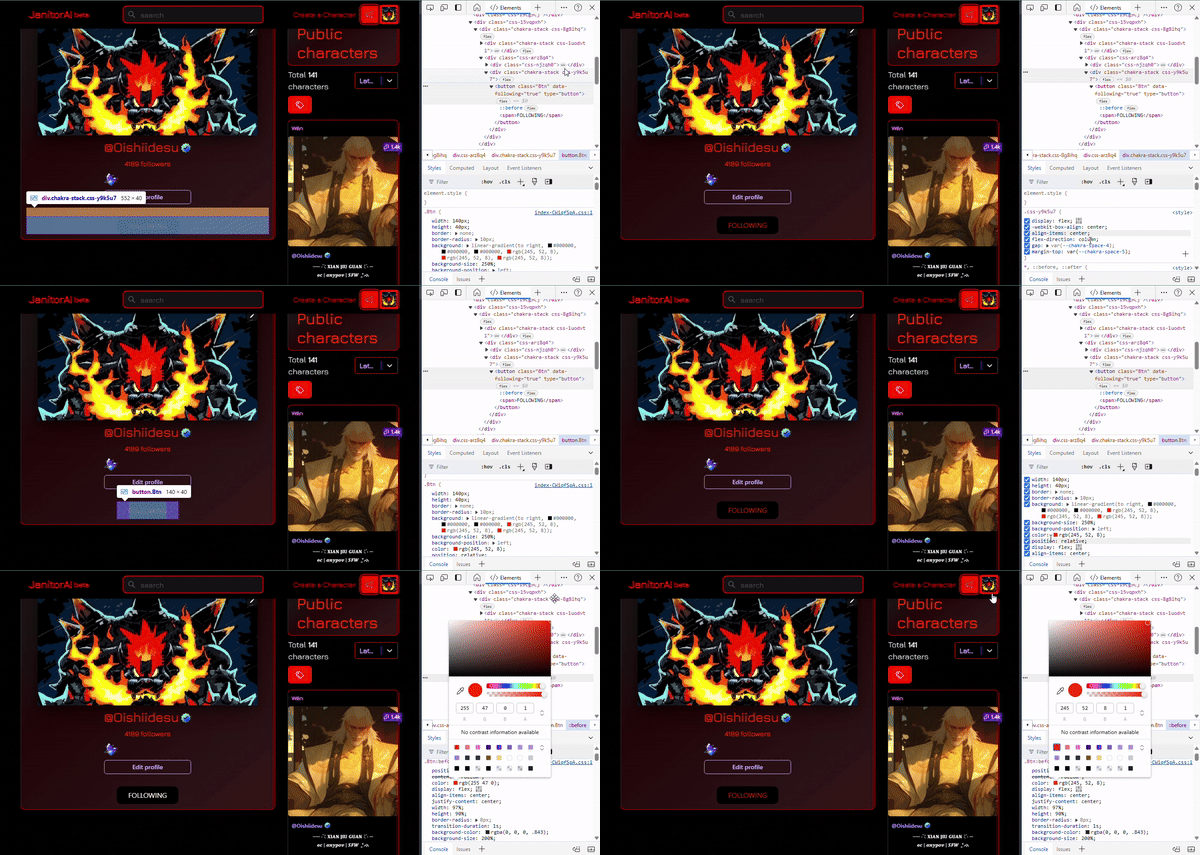
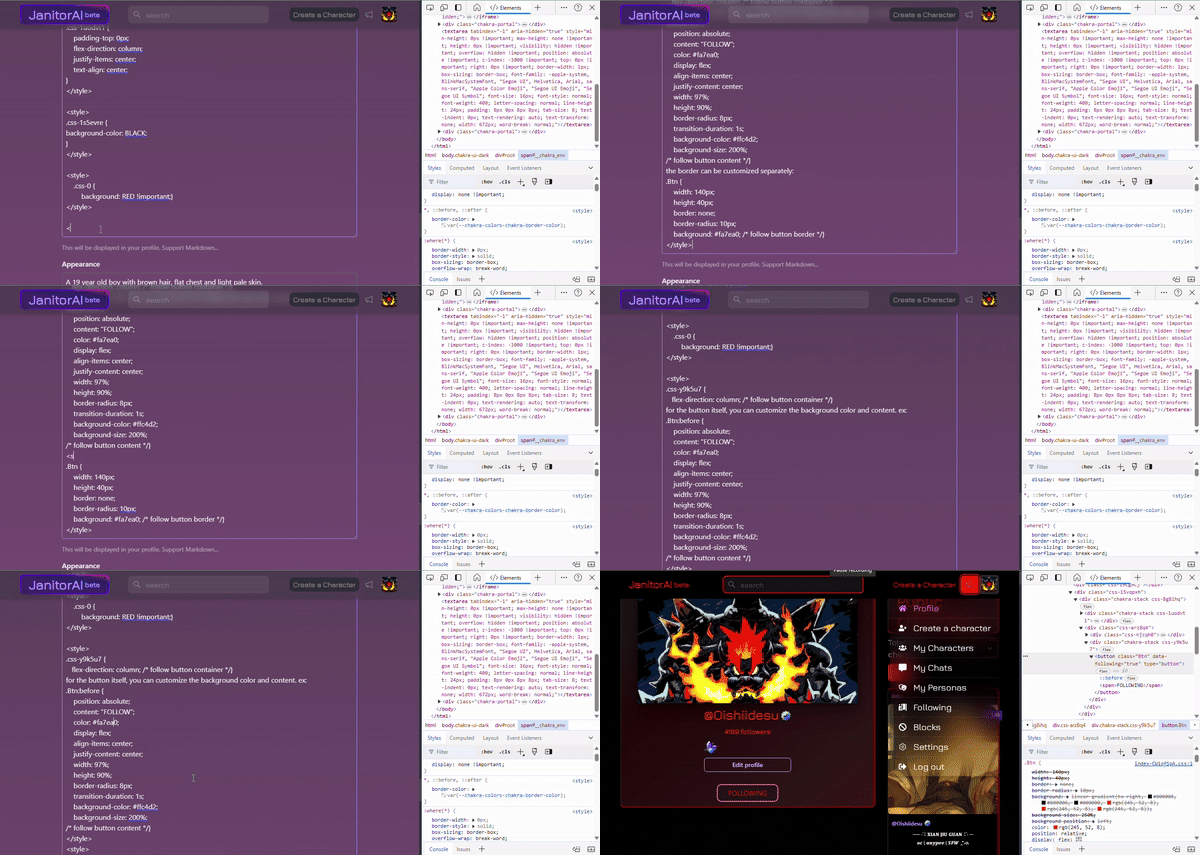
HOW TO EDIT THE FOLLOW BUTTON
<style> .css-y9k5u7 {
   flex-direction: column; /* follow button container */} </style>
Container
<style> .Btn:before {
    position: absolute;
    content: "FOLLOW";
    color: #fa7ea0;
    display: flex;
    align-items: center;
    justify-content: center;
    width: 97%;
    height: 90%;
    border-radius: 8px;
    transition-duration: 1s;
    background-color: #ffc4d2;
    background-size: 200%;
/* follow button content */} </style>
Follow button container
<style> .Btn {
    width: 140px;
    height: 40px;
    border: none;
    border-radius: 10px;
    background: #fa7ea0; /* follow button border */} </style>
Border of button
Here is the code above, and the gif below. Make sure to do the inspect and find JanitorAi's specific class using the video above! Use the top video to center your icon, and the bottom to change the dimensions of it!
__________
SO YOU WANT TO CHANGE YOUR FONT...
This was one of the hardest things for me to figure out even with guides. So I'm going to try and break it down the best I can. This is instructions directly from LunaxLee's resource.
STEP 1 - GO TO GOOGLE FONTS.COM
STEP 2 - PICK A FONT AND CLICK TO GET THE EMBED
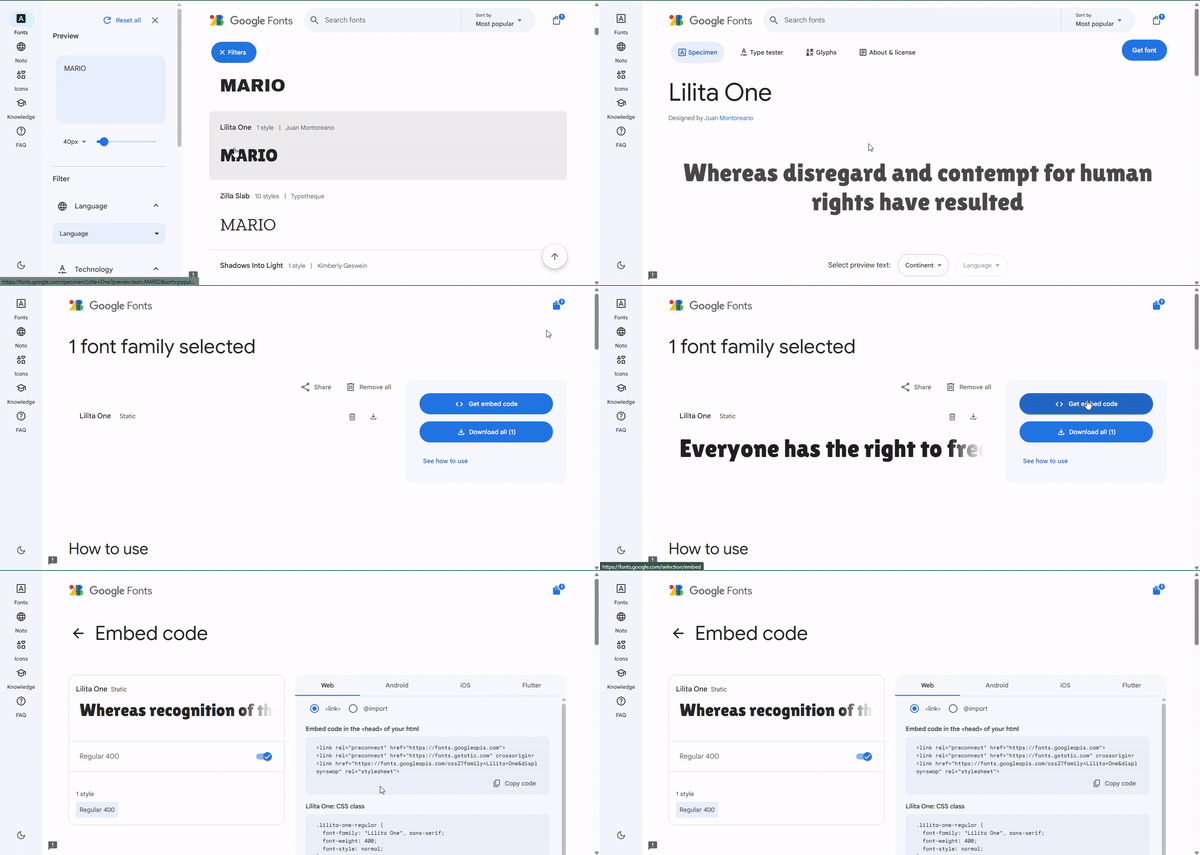
COPY AND PASTE THE EMBED AND ANY CSS CLASS IN YOUR ABOUT ME (DO NOT CLOSE THE GOOGLE FONTS PAGE AT ALL)
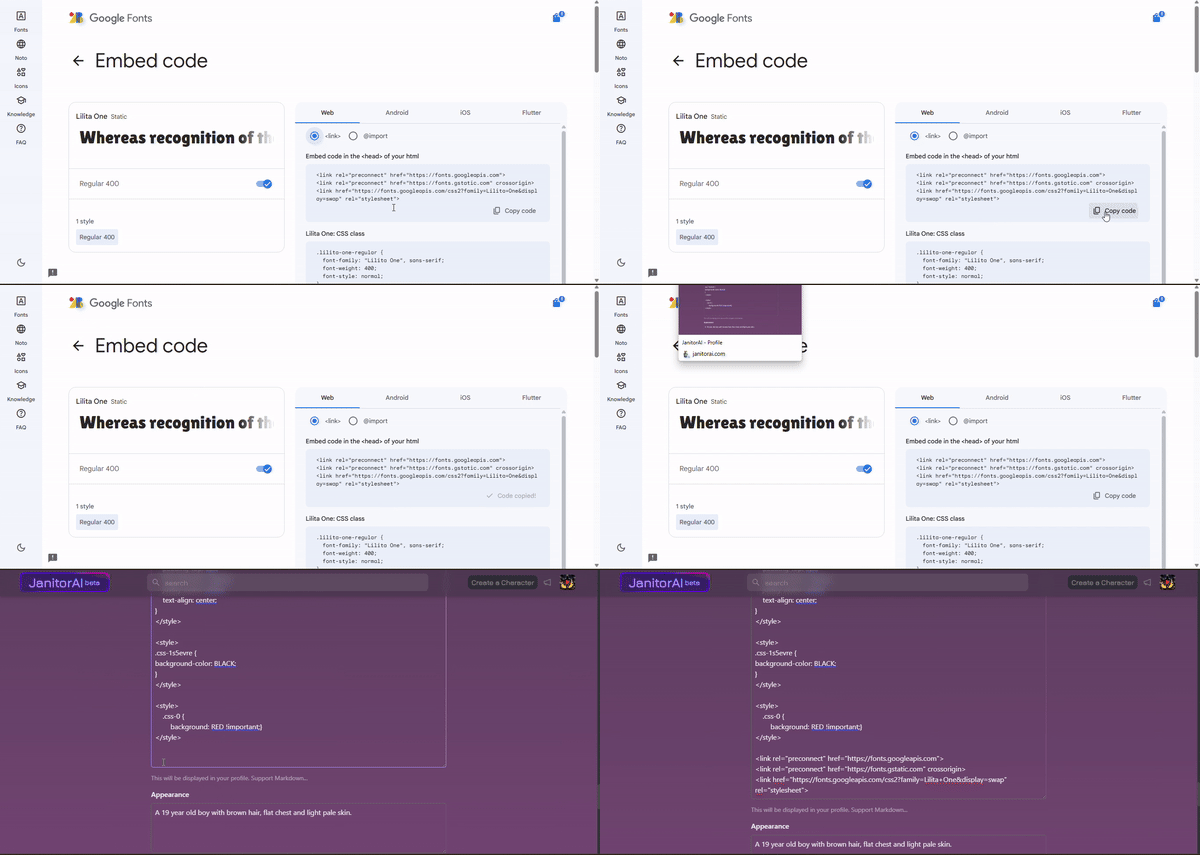
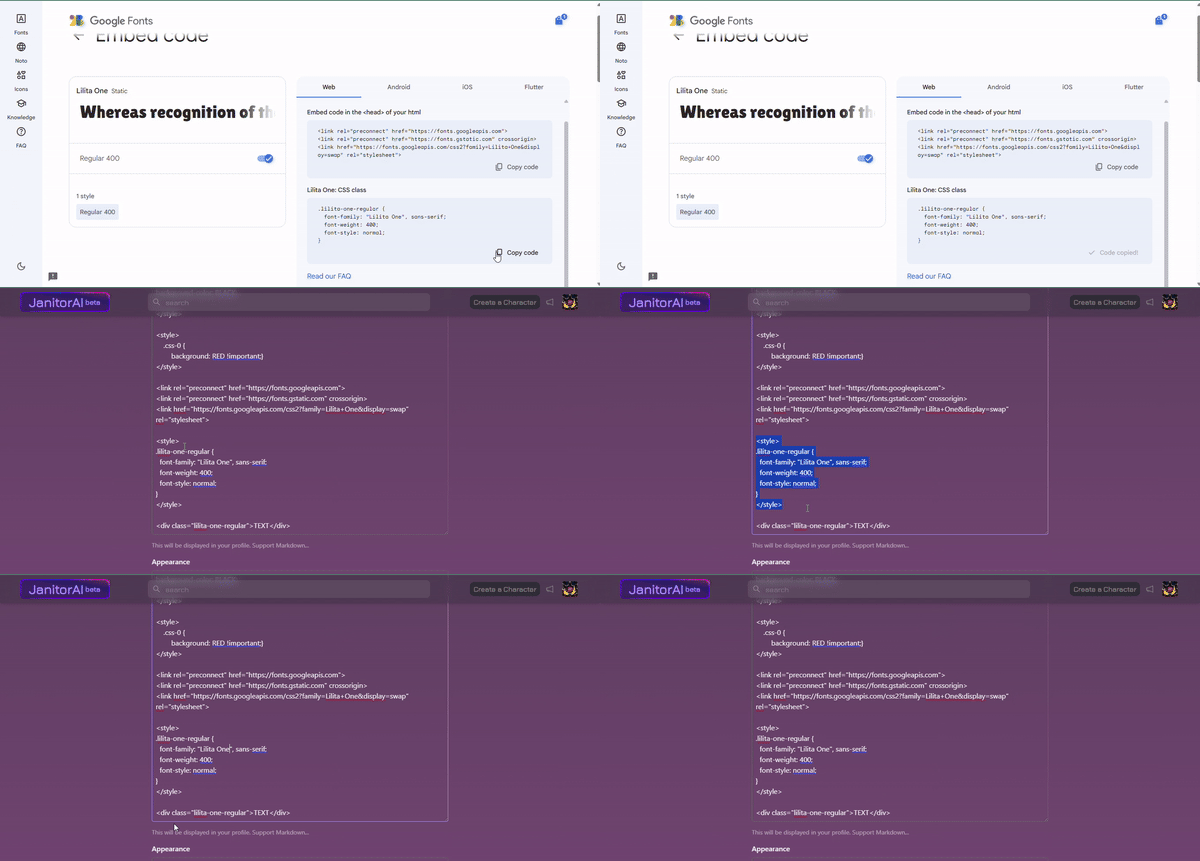
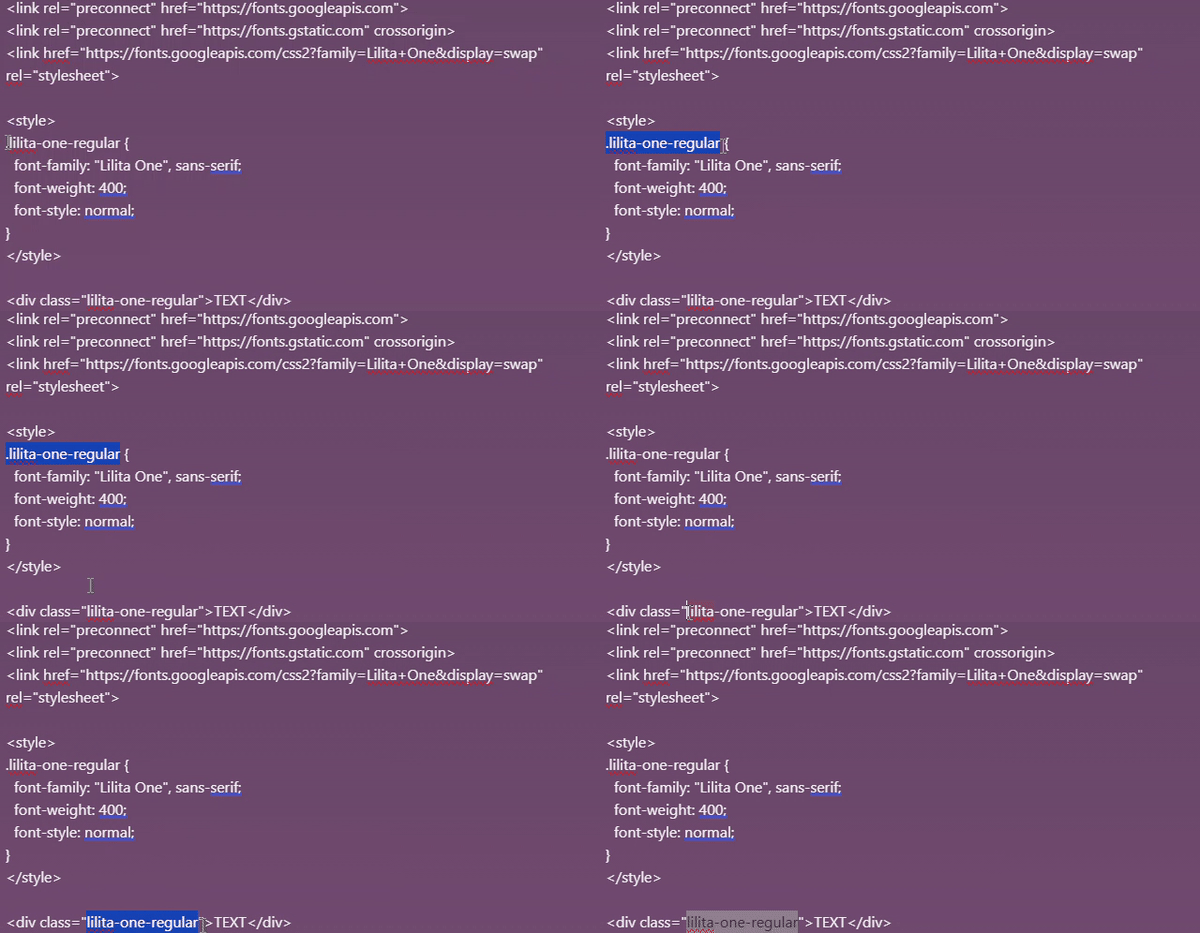
NOW, PUT ANY REGULAR TEXT IN THIS FORMAT...
<div class="FONT CLASS NAME">TEXT</div> and you're done! Psst, the class name is the lower case one!
CHANGE USERNAME FONT
<style>
.css-YOURSPECIFICCLASS {
font-family: YOUR FONT NAME IN EMBED
font-weight: 100;
font-style: normal;
}
</style> 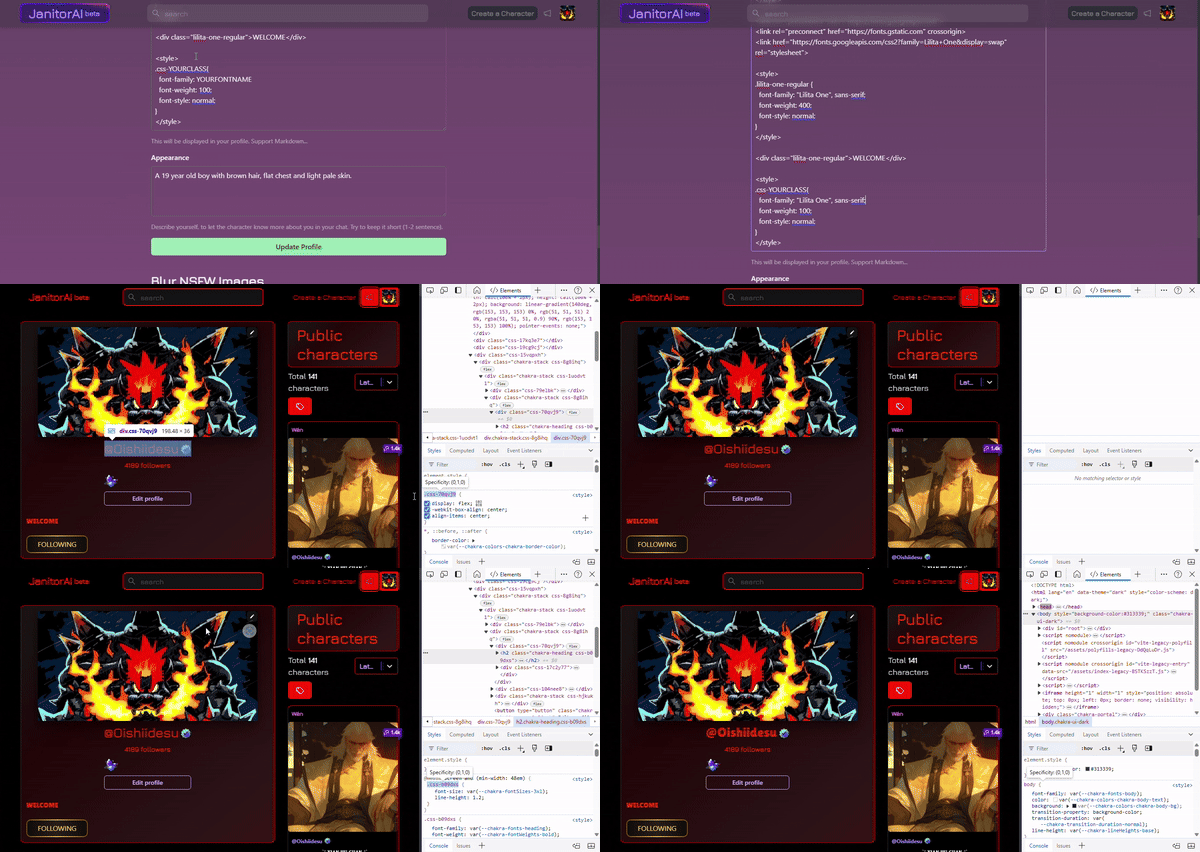 <-
<-
CHANGE JANITOR.AI FONT
<style>
.css-1ej4ex {
    font-family: "Lilita One", sans-serif;
    font-weight: var(--chakra-fontWeights-bold);
    font-size: var(--chakra-fontSizes-2xl);
    line-height: 1.33;
    color: #f70103;
    margin-bottom: 0px;
}
</style>
PSST! You have this already, we did this to change the color. Go back up and replace the font-family with your chosen font! <-
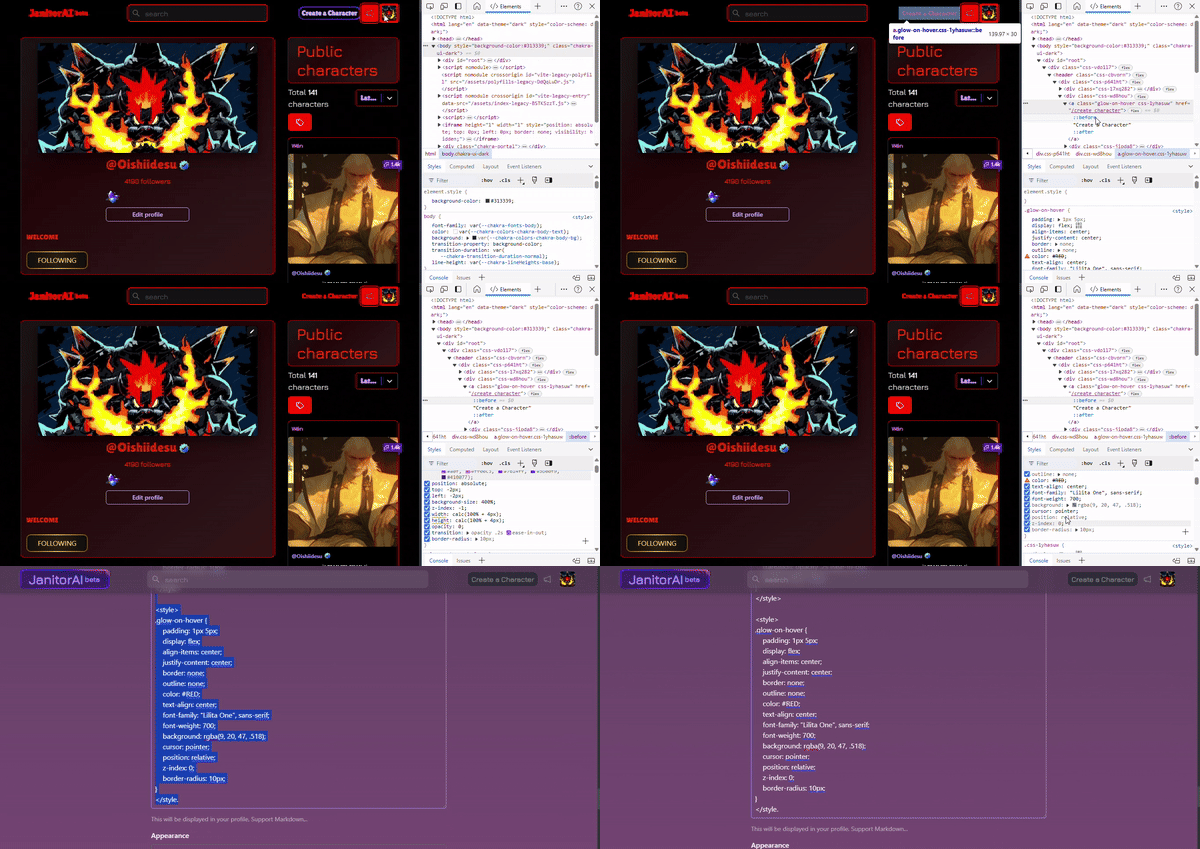
CHANGE CREATE A CHARACTER FONT
Look at the last video to see how to change everything that can be changed with fonts! Give a man a fish and he'll ask for more, teach a man to fish and... well.
CHANGE BOT CARD TOP FONT
<style>
.css-1ifv49 {
    font-size: 13px;
    display: flex;
    -webkit-box-align: center;
    align-items: center;
    font-family: "Lilita One", sans-serif;
    font-weight: var(--chakra-fontWeights-bold);
    color: rgb(245, 52, 8);
    overflow: hidden;
    text-overflow: ellipsis;
    white-space: nowrap;
}
</style>
HOW TO CHANGE THE PUBLIC CHARACTERS FONT AND WORDS
.css-YOURCLASS {
    font-family: 'FONT FAMILY';
    color: #COLOR HEX;
    text-transform: uppercase/lowercase/propercase;
    margin-inline-start: 20px;
    font-size: ANY NUMBERpx;
}
change font, size color, text style
WORKING ON FINDING THE CODE to change text
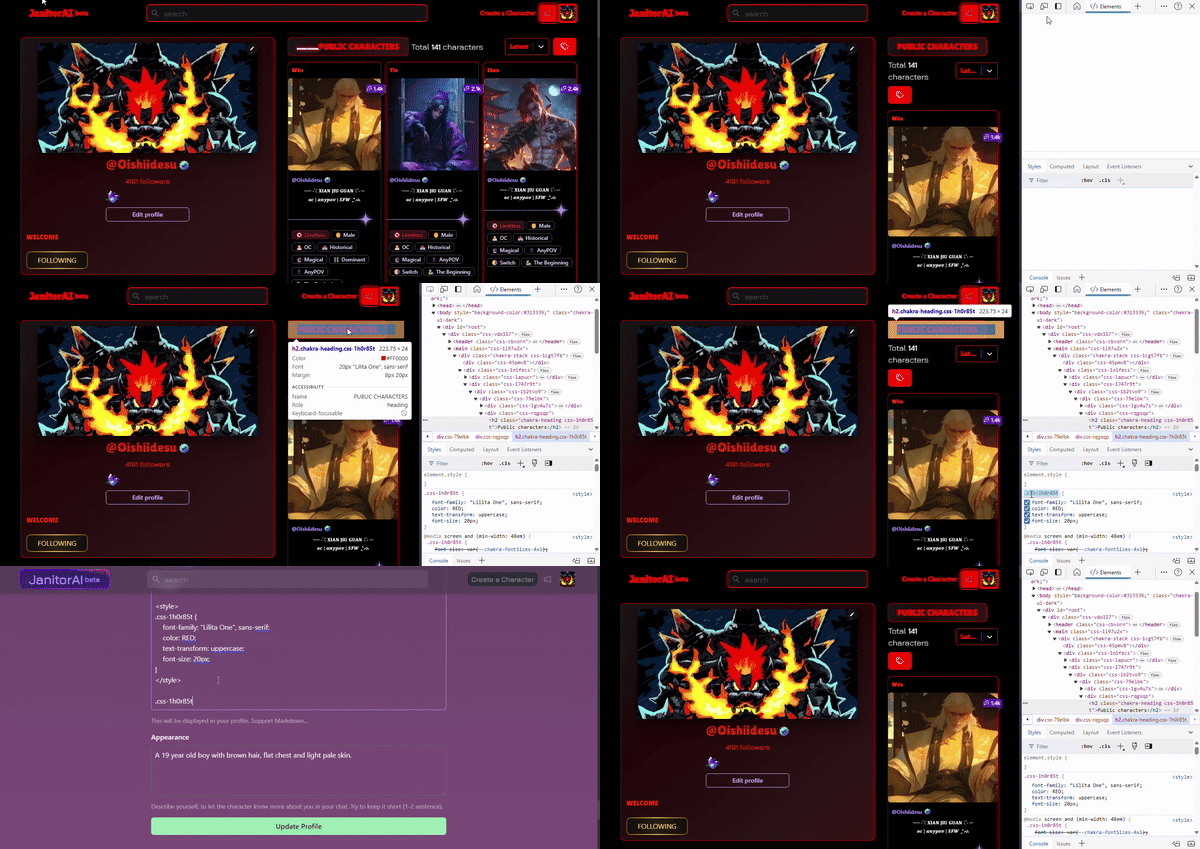
HOW TO CHANGE TOTAL CHARACTERS FONT AND COLOR
<style>
.css-YOURCLASS {
    font-family: "Lilita One", sans-serif;
    color: RED;
    font-size: var(--chakra-fontSizes-lg);
}
</style>
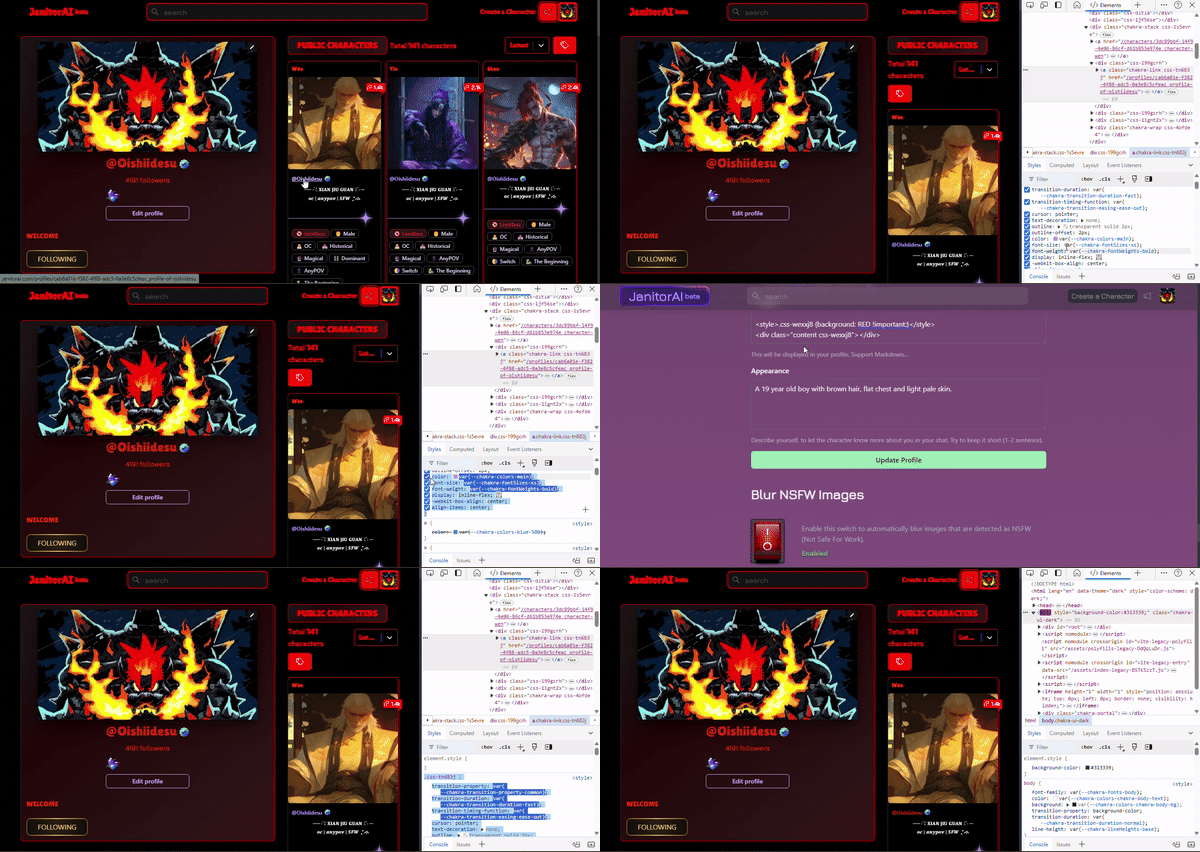
HOW TO CHANGE RIBBON COLOR
<style>.css-wexxj8 {background: RED !important;}</style>
<div class="content css-wexxj8"></div>
THIS CODE SHOULD BE UNIVERAL SO IMMEDIATE COPY AND PASTE
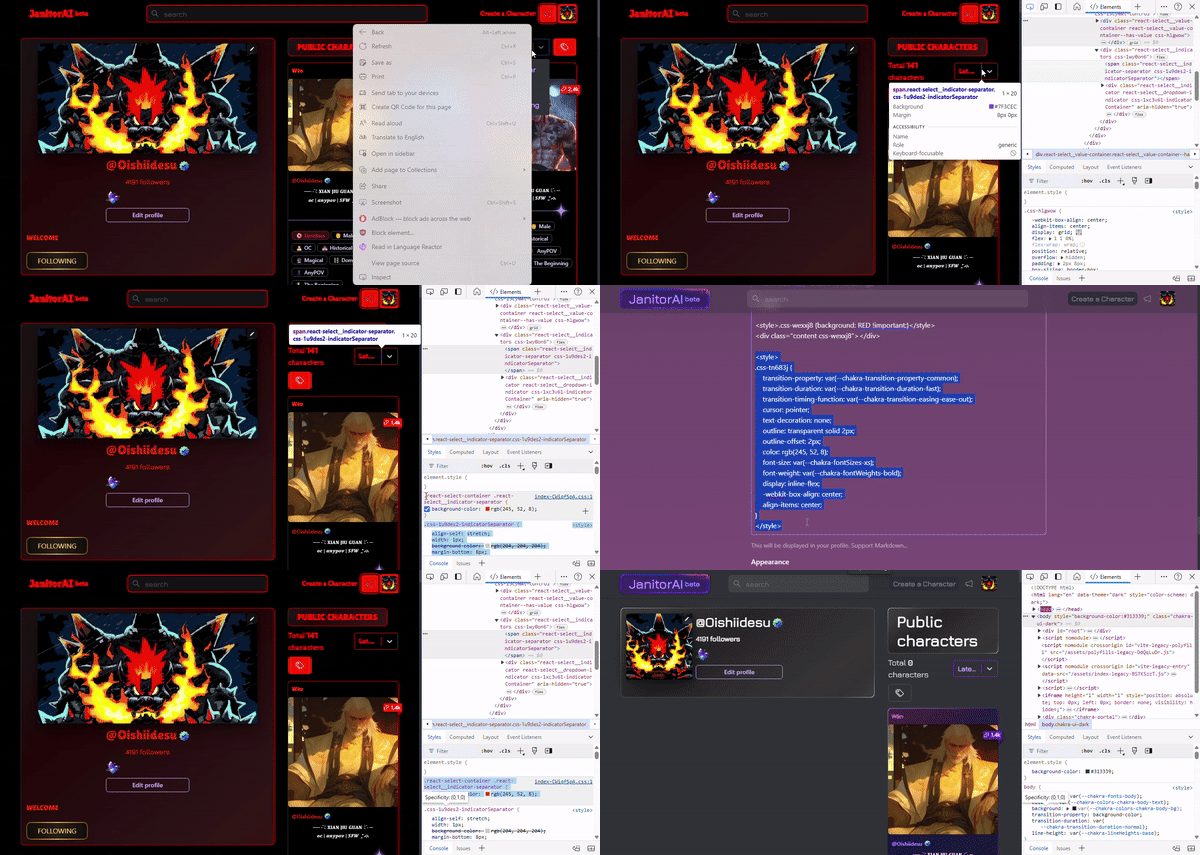
HOW TO CHANGE SMALL USER COLOR AND FONT
-> <style>
.css-YOURCLASS {
transition-property: var(--chakra-transition-property-common);
transition-duration: var(--chakra-transition-duration-fast);
transition-timing-function: var(--chakra-transition-easing-ease-out);
cursor: pointer;
text-decoration: none;
outline: transparent solid 2px;
outline-offset: 2px;
color: rgb(245, 52, 8);
font-size: var(--chakra-fontSizes-xs);
font-weight: var(--chakra-fontWeights-bold);
display: inline-flex;
-webkit-box-align: center;
align-items: center;
}
</style>
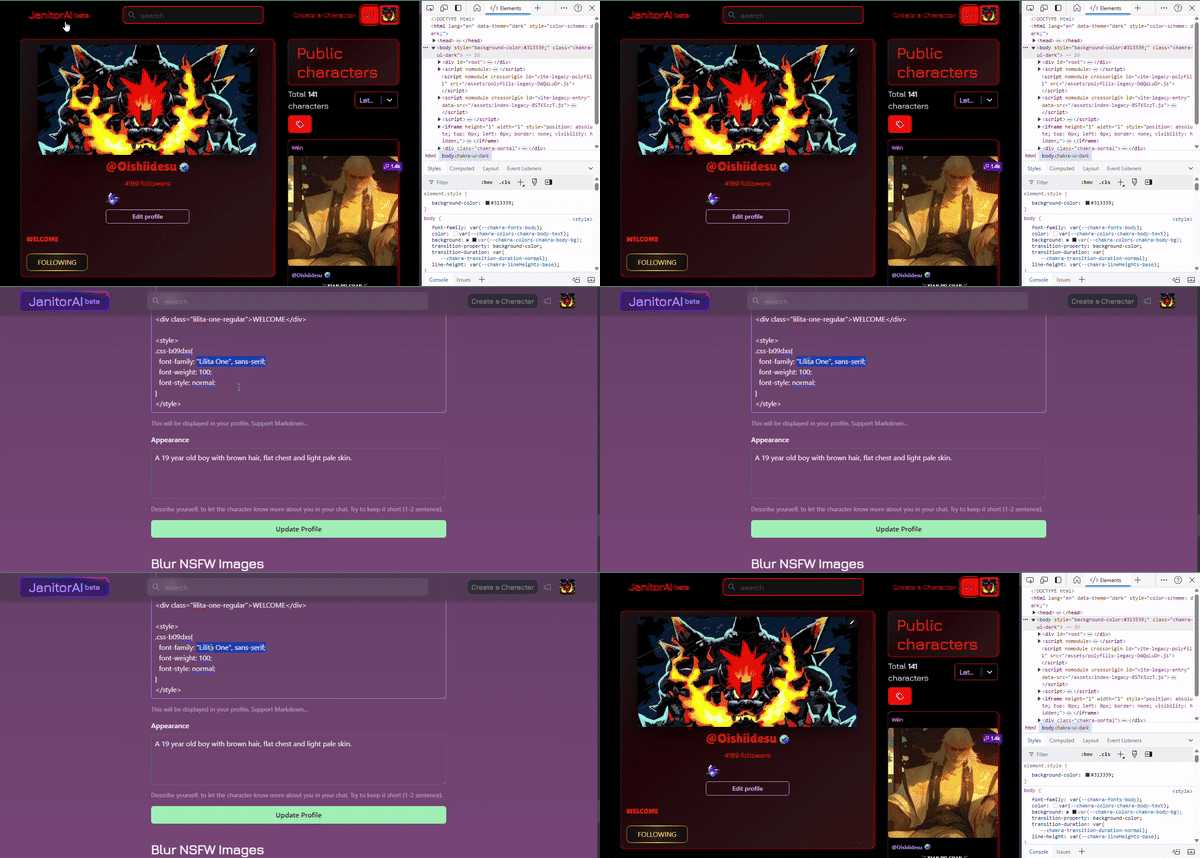
LASTLY... HOW TO FIX THIS
HERE IS HOW TO CHANGE FONTS IN THE BUILT IN INSPECT SOURCE, JUST BE SURE TO COPY AND PASTE THE STYLE INTO YOUR ABOUT ME WITH THE RIGHT <STYLE> </STYLE>!
IT'S THE END, HERE IS WHAT THE FINAL RESULT LOOKS LIKE
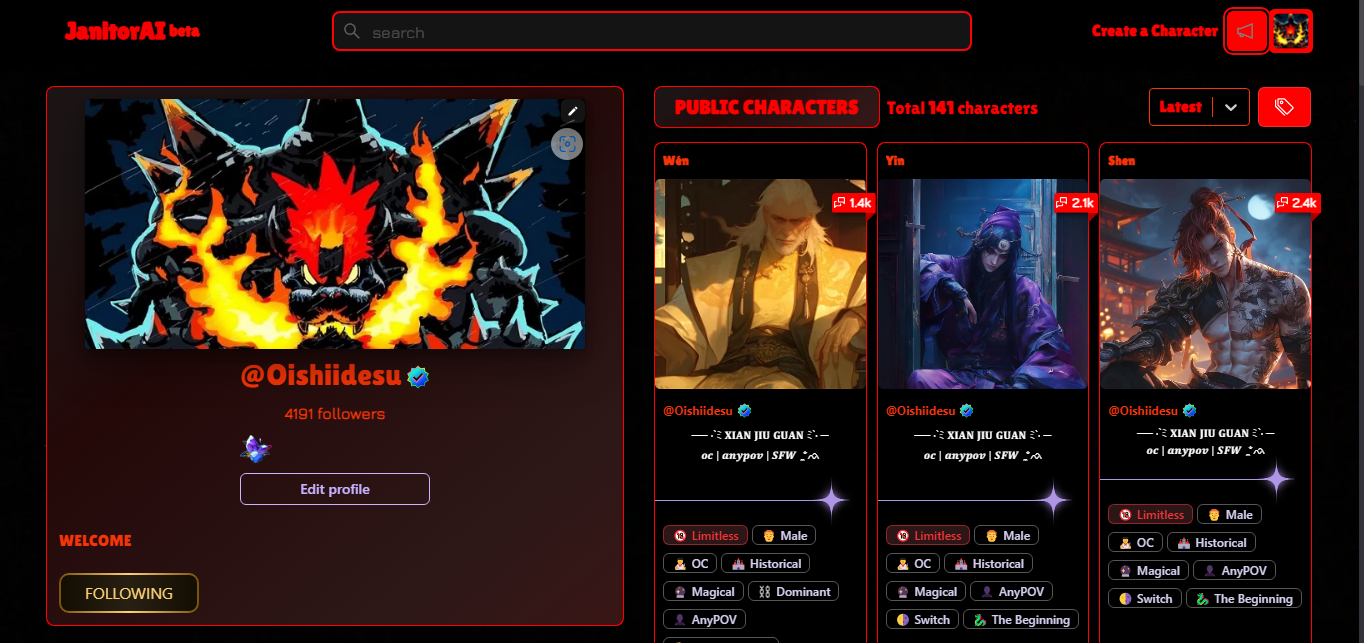
CONGRATULATIONS! You've now made a basic barebones profile. All the fancy stuff will be added beneath this later. Credits to LunaxLee and the creators for some of the codes! If you have any questions, I'm a mod at Janitor.Ai's Discord, tag me as @Oishiidesu! My Profile