Stable Diffusion Regional Prompting Guide

Welcome
One of the most frequently asked question is how to generate multiple characters with specific attributes, e.g. duos with clothing and certain body types/features with text2img. SDXL based models have basically no tag context, so it is very random what attribute tag will be assigned to which char and the models do have a lot of bias' in this regard as well.
Regional Prompting is a method to split the empty image into multiple regions and apply specific text prompts to these regions in combination with one common prompt during the generation process.
You will see that this has a lot of limitations, so while it can still be used the more reliable way to get the result you want is to use inpainting.
As usual this guide is eternally WIP.


Introduction
Regional Prompting is the process of defining certain areas aka regions and assigning specific prompts to them. On first glance this looks like the magic bullet to all your custom character or scene definition woes, but it does come with (a lot of) limitations as well.
Regional Prompter vs Forge Couple
Currently the following two extensions are recommended for regional prompting in (re)Forge:
- Regional prompter
is the popular "original" extension developed for A111 and updated for Forge/reForge. - Forge Couple
is a newer extension originally developed for Forge that also works with reForge (and now also with A1111).
Both are not included by default and must be installed via the "Extensions" tab first.
Which one should you use? Forge Couple has the better region setup but messes with your prompt fields, Regional prompter is a bit more convoluted but has more options. Sometimes one or the other is not working due to version incompatibilities so it is good to know how both work. Both have the same general limitations e.g. with tag limits or how well the model will follow the regional prompts.
TLDR
Use Forge Couple, its a more recent implementation and the user interface is nicer, plus it seems it has more tolerance for parts that cross region borders.
Occasionally check for updates for your extensions as there might be bug fixes!
For the examples in this guide we will use the following settings:
| Type | Value |
|---|---|
| Model | Nova Furry XL - Illustrious 4.0 |
| Sampling method | Euler a |
| Schedule type | SGM Uniform |
| Steps | 28 |
| Width | 1152 |
| Height | 896 |
| CFG | 4 |

Prompts considerations
For this to work your prompts will be split up:
- All tags that are applied to the whole image during the generation process
This is called "common prompt" in Regional Prompter, in Forge Couple it is referred to as "Global Effect" but there is a different functionality that is called common prompt! Thanks, devs! - Region specific prompts: these prompts are only applied to the region they are assigned to
While it can work quite well on simple setups, img2img or for setting up a better basegen for inpaiting, you cannot really force the models to do things they don't want to do or don't know/understand. The Forge Couple devs put it quite well:
The defined regions are more like "suggestions" rather than strict boundaries. Don't expect the results to follow the regions with pixel-perfect precision. Additionally, the effectiveness of this Extension depends on how well the Checkpoint follows to the prompt. If the Checkpoint doesn't understand the composition, it won't generate the desired result accurately.
The common prompt still is important in defining the overall image composition and must fit what you want to do in your regions. For example, if you want to generate two different characters your common prompt must contain appropriate tags like duo or 2girls etc, otherwise you may still receive solo gens.
You can test without using regional prompting if your model does understand what you are trying to do at all. If you want a scene with three characters flying in the air side by side but the model does not "know" how to construct such a scene, it will not do so regardless of your regions.

Forge Coupe - Advanced Mode
Huh?
Wait a moment, what about Basic Mode? Just don't use it. In basic mode the regions are automatically created depending on how many lines your prompt field has. The advanced mode is so simple to use and much clearer to understand, so we will skip basic mode.
Enabling Forge Couple will reformat/wipe your prompt field! The first line of your prompt will be the common prompt part and each following line will be assigned to one region. After Forge Couple is activated it is easier to edit the prompt in the mapping table instead.

Forge Couple - Example 1
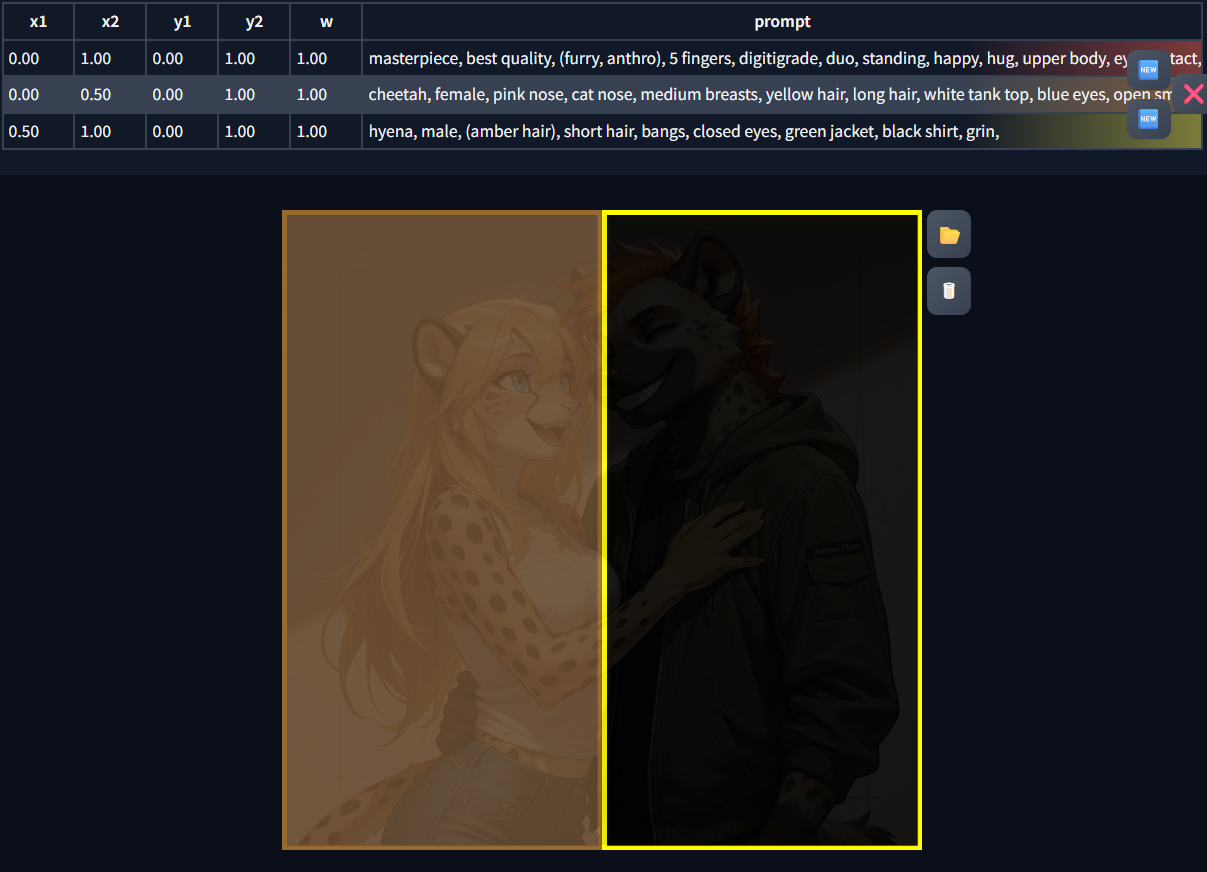
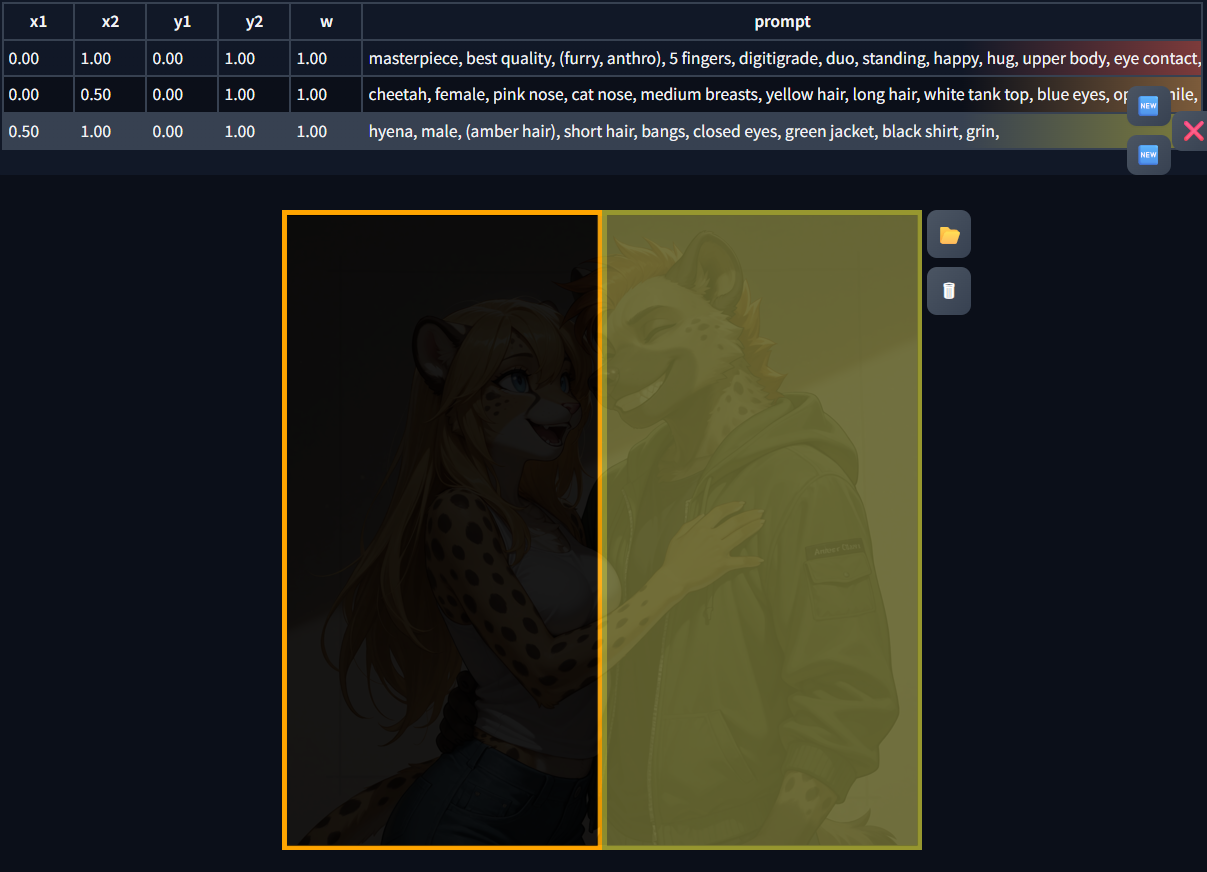
Let's start with the easiest example, two characters side by side. This will require three regions, set them up as follows (Video):
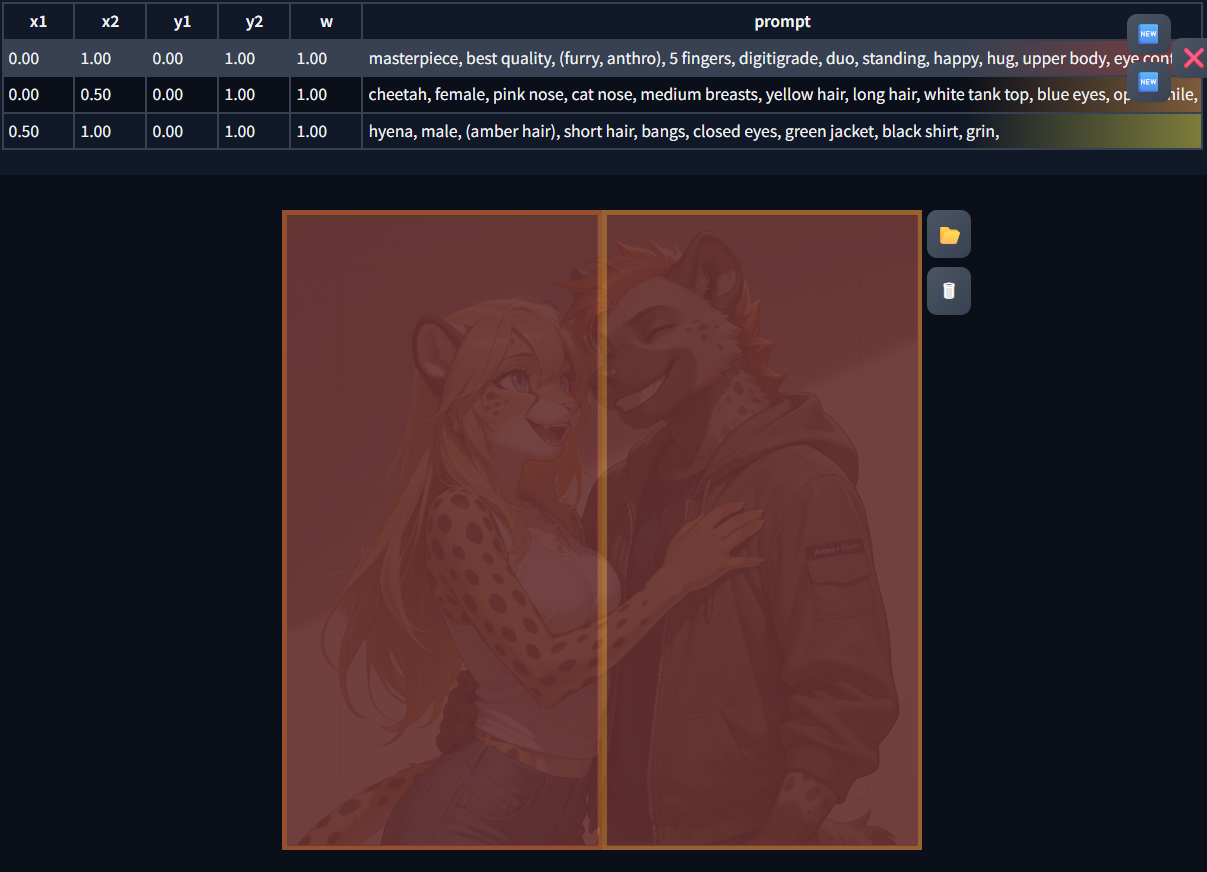
Open the Forge Couple extension, click the "Enable" and "Compatibility" checkbox. Select the "Advanced" option in the Region Assignment section, this will enable the region editor. By default only two regions are created, for our first example we will need a third one, so select the second existing line in the prompt mapping table and click on the blue "Add new row below" button that appears. Selecting a line in the table will highlight the associated region which you then can easily drag and resize each region with your mouse.

- Select the first line and resize the region to fill the whole area
- Select the second line, move the region to the left side of the area and keep it at about half the total width
- Select the third line (our newly created region), drag it to the right side and resize it to fill the full height and half the total width

Then use the prompt table to add the following prompts:
masterpiece, best quality, (furry, anthro), 5 fingers, digitigrade, duo, standing, happy, hug, upper body, eye contact, side by side
cheetah, female, pink nose, cat nose, medium breasts, yellow hair, long hair, white tank top, blue eyes, open smile
hyena, male, (amber hair), short hair, bangs, closed eyes, green jacket, black shirt, grin

Generate a few images. Here is a cherry picked upscaled result that has metadata:

| Common | Region 1 | Region 2 |
|---|---|---|
 |
 |
 |
As you can see with this example we put all tags that define the general setup of the scene as well as some tags that should apply to all regions in the first line, the "common prompt". For simplification you can think of the common prompt to be added to the prompts of each region as well, so if e.g. all your characters are the same species and male, you can add those tags to the common prompt as well instead of each region individually.
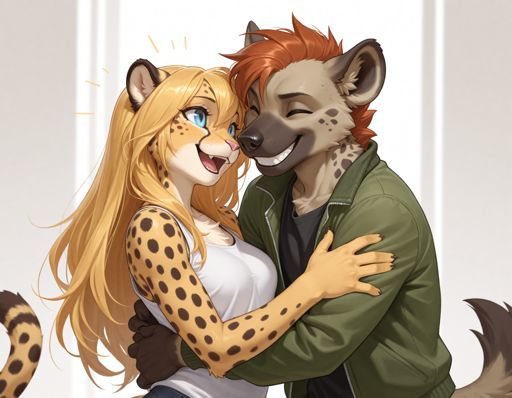
You will find that there is still some randomness and sometimes if the characters/features generated are too far outside their region something called "tag bleed", which means it will partially receive tags from the other region instead. There is some leeway, as you can see in this example arms stretching across the regions usually keep the traits of their "origin", but how well this works is different case by case. All in all remember the words from the introduction, regional prompts are just "suggestions" the models may follow or may ignore. The bias' of the model can overwrite any suggestion you give it.

Forge Couple - Example 2
Now you are probably asking yourself "how many regions can I use?". Forge Couple lets you create a lot, but it's effectiveness rapidly declines. There are two major issues with regional prompting:
- Each region costs additional "brain power" from the model. If you add many regions you will notice that the overall quality of details in all regions will begin to deteriorate as it tries to accommodate everything
- If you try to define a lot of regions you will quickly accumulate a lot of tags, which leads to the usual problems with high tag count prompts. Models usually have a limit of tags they can handle and the closer you get to this limit the less effective your prompt gets
For this example set up the following five regions and prompts:
masterpiece, best quality, (furry, anthro), furgonomics, duo, dungeon, doorway
(furred kobold), red body, digitigrade, female, rear view, grin, holding dagger, leather armor, fantasy clothes, looking back, leather pants
bear, brown fur, male, plantigrade, knight armor, side view, holding sword, holding shield, serious, annoyed
burning candle
burning candle

Let's first disable Forge Couple and see what we get without regional prompting. You can easily see what the model will do for the "dungeon, doorway" part, but the character features are all mashed together (plantigrade/digitigrade, armor, facial expressions, tails, etc.).


Alright, enable Forge Couple and generate again. Much better!


Now swap the lines of the characters. In this example you will immediately see that even on same seed the image changes dramatically, showing that even with regional prompting any change to the overall prompt can have a big influence on the generated image. Also the model has a bias to show any character with "rear_view" in the foreground.


To show how another seemingly little change can majorly change the gen, replace the "burning candle" in the fourth (green) region with "wanted sign". For the model used "burning candle" is a tag that it strongly associates with "dungeon", so while it did create the sign it still kept the candle around cause it wanted to.


How flexible is the whole regional prompting? Replace the "burning candle" in the fourth (green) line with "spaceship, galaxy" and the fifth (blue) line with "floodlight".


What does this tell us? While regional prompting on text2img can help, it is subject to the same randomness and bias of the models. If you try to prompt for things that do not fit what the model associates with the general scene it will be very unlikely to create them in a region.

Forge Couple - Mask Mode
In my experience Mask Mode has an issue when your display and/or browser scaling setting is not at 100%. I initially tested on a screen with 125% and later a browser with 80% scaling and the drawing canvas was failing on both Forge and reForge with different issues. Doing all on a screen with 100% scaling it worked as expected!
Mask mode works very similar to Advanced mode with the difference that you will draw the regions onto a canvas. This allows you to freeform them into any shape you want instead of the strictly rectangular ones. Be aware that you cannot really force the model to create a character in a certain pose/at a certain location that way! Remember, regions are just suggestions, if the current generation does not fit your masks they will be (mostly) ignored!
One difference is that you don't need a mask for the common prompt. When switching to Mask mode you will see a new option "Global Effect", select the "First Line" option to make the first line in your prompt your common prompt.
The Mask Canvas that you draw the regions on scales to the ratio that you have set in your base generation config, should you change these settings you may need to click on "Create Empty Canvas" for it to adapt to the new settings. This will not reset any regions already saved, there is a separate "Reset All Masks" further down below for that.
Draw only in full white color, other colors will be ignored but may have strange side effects!
To edit a saved mask, click on the preview image in front of the desired masks line and click on "Load Mask". To save it you must click "Override Mask", "Save Mask" creates another new mask at the end of the list!
Forge Couple - Example 3
Just to show the difference let's rebuild Example 1 in Mask mode.
Reuse the prompt:
masterpiece, best quality, (furry, anthro), 5 fingers, digitigrade, duo, standing, happy, hug, upper body, eye contact, side by side
cheetah, female, pink nose, cat nose, medium breasts, yellow hair, long hair, white tank top, blue eyes, open smile
hyena, male, (amber hair), short hair, bangs, closed eyes, green jacket, black shirt, grin
Switch the "Region Assignment" to "Mask", and the "Global Effect" to "First Line". Instead of the area where you could drag the rectangular region boxes you will see a Mask Canvas that works similiar to the inpaint tab. For our example we just need to draw two regions that cover roughly half of each side of the canvas. Video

Your resulting "Mask Layers" list should look like this:

Enable Forge Couple and generate a few images to make sure it works. Here is a cherry picked example with metadata:


⬆️⬆️⬆️To the top⬆️⬆️⬆️

Regional Prompter - Matrix mode
Matrix mode in RP is similar to Advanced Mode in Forge Couple but no cool drag and drop editor
Regions can be separated in two ways, the "classic" way is the BREAK tag. New way is ADDCOM, ADDCOL. Both work for this example we will use the commonly used BREAK tag way.

Regional Prompter - Example 1
Let's start with the easiest example, two characters side by side. This will require only two regions.
Expand the "Regional Prompter" extension and set up the following options:
- Enable "use common prompt"
- Disable "use common negative prompt"
- Make sure "Main Splitting" mode is set to "Columns"
- Set the Width and Height to the same dimension as your main generation options for easier visualization
- Set "Divide Ratio" to "1,1", click on "visualize and make template" to verify that the regions are split 50/50

Then use this prompt:
masterpiece, best quality
(furry, anthro), 5 fingers, digitigrade, duo
standing, happy, hug, upper body, eye contact, side by side
BREAK
cheetah, female, pink nose, cat nose, medium breasts, yellow hair, long hair, white tank top, blue eyes, open smile, clothed
BREAK
hyena, male, (amber hair), short hair, bangs, closed eyes, green jacket, black shirt, grin

Generate a few images. Here is a cherry picked upscaled result that has metadata:


Regional Prompter - Example 2a
Warning! Warning! Warning!
This example is just to show you that overdoing the amount of regions with RP Matrix mode doesn't work! Just in case you were curious ...
Trying to set up a more complex arrangement of regions is not very user friendly with Regional Prompter Matrix Mode. It does not support overlapping regions, so you will have to define a fine matrix of regions. The "visualize" button can help you to see if you are on the right path. The Github has some examples, but let's try to build the same setup that we had for the second Forge Couple example.
You will not like it.
1,0.2,0.4,0.2;3,0.1,0.1,0.1,0.1;4,0.5,0.5
In 2D Matrix Mode the ";" separates (in this example) the rows, and the first number in each section defines the ratio of this row to the other rows. Lets take it apart into three lines to make it easier to understand.
The first row will contain three columns, two smaller ones (0.2) for the region of "burning candle", and the middle one which will be empty in this case. We will start the first row with a "row ratio" of 1 and set a larger one for the others:
1, 0.2, 0.4, 0.2;
The second row will contain four columns, two on the outside (0.1) which will contiune the region for the "burning candle", and two that will be a region for the two characters (also 0.1). We ratio this row higher (3) as it will cover about a third of the image.
3, 0.1, 0.1, 0.1, 0.1;
The third row will just contain two equally wide regions for the characters (0.5) and will have a again higher ratio as this will be the largest row (4)
4, 0.5, 0.5
So stick them all together into the "Divide Ratio" (make sure splitting mode is still on "Columns") and click on the visualize button. It should look like this:

And add this monstrous prompt:
masterpiece, best quality, (furry, anthro), 5 fingers, digitigrade, duo, dungeon, doorway
BREAK
burning candle
BREAKBREAK
burning candle
BREAK
burning candle
BREAK
(furred kobold), red body, digitigrade female, rear view, grin, holding dagger, leather armor, fantasy clothes, looking back, leather pants
BREAK
bear, brown fur, male, plantigrade, knight armor, side view, holding sword, holding shield, serious, annoyed
BREAK
burning candle
BREAK
(furred kobold), red body, digitigrade female, rear view, grin, holding dagger, leather armor, fantasy clothes, looking back, leather pants
BREAK
bear, brown fur, male, plantigrade, knight armor, side view, holding sword, holding shield, serious, annoyed

But as you will see, it doesn't work. If you disable Regional Prompter you will see the usual bleeding, but even with it turned on it sometimes seems to apply some tags, but if you remove the newlines or not, it will not properly apply all the regions.


Regional Prompter - Example 2b
Luckily with the regions only being suggestions and the overall bias of the model taking care of the details for this specific example you can use a much simpler region divide ratio and it will still work.
Set it to
0.1,0.4,0.4,0.1

and use the adapted prompt
masterpiece, best quality, (furry, anthro), 5 fingers, digitigrade, duo, dungeon, doorway
BREAK
burning candle
BREAK
(furred kobold), red body, digitigrade female, rear view, grin, holding dagger, leather armor, fantasy clothes, looking back, leather pants
BREAK
bear, brown fur, male, plantigrade, knight armor, side view, holding sword, holding shield, serious, annoyed
BREAK
burning candle
Generate a few images. Here is a cherry picked example with metadata:

To verify that the two outer small regions work at all, replace the first "burning candle" with "wanted poster" and the second one with "metal chain"


Regional Prompter - Mask Mode
Mask mode works very similar to Matrix mode with the difference that you will draw the regions onto a canvas. This allows you to freeform them into any shape you want instead of the strictly rectangular ones. Be aware that you cannot really force the model to create a character in a certain pose/at a certain location that way! Remember, regions are just suggestions, if the current generation does not fit your masks they will be (mostly) ignored!

Regional Prompter - Example 3
Let's redo the first example in Mask mode. Copy the prompts, then switch Regional Prompter to "Mask mode". Here is a short video visualizing the following steps: Video
- Set the "Inpaint+ Width" and "Inpaint+ Height" to the same dimensions as your basegen, otherwise undesired effects can occur.
- Click on "Create mask" to generate a white drawing canvas to draw the masks on
- Draw the first mask covering slightly more than the left half of the canvas
- Click on "Draw region + show mask" to save your mask for the first region
- Draw the second mask covering slightly more than the right half of the canvas
- Click on "Draw region + show mask" again to save your second mask
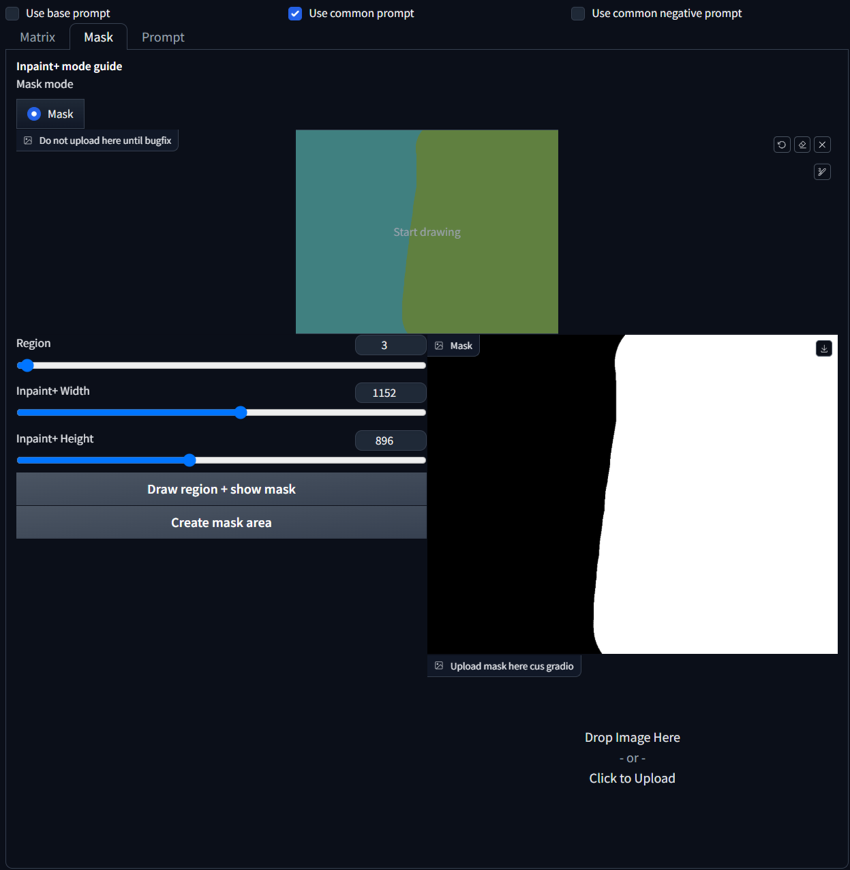
Generate a few images. Here is a cherry picked example with metadata:

⬆️⬆️⬆️To the top⬆️⬆️⬆️

Older guide
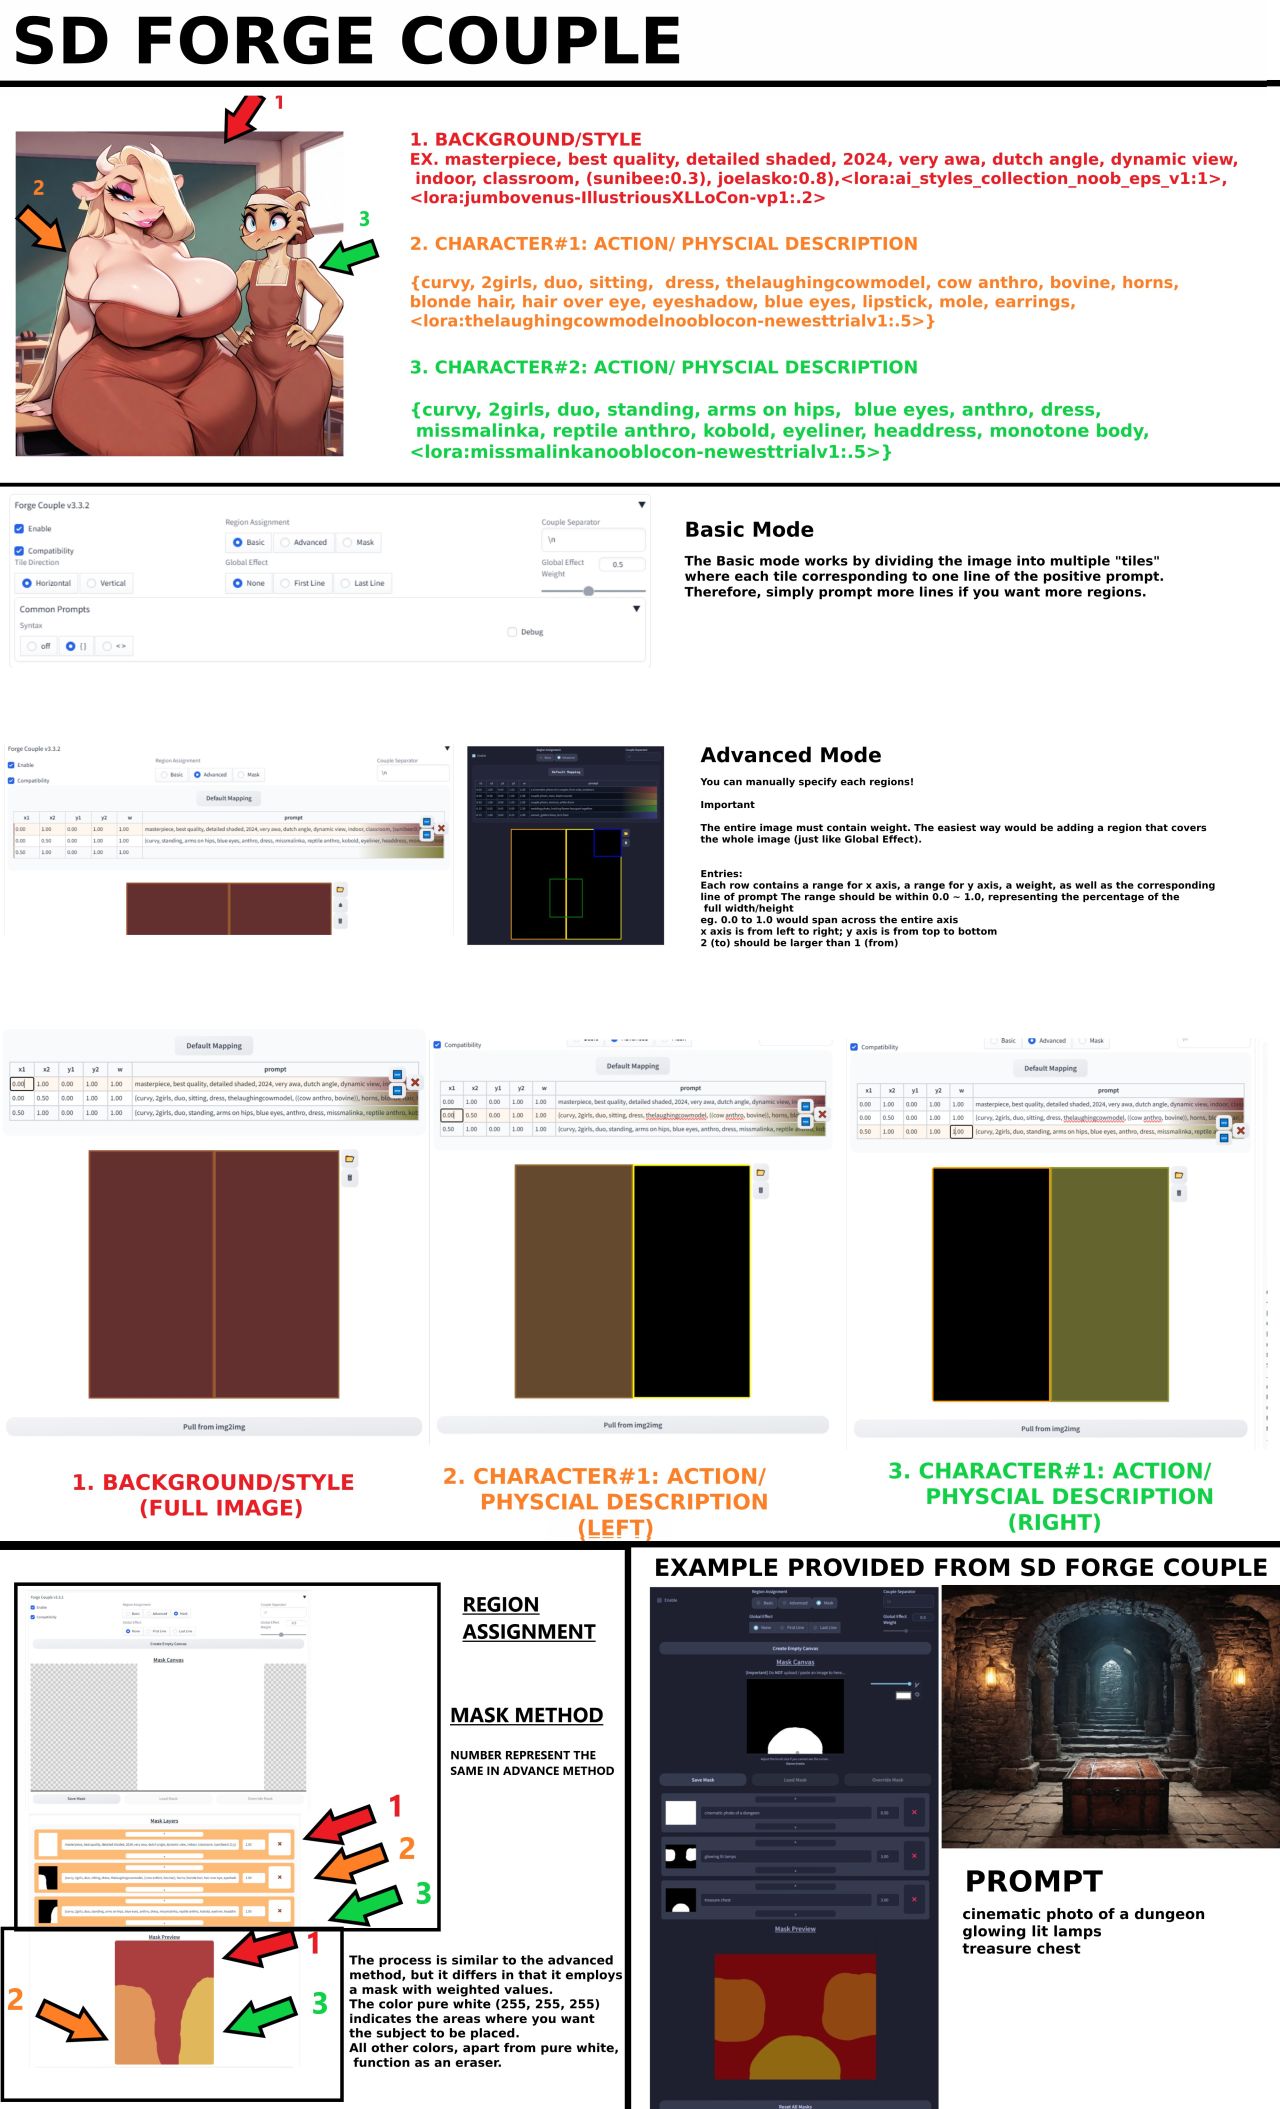
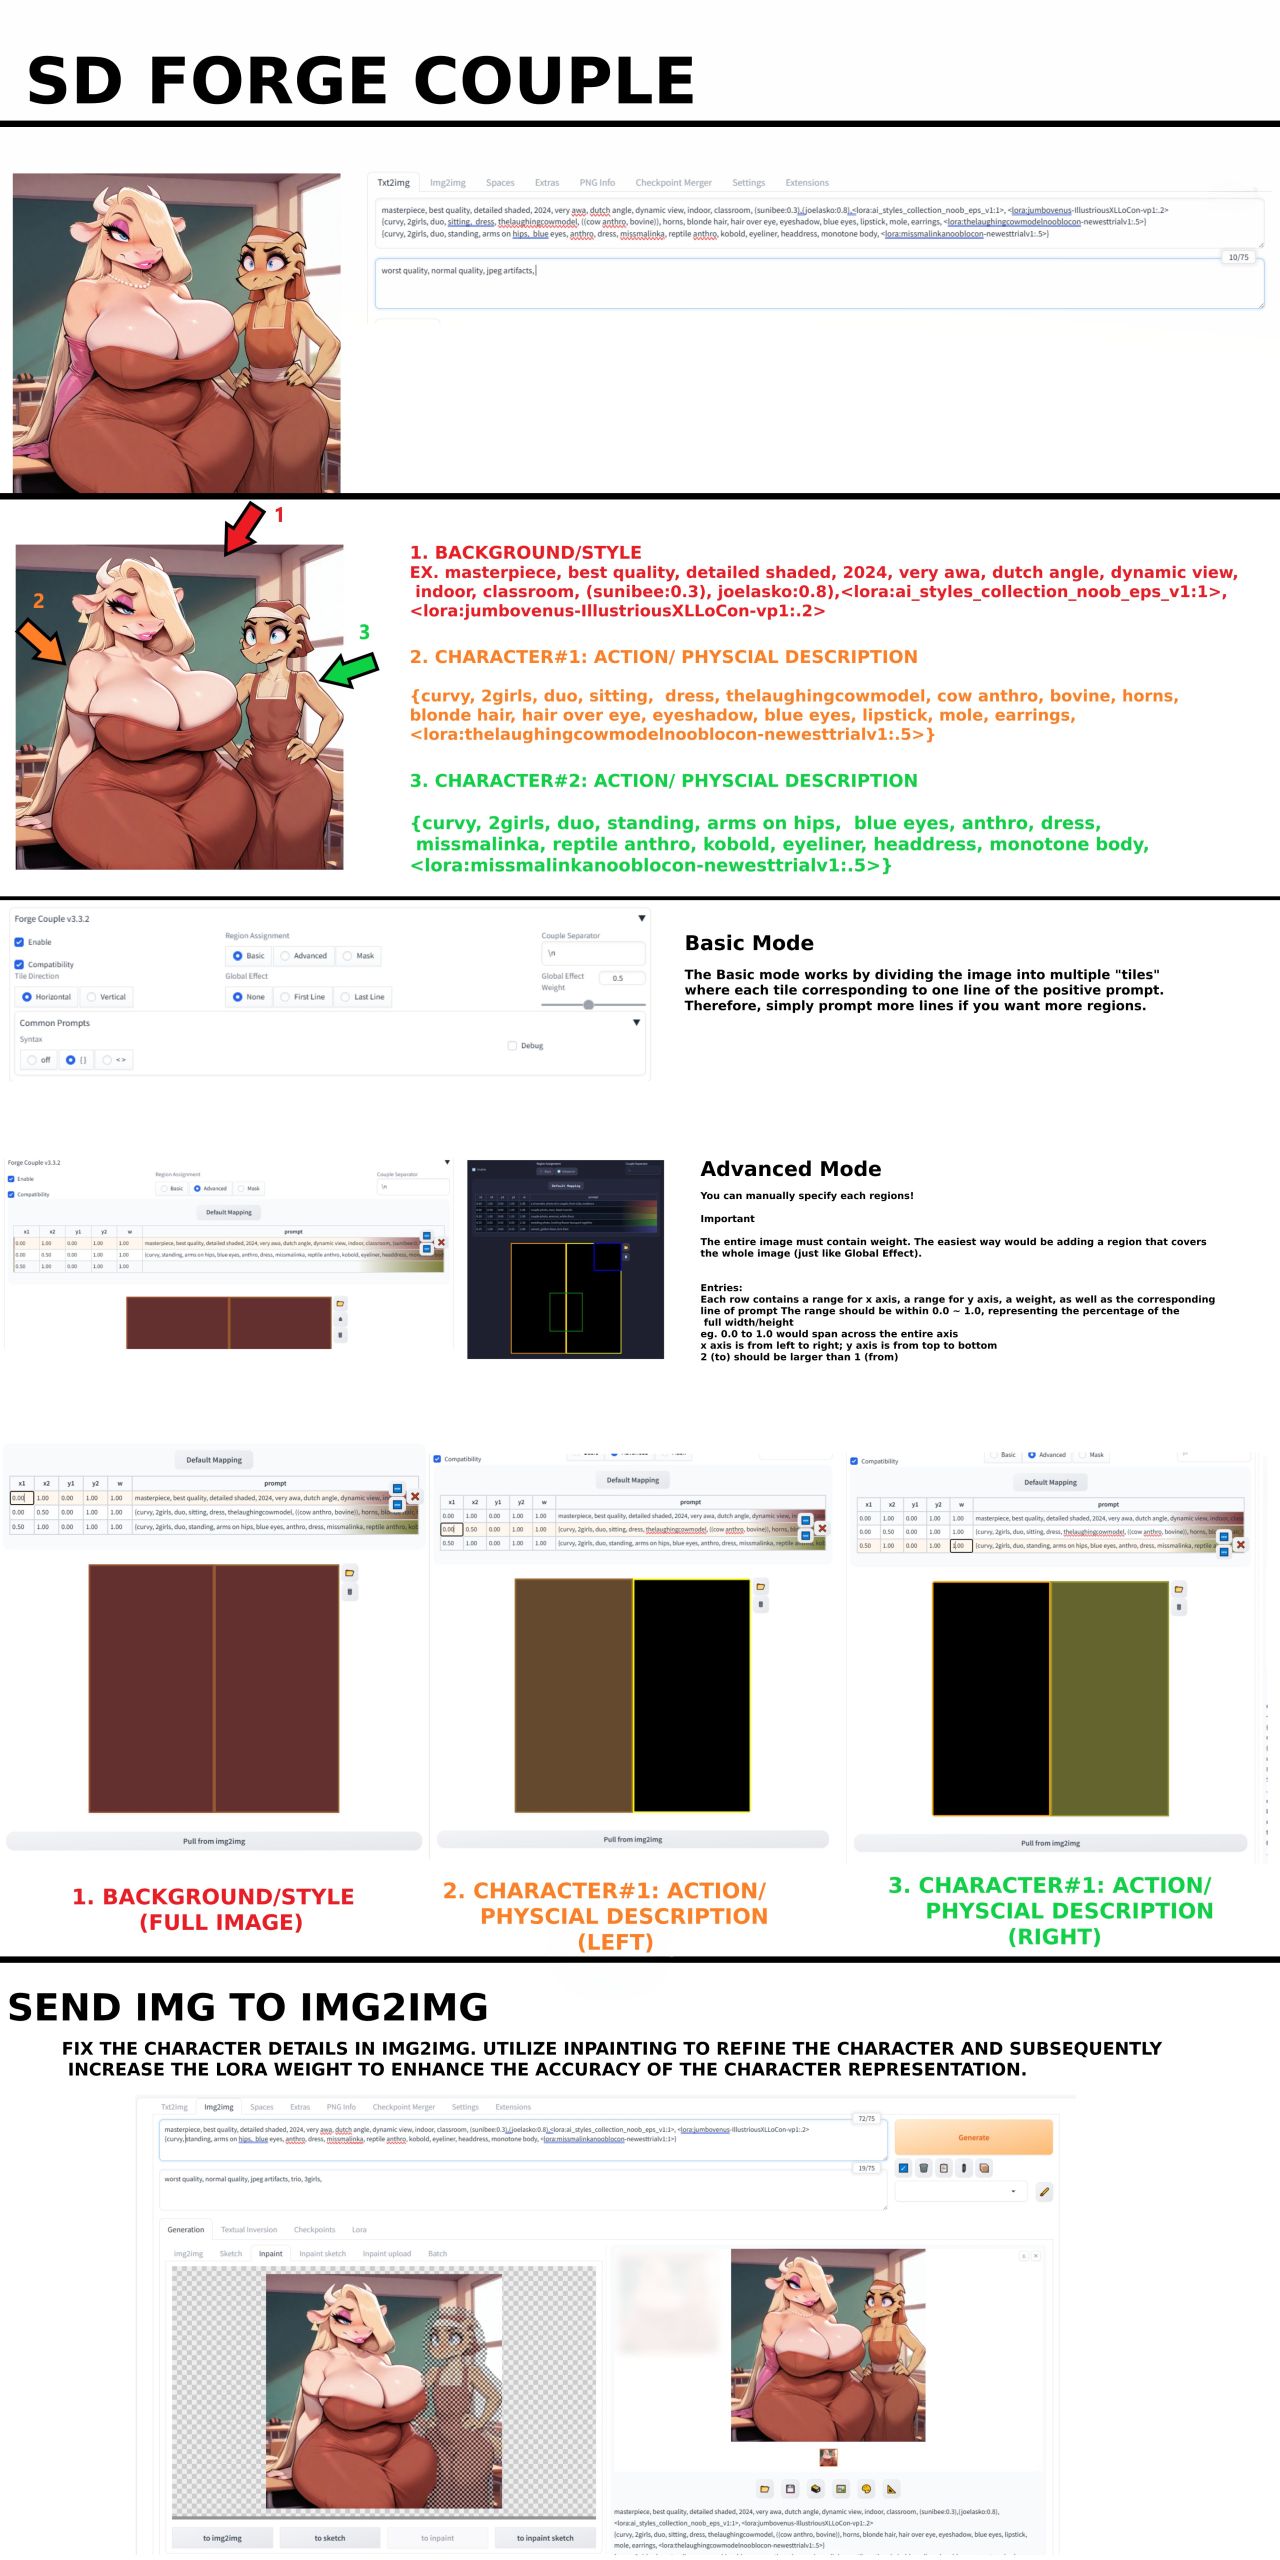
These two guides were posted by another anon a long time ago, and they contain some mistakes, e.g. the {} work differently than shown here, and using specific LoRas in regions only works under certain circumstances. Nevertheless I will keep them here for posterity.

⬆️⬆️⬆️ To the top ⬆️⬆️⬆️

Xeno443
