Spaghetti Spyro Framework Guide - Creating Classic-Style Spyro & Crash Fangames
- Hardware Requirements
- Downloading Unreal Engine 4.27
- Downloading Spaghetti Spyro Framework
- Getting Started
- Getting Started - Crash
- Using Modular Blocks to Create Levels and Block-outs
- Creating Level Blockout Using BSP Brushes
- Tips & Tutorials for Creating the Level in Blender
- The Adventure Template
- Level Import and Set-up
- Customizing the Adventure
- Advanced
- Music
- Asset Index
- Tips
Hardware Requirements
- Any CPU from or newer:
- Intel i3 2000 Series
- AMD FX 6000 Series/Ryzen 3 1000 Series
- 8GB RAM
- Any GPU from or newer:
- NVIDIA GTX 900 Series
- AMD HD 7000 Series
- Intel Arc A Series
🛈 Any modern APU/laptop processor (2018+) should also work fine
- 30GB of disk space
Downloading Unreal Engine 4.27
- Download Epic Games Store - https://store.epicgames.com/
- Launch EGS and click on Unreal Engine tab
- Head to Library tab
- Click the + next to Engine Versions
- From dropdown menu choose 4.27.2
- Click Install
- (Optional) Reduce Unreal Engine's install size by 20GB:
- Click Options
- Uncheck Android, IOS and Linux under Target Platforms
- 🛈 You can install these build files later if you want to compile your fangame for other devices
- Click Apply
- Click Install
Downloading Spaghetti Spyro Framework
Main branch by Bunbaroness - If you want to make solo Spyro games:
- Download the UE4.27 Source Project {date-and-time-here}.zip from this link:
- https://drive.google.com/drive/folders/1IV8n-DEH9qD92nHu3InQJuvSf7f6bqxs
Spaghetti Spyro Orange fork by qtderg - If you want to make Spyro/Crash crossovers and/or solo Crash games:
- Download the Spaghetti Spyro Orange {date-here}.7z from this link:
- https://drive.proton.me/urls/AADZJPMHMC#ekK6JvR76IrR
- You can track the project progress here - https://trello.com/b/DH80koGe/spaghetti-spyro-orange
- Extract the archive in the root of your drive to avoid troubles with Windows' maximum file path length
- Run Spyro_Bunnited.uproject
Getting Started
Info
The Community Remaster of Original Trilogy is a perfect first project for people wanting to dive into Spaghetti Spyro. Learn more here - https://rentry.co/SpyroOTCR
Locations of important Blueprints
Tip
Add these folders to favourites for quick access. Right click -> Add to favourites
| Spyro | SpyroContent\Global_Assets\Global_Characters\Playable_Characters\Spyro |
|---|---|
| Gems | SpyroContent\Global_Assets\Global_Level_Items\Gems\Actors\Child_Actors |
| Treasure Containers | SpyroContent\Global_Assets\Global_Level_Items\Treasure_Containers |
| NPCs | SpyroContent\Global_Assets\Global_Characters\NPCs |
| Fodder | SpyroContent\Global_Assets\Global_Characters\AI_Characters\Actors\Fodder |
| Enemies | SpyroContent\Global_Assets\Global_Characters\AI_Characters\Actors\Enemies |
| SpyroContent\CiC_Assets\CiC_Characters\Pony_Soldiers\Actors | |
| Portals | SpyroContent\Global_Assets\Global_Level_Items\Portals |
| Fairies (they give powers like Superflame or Superfly) | SpyroContent\Global_Assets\Global_Characters\NPCs\Fairies |
Global_Level_Items folder also contains other useful things such as Whirlwind/Hurlwind, Banana Plants, Black Portals or Blue Star (which gives boost when Spyro is superflying)
Tip
If you don't know where the blueprint is located, just type it's name in the Search Content bar

Gems
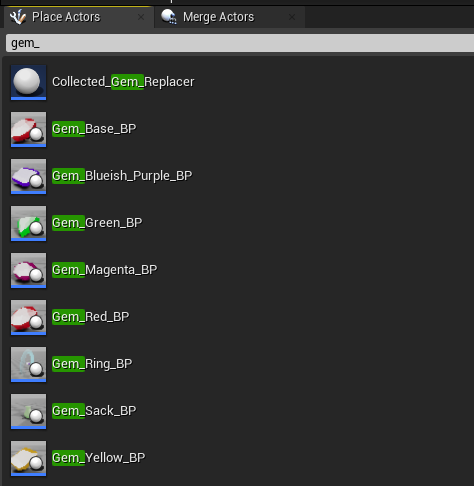
Tip: Type "gem_" inside Search Classes text field near top left corner. It'll let you quickly place gems on the map
Treasure Containers
General
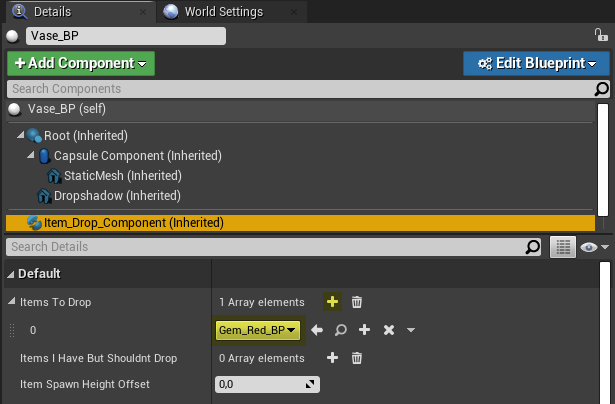
- Under green + Add Component button, scroll down and click on Item_Drop_Component
- Items To Drop is an array defining which items are inside treasure container
- You can choose a different gem with a dropdown menu
- If you want to add more items, click a + near 1 Array elements
Spring Chests
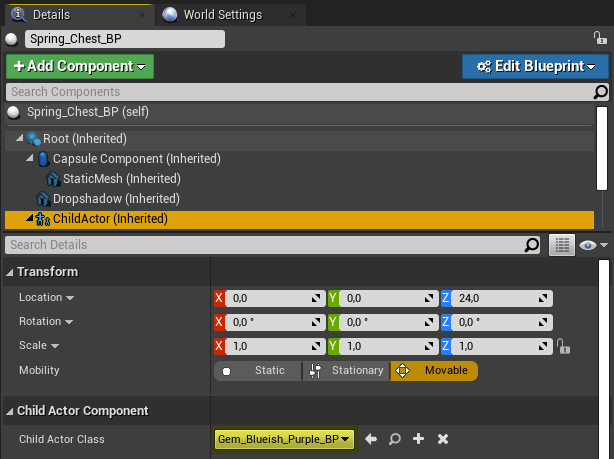
- Select ChildActor Component
- In the Child Actor Class select the gem blueprint
Locked Chests
- Location - (Treasure_Containers\Locked_Chest\Actors)
- Place both Locked_Chest_BP and BP_Key in the level
Mystery Vases
- Place at least two of Mystery_Vase_BP actors on the scene
- Pick the appropriate vases in Next/Previous Mystery Vase variables
- Example setup of 3 mystery vases:
- First:

- Second:

- Third:

- First:
Portals
- My Level - the name of level portal leads to
- Leads To Level - pick the level asset here
- Skybox Mesh - a Static Mesh of your skybox
- Skybox Transform - set skybox transform to different Z values only! Portal transitions will look very wonky if you don't do this. For example:
X 0 Y 0 Z 60000 - Incoming Levels Origin - this controls where Spyro arrives in the level. However, the official recommendation is to leave this variable at default value of X 0 Y 0 Z 0. Look at Advanced section for details
- Required Primary Collectables - Number of primary collectables (candles, eggs, orbs) required to enter the level
Return Home Portals
- My Level - set the current level name here
- Leads To Level - pick the home world level asset here
- Return Home Skybox Transform and Skybox Transform - set to same value as Skybox Transform on portal leading to the level
Thieves
- Spline path:
- White squares along the spline are the points defining it's shape. Click on them to drag the point and change spline shape
- To add a spline point right click on a spline and choose Add Spline Point Here or Alt + LMB Drag in the direction you want to place the new point
- Note: Spline needs to be flat instead of conforming to elevation changes of the level geometry. This applies to any runaway enemy type. Look at 01_RainyMesa for examples of spline paths
- Stolen collectable
- First, drag and drop a dragon candle in the level
- Pick it in the Stolen Collectable variable
- Tick Has a Stolen Collectible box
- Difficulty
- Set the walk speed for each difficulty level
Recommended speeds of thieves
| Difficulty/Type | Normal | Supercharge | Plane |
|---|---|---|---|
| Easy | 690 | 1600 | 630 |
| Normal | 810 | 1650 | 700 |
| Hard | 835 | 1700 | 750 |
| Nightmare | 860 | 1750 | 810 |
Whirlwinds
- To adjust height, select Whirlwind_Top component
- Move it higher or lower depending on your desired height
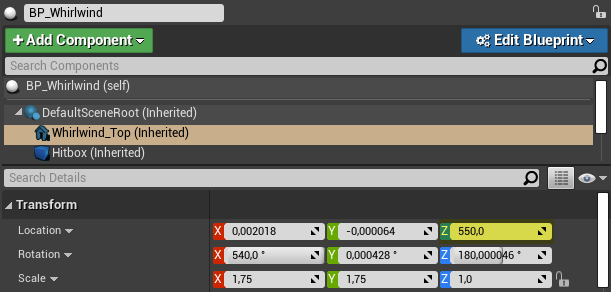
🛈 You might want to adjust Upwards Speed and Rotation Speed
Hurlwinds
Info
An alternative method for vertical locomotion
- Drag and drop BP_Hurlwind
- Adjust Launch Velocity Z
Banana Plants
Info
Banana plants from Attack of the Rhynocs offer a way to go from the end to the start of the map without the level needing to be donut-shaped
- Drag and drop two of Banana_Plant_BP
- Adjust Goes To variable
Destructible Walls
- Place a Simple_Destructable_BP on the scene
- Replace the mesh in StaticMesh component
- Adjust the hitbox (Box component)
- Select Shrapnel & Sound Origin component
- Move it to the middle of your destructable
- You can adjust response to various damage types by selecting Damageable component:
- Damage Resistances - remove Ram if you want wall to be destroyable by basic charge
- Bonkable - disable if you don't want Spyro to bonk when he charges and destroys the wall
NPCs
- Fairies
- Scroll down to Fairy Abilities section. Everything here is pretty self-explanatory
- Note: You also need to setup Powerup Duration in Difficulty section!
Setting up NPCs dialogue
- If you want NPC to have dialogue make sure Won't Talk box is unticked
- To add dialogue turns click on + in Dialogue Info
- If it's player turn to talk, tick Player's Dialogue? box
Scripting the level and NPCs
- To make things like Hunter's gliding tutorial, destroying towers in Future Ruins, trade sequence in Arid Basin, study the Level Blueprints of currently implemented levels:
- 00_PastChasms
- 01_RainyMesa
- 02_AridBasin
- 03_Fissure_Falls
- 00_PresentMeadows
- 01_AstralUtopia
- 00_FutureRuins
- 00_PastChasms
Getting Started - Crash
Info
Open the 72_CrashLinearLevelTest map in CrashContent to study how to set-up things like outline crates, spline cameras, bonus platforms, enemies and many more
Editor UX Improvements
For better experience placing the assets, do the following:
- Click Edit > Editor Preferences

- Navigate to Level Editor > Viewports on the left sidebar
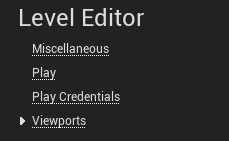
- Click a little arrow in Grid Snapping section

- Open Decimal Grid Sizes option
- Add 54 and 108 to the array by clicking the small arrow and choosing Insert
- Note: Increment of 28 also comes in handy sometimes
- Video - https://imgur.com/a/GMf41XZ
- Type "grid size" in the Search Details bar at the top
- Bind 1 and 2 keys as Grid Size (Position): Decrement/Increment shortcuts

Placement and Set-up of Entities
Wumpa Fruits
CrashContent\WumpaFruit
Drag and drop Wumpa_Fruit_BP onto the scene. If you want them to be suspended in air, place the Wumpa_Fruit_Levitating_BP variant
Crates
CrashContent\WumpaCrates\WumpaCrates
All crates are drag & drop except the Activator Crate:
- Click a + to add crates to My Crates array
- Click on a picker icon and pick the crates on the scene or use dropdown menu

- Crate Spawn Delay lets you adjust the rate the crates spawn in
Enemies, Obstacles & Environmental Assets
Enemies - CrashContent\Global_Assets\Enemies
Obstacles - CrashContent\Global_Assets\Obstacles
Env assets - CrashContent\Global_Assets\Environmental
The assets are segregated by type of level they usually appear in. To use, drag & drop onto the scene
- Many obstacles have Begin Play Delay variable. Use it to adjust the timing
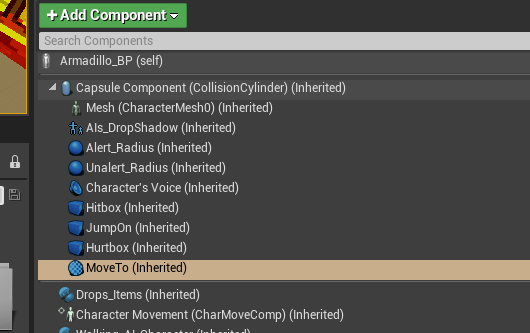
- To adjust the enemy path, select MoveTo component and change its location
Collectibles
CrashContent\Global_Assets\Collectibles
Here you will find collectibles such as Power Crystal, Clear Gem and +1 Life. Collectable Aku mask is located in CrashContent\Characters\Aku_Aku
Spline Camera
CrashContent\Global_Assets\Level_Items\Spline_Camera
Camera Pitch
Activate at Begin Play - set this to true on the spline camera located at the beginning of your level
Camera Yaw Offset - set this to 90 on a camera for sidescrolling part of your level
Sidescrolling Segment - set this to true on a camera for sidescrolling part of your level
- You need to use many spline cameras namely for normal or sidescrolling segments of the level and the bonus round/death routes
- Use the BP_SwitchCamera blueprint located in Utils folder to switch between cameras
- To alter the path, click on small white squares and move them. Click Left Alt + Left Mouse Button and drag to create a new spline point
Bonus Round/Death Route
CrashContent\Global_Assets\Level_Items\Bonus_Round
CrashContent\Global_Assets\Level_Items\Death_Route
The set-up of both bonus round/death route platforms is the same
Movement Speed
Platform Travel Spline Camera - a camera used while the platform travels to the destination
Target Spline Camera - a camera used when platform arrives at the destination
Bonus Round/Death Route Music - music which gets used in the bonus round/death route
Main Level Music - music used in the main level
Is Exit Platform - set this to true on platform which takes Crash back to the main level
Exit Platform Ref - on your entry platform, pick the blueprint of exit platform
- Click on the little white squares to alter the spline path the platforms travel
- On bonus round platforms only:
- Select SpawnPoint component
- Move it to the point Crash will be respawned in upon dying
Example setup of entry and exit platforms:

Warp Portal
CrashContent\Global_Assets\Level_Items\Warp_Portal
Leads To Level - pick the map file of the level the portal leads to
Level Name - leave blank if the portal leads to the Warp Room
Quit Game - only used in the standalone levels, leave it at default value
Warp Room Platform
CrashContent\Global_Assets\Level_Items\Warp_Room_Platform
A platform that transports Crash between warp room floors Crash 2-style
Movement Speed
Max Floor - highest available floor. For example if you have 10 levels in the game set it to 1
Min Floor - lowest available floor. If you don't have bonus levels in your game, set it to 0
The Game Template
Content\CrashContent\Game_Template
Thanks to the Game Template you can start creating your Crash game right away without needing to care about most of the quirks of the framework. The template provides a warp room with placeholder levels for a 25 + 5 bonus levels Crash game
- Open Levels folder
- Open one of the Warp_Room_I/II/III etc. folders
- Open the map file for example 01_Level1_CBGT
- Make your level
Note
Take care when upgrading to the newer version of Spaghetti Spyro Orange to not overwrite your work! I recommend renaming the level map files for example from 01_Level1_CBGT to 01_SewerFever. After you do so, right click on Game_Template folder and select Fix Up Redirectors in Folder
Adding a Death Route Clear Gem
- At the end of the death route, place a Clear_Gem_BP actor
- Select NPC_Award_Item component
- Set Level Item Index to 2

- Open CBGT_AdventureInfo inside CrashContent > Game_Template > Definition_Files
- Watch the video tutorial for the next steps - https://imgur.com/lruRIr4
Creating a Cubemap Capture For the Warp Portals
- Type "scene capture cube" in Search Classes field near the top left corner

- Drag and drop Scene Capture Cube into the scene
- Assign CubeRenderTarget asset to Texture Target variable
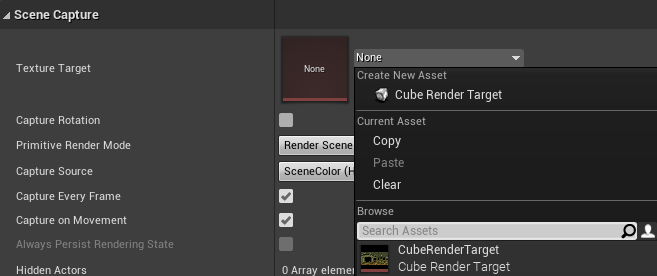
- Navigate to CrashContent > Game_Template > Cubemap_Captures
- Right click on CubeRenderTarget > Create Static Texture

- Duplicate, rename and open the "DUPLICATE_THIS" material
- Assign the created static texture to SkyboxCapture variable

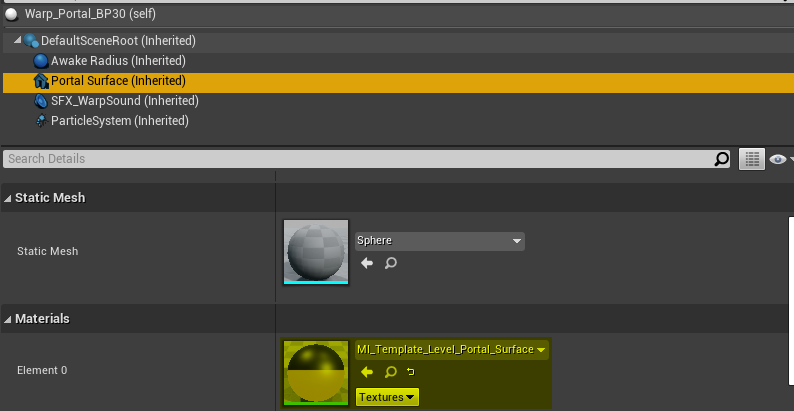
- Select the portal inside the warp room which leads to the level
- Select Portal Surface component
- Assign your material to Element 0 variable in Materials section
Making a Standalone Level
Here's how you can make a standalone level and easily share it, similarly to Crash Creator levels:
- Go to CrashContent\Standalone_Levels
- Duplicate the "DUPLICATE_THIS_MAP" file and rename it
- Open the duplicated file and make your level
- Once you're done:
- Right click on your map > Show in Explorer
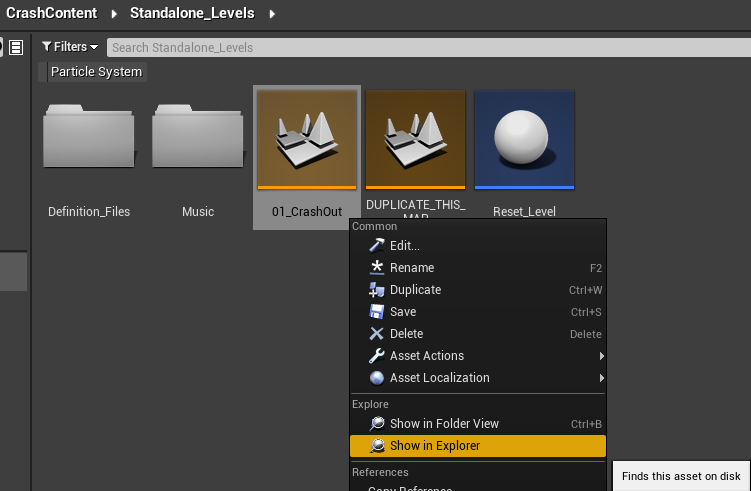
- Share the .umap file

Changing Music
- Import your music file to Music folder
- This section of guide will tell you how - https://rentry.co/SpaghettiSpyro#import-and-set-up-of-sound-files
- Click Blueprints icon (between Settings and Cinematics)
- Find the Set Music node (marked with "SET YOUR MUSIC HERE")
- Assign your music file to New Sound variable
- Share the music you used for the level in .uasset format. Simply Right Click on the music file > Show in Explorer
Using Modular Blocks to Create Levels and Block-outs
Getting Started
- Download and extract this archive - https://mega.nz/folder/4cZABRIS#Qs2Hs03QwjrOiRSwJifMxA
- Place Spyro_Blocks_V2 folder inside Content folder
- Inside Unreal Engine:
- Navigate to Edit > Plugins
- Enable Editor Scripting Utilities
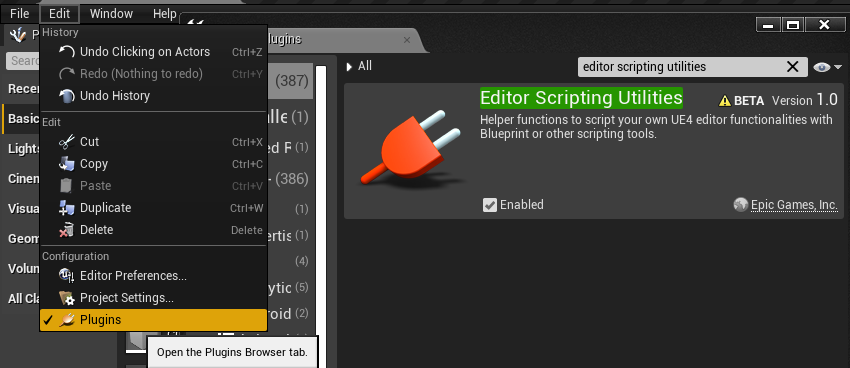
- Restart the editor
- Video - https://imgur.com/a/d8vRUlT
- Navigate to Spyro_Blocks_V2 folder inside Unreal Engine
- Right click on Create_Blocks asset
- Use Create_Blocks_1080p or 720p if you've got smaller display
- Choose Run Editor Utility Widget
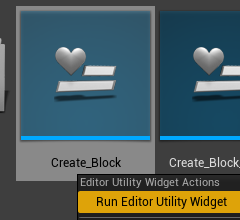
- Dock the tab next to Content Browser
Basic Usage
Note
I recommend downloading The Adventure Template and opening one of the placeholder maps to make your levels in - https://rentry.co/SpaghettiSpyro#the-adventure-template
Video tutorial - https://imgur.com/a/BPZFk0G
- Select any object on the scene
- Select a texture on the tile sheet. A yellow border indicates currently selected tile
- Select one of the block shapes
Important
Use the following snap sizes
- Position: 100 and 50
- Rotation: 90°
- Scale: 0.5

- Tips:
- Recommended scale for blocks:
- X:2, Y:2, Z:1 for Floors
- X:2, Y:1, Z:2 for Walls
- Bind "1" and "2" as Grid Size (Position): Decrement/Increment shortcuts inside Editor Preferences
- Recommended scale for blocks:
- To swap a texture of the block:
- Select a block on the scene (tip: hold Ctrl+Alt+Left Mouse Button and drag your mouse to select multiple blocks)
- Double click on the tile sheet
- Or use Swap texture of selected blocks button
- To swap a shape of the block:
- Select a block on the scene
- Tick Swap block shape checkbox
- Click on one of the shapes
- Tip: You can use dropdown menu on the right to select more advanced block shapes not available in the standard menu
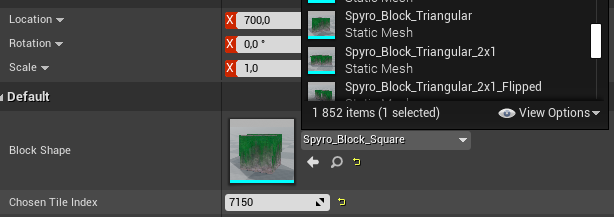
- To share your level:
- Right click on the map file (orange icon)
- Select Show In Explorer
- Share the .umap file
- Alternatively you can compile the project. Details here - https://rentry.co/SpaghettiSpyro#compiling-your-fangame
Creating, Modifying and Sharing Small Modular Structures
In order to streamline the creation of your level you should consider creating prefabs - a small structures made of multiple blocks. Also if you wish, you don't need to make a whole level - you can just create and share things for other people to make their map from!
Info
The project already includes a few prefabs you can use in your levels - just open the Prefab_Library map
Making and Editing Prefabs
- Inside Spyro_Blocks_V2 > Prefab_Library folder, rename My_Prefab_Library map to YOURNICKNAME_Prefab_Library, then open it
- Video tutorial - https://imgur.com/a/KXoEraQ
Important shortcuts
- Alt+Left Mouse Button to duplicate and move block
- Ctrl+G to group blocks
- Shift+G to un-group blocks
- Ctrl+Shift+G to select blocks within a group
- Ctrl+Alt for selection box
- Ctrl+Shift+Alt for selection box which adds to current selection
Sharing Your Prefabs
- Right click on YOURNICKNAME_Prefab_Library
- Select Show In Explorer
- Share the .umap file
Tips
- Frequently test the level you're making to make sure the scale is right!
- Avoid making big flat open areas and long walls of repeating textures
- Organize the blocks and structures into folders in the World Outliner (top right) like "Castle", "Tree", "House", "Bridge" etc.
- To practice, try to re-create the original levels or structures inside them using the blocks
- You can download the OG levels here - https://mega.nz/folder/ldwixKjC#eYJETuxQFR_0nL8czECBDQ
- Blender 5 is needed to open .blend files with the maps
- Some textures are meant to be used sparingly. Example below:
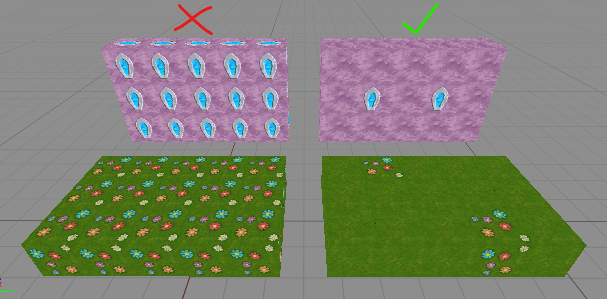
- If you have no idea how to use certain textures, open and study the original levels. Open the UV Editing tab and click on polygons to see which texture goes where
- If your blocks suddenly stop snapping to each other, check their location coordinates on the right. It should be an increment of smallest grid size you're using like 1500, 2300 etc. rather than 1521.292 or 2296.839 etc.
- Level design tutorials:
- Exploration Feeling in Spyro the Dragon’s Level Design by David Bailly - https://david-bailly.com/portfolio/exploration-feeling-in-spyro-the-dragons-level-design/
- Spyro the Dragon's Tree Tops -- Designing For Incongruity - https://www.youtube.com/watch?v=52gp5gM0Ei8
Advanced
Exporting Blocks to Blender for Vertex Lighting or Modelling
Note
If you're unable to do the steps below, share the .umap file with your level on the Discord server and someone will export the level for you
Due to how the system for the blocks works you will need to do following steps:
- Download Unreal Engine 5.7
- Download this project - https://mega.nz/folder/BZ5iUQhL#Plq3rM_1kjND1SNPS_4nSw
- Copy the .umap file with your level to the downloaded project
- Open the map inside the UE5 project
- Select one of the blocks
- Click Ctrl+Shift+A to select all of them
- Press Shift+5 to enter modelling mode
- Select Faves or XForm on the left sidebar
- Select Merge
- Set Output Type to Static Mesh
- Important - set Handle Inputs to Keep Inputs
- Click Accept
- Navigate to GENERATED folder
- Right click on the merged mesh > Asset actions > Export
Technical explanation
The UE 4.27 version of the system uses Custom Primitive Data inside the material to set the texture tile the block is UV-mapped to. This is not baked when you use Merge Actors or Convert Actors to Static Mesh tools
In UE 5, the system uses Dynamic Mesh Component which actually shifts the UV map of the block which allows it to be exported with appropriate texture
Baking Vertex Lighting Inside Blender
Set-up:
- Download and install the gpu_advanced_vertex_painter.py blender add-on - https://drive.google.com/drive/folders/1OislvF2iPRmrLUScuemcur8UPnJH2WYJ?usp=drive_link
- Import the exported level into blender
- Assigning the material and texture to the level:
- Step 1 - Material:
- Download the "Material with vertex colors" .blend - https://drive.google.com/drive/folders/1c5sjdXWDwrPBKlVPZhdUq5TVs_U-wetZ?usp=sharing
- Inside the Blender window with your level mesh imported:
- Click File > Append
- Navigate to the downloaded .blend
- Open it and go to Material folder
- Select Material and click Append
- On the right sidebar select Material icon (red sphere with checkerboard pattern)
- Assign the appended material to your level
- Switch viewport mode to Material Preview
- Step 2 - Texture:
- From following link, download Spyro Giga Texture Atlas V2.1.png - https://mega.nz/folder/ldwixKjC#eYJETuxQFR_0nL8czECBDQ
- In Blender, go to Shading tab
- Inside Image Texture node click Open
- Navigate to the downloaded texture
- Step 3 - Preparing the level for the lighting
- Go to Edit mode
- Click A to select every polygon
- Select Face > Triangles to Quads
- Select Edge > Mark Sharp
- If the lighting is broken (black patches):
- Select Data (green triangle icon on the right)
- Click on Geometry Data
- Select Clear Custom Normals Data
Usage of the add-on:
- Go to Object mode
- Add > Light > Sun or Point
- I recommend one Sun light and a bunch of Point lights
- On the right sidebar you can set-up the light - it's color, intensity etc. Look up blender rendering related tutorials for this stuff
- Click N to show the sidebar
- Select Vertex Paint
- Set the Shadow Color to your liking
- Set Bake Samples to 64 for preview bakes and 512-1024 for final bake
- Click Bake Lighting (GPU)
- Note: Nvidia RTX GPU recommended for fast bakes
- After you're done baking the lighting, you need to export the level back to Unreal. This section provides details on that - https://rentry.co/SpaghettiSpyro#level-import-and-set-up
Advanced Use of the Blocks
If you want your levels to look closer to ones made in blender, you will need to get creative with the use of the blocks. Making some adjustments to UI/UX is also necessary:
- Add custom Grid Snap values of 25 and (optionally) 12.5
- Navigate to Edit > Editor Preferences
- Search for "decimal grid sizes"
- Click the little arrow near 50 and select Insert
- Video - https://imgur.com/a/h71kpby
- Use Scale Snap Increments of 0,25 and 0,125
Open the Prefab_Library map and study the prefabs included here. Remember, you can ungroup blocks by clicking Shift+G or clicking Ctrl+Shift+G to be able to select individual blocks in the group
To get smooth corners use the triangular blocks in a succession depending on how smooth you want it to be:
Triangular (normal) - 3x2 - 2x1 - 3x1 - then the "flipped" variants on the other side
To get a smooth terrain:
- Use the following blocks scaled to 0.25 or 0.125 - Slope (x), Triangular Corner B (y) and Spire (z)
- Here's a layout which makes a hill:
y x x x y
x y x y x
x x z x x
x y x y x
y x x x y
Creating Level Blockout Using BSP Brushes
Note: You can use the blocks mentioned in previous section for blocking out your level. This section provides some details about a more traditional method
Here's a video tutorial on the subject - https://www.youtube.com/watch?v=MEkwlDMSSAE
Exporting blockout to Blender:
- Select brush actor(s) in World Outliner. If you are using multiple brushes to create the shape, make sure to select all the brushes.
- In Details > Brush Settings, press Create Static Mesh. Click on the little arrow below Tesselated checkbox to show the Create Static Mesh button.
- Find the mesh in the content browser.
- Right click on newly created static mesh, Asset Actions > Export.
- Open the .fbx file in Blender.
Tips & Tutorials for Creating the Level in Blender
Note:
If you want to create original Spyro levels, you need to have Blender experience, since there's no modular asset library to build your level from
Edit: Since 2026-03-31 this is no longer true. With a creative use of modular blocks and prefabs made out of them you can make levels that look very close to ones modelled in blender. Details in section above - https://rentry.co/SpaghettiSpyro#using-modular-blocks-to-create-levels-and-block-outs
Here are relevant Blender tutorials:
- Spyro: Myths Awaken Narrated Level Dev by vgripps - https://www.youtube.com/watch?v=FiZePW0gq3c
- Custom Spyro Level (Speed Model) by vgripps - https://www.youtube.com/watch?v=3LGNnZDHIs4
- Simple Texture Atlas Tutorial by vgripps - https://www.youtube.com/watch?v=Z1MouKWH6IM
- Spyro Style Texturing/Texture Atlas Demonstration by vgripps - https://www.youtube.com/watch?v=oW9euFmznE8
- Fast & Easy Vertex Lighting by vgripps - https://www.youtube.com/watch?v=0VEdMQIF_sU
- Vertex Painting and Texturing a Spyro Level by vgripps - https://www.youtube.com/watch?v=IWQd5uKEOSk
- Creating a skybox by Cyreides - https://www.youtube.com/watch?v=DgSYd_beXmw
- How to Make an Environment Inspired By Spyro The Dragon (A Blender 3.1 Tutorial) by TheSicklyWizard - https://www.youtube.com/watch?v=eyNAYiVn0nM
- Must have blender add-ons:
- Sprotile - lets you quickly map faces to UV tiles - https://drive.google.com/drive/folders/1OislvF2iPRmrLUScuemcur8UPnJH2WYJ?usp=drive_link
- Usage:
- Select the faces in Edit mode
- Select UV
- Select Atlas Texture Picker
- Pick the texture tile
- Magic UV - lets you rotate and flip UV tiles, copy the UV mapping from one group of faces to other to quickly transfer patterns and many other things - https://extensions.blender.org/add-ons/magic-uv/
- Sprotile - lets you quickly map faces to UV tiles - https://drive.google.com/drive/folders/1OislvF2iPRmrLUScuemcur8UPnJH2WYJ?usp=drive_link
- If you don't use the Sprotile add-on here's a UV mapping tip (if using the texture sheets from PS1 trilogy):
After you do the UV > Reset thing, it's faster to scale the UVs by typing these values:
X - 0.0615
Y:
- 1 row (64x) - 0.98
- 2 rows (128x) - 0.49
- 3 rows (192x) - 0.325
- 4 rows (256x) - 0.245
- 5 rows (320x) - 0.195
- 6 rows (384x) - 0.16
- 7 rows (448x) - 0.14
- 8 rows (512x) - 0.12
See the video - https://imgur.com/a/VCNUB89
The end result will be a properly scaled UV which leaves 1 pixel of space around to prevent texture seams. Also turn on UV > Round to Pixels > Corner
- Skybox tutorial 2024 by Cyreides:
You might want to watch previous tutorial to make sense of this
Videos - https://drive.google.com/drive/folders/1TUj2P5wLY2hwZ7M9NZ3cx8vzr_qFqjD7?usp=sharing
"you basically get that rectangle shape from the first video and then before you add modifiers or rotate it to be standing up, take that and carve it up like in the second video with your reference skybox that you've painted (or not, you can just wing it too but i find it easier to have a reference) and then you can do the last part of the first video which is rotating it to stand up and applying those modifiers
now worth noting, if you use old blender like i do for the actual modeling processes, you'll need a newer version like in the first video to do the modifiers and to copy past the objects back and forth between. the modifiers do exist technically on old blender, but they don't work the same way and thus will not have the same globe effect. there might well be a way to do this in old blender without needing to copy the objects back and forth between versions but i don't know how, so for now i just copy the objects outside of edit mode back and forth when i need to
in the second video , the reference image is setup to be like 1:1 underneath like that so you can carve like 1:1 where you have stuff in it, it makes it SO easy, and the second rectangle with the same reference on it as a texture is so you can color pick from it while painting the color on afterwards, since you won't be able to see the one below it in that view
also for the scale of the reference image and the rectangle itself
just need the width to be exactly twice the height
and you can probably after making a globe, for the sake of polygon count, just collapse most of the bottom down to a single point once it's at the fade to void part
or straight up delete it past the first rung of the color fade, and use an identical solid color sky in whatever engine you're using
to fill in the rest"
- Level making tips by Cyreides:
"as far as a process i follow now that it is, i blockout and playtest it like a motherfucker with every little platform i add and test the height, how it feels to run through like a cracked speedrunner, how it flows etc., i also check the views, mostly the spawns in any given area to see how they feel aesthetically i guess? nice views are great, combine that then with well planned and tested out gameplay of the level, with difficulty gradually increased throughout it. I also plan the full look of the level too basically with the blockout too as much as possible before the actual modeling to make sure it's actually going to look good done, with as little or as much detail in the models as is necessary to figure out the vibe. like, i use vertex color to see how the level will actually look in its final state and try to shape things as vaguely close to what i think the final should actually look like to see what works and doesnt. i get a bit more in depth than i probably should for a blockout but it turns out nice results imo, especially compared to what i use to do. and then i basically just model over that in another object. sometimes i do adjust and change things from the blockout if im finding a better idea after the fact or think a part just isnt working as well as it could or should
here are some blockout vs final model pics. i hope any of this was at all helpful considering this is very drawl the rest of the fucking owl kind of posting here with these"
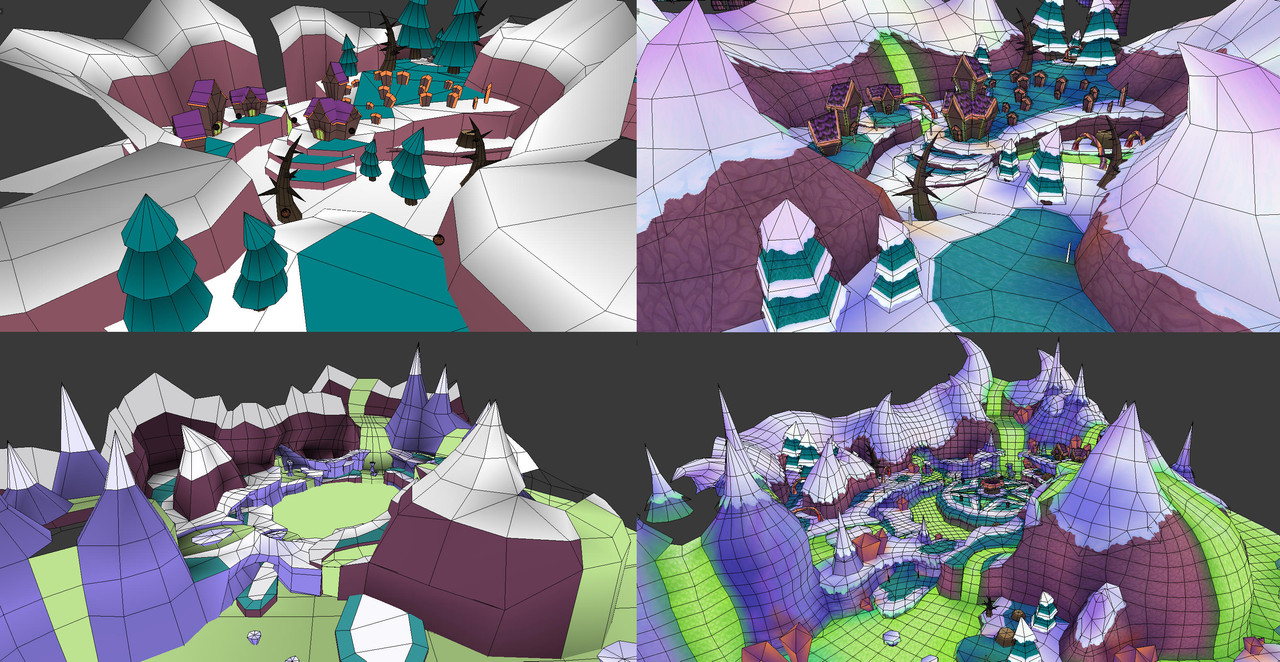
"p.s. I did not use to blockout btw when i did start modeling levels, and that was a HUGE mistaaaaaaaaaake. no one ever be early game dev cyreides pls, love yourself more than that
also, smooth vertex is your friend, grid fill is (when it behaves like you want it to anyways) your friend, also bridge edge loops and then loop cutting... ooo the satisfying topology you can get from that so easily
i also sometimes take a picture of blockout stuff or partial final model stuff and paint over it in like krita or photoshop or whatever if im having issues kinda visualizing somethings or need to quickly without modeling figure something out that's wrong with the level or i dont know what to do with it"
Tips
- How to Use Extrude Manifold in Blender - https://www.youtube.com/shorts/97maXBeUJxM
- "Spyro Art Bible" texture design guidelines - https://archive.gamehistory.org/item/bdd3c301-557a-40bc-b1ba-9019bbf6f2ef
- Save a selection in Blender - https://www.youtube.com/shorts/uSQ-pxcFY44
- Blender tutorial by Jroobelucios - https://docs.google.com/document/d/18HN5ieRsiBQQVG7vEHVJh5f5z0LlHQTu5-_Lkzqs36Y
- Outset boundary - a useful addon for Blender - https://kushiro.gumroad.com/l/outset_boundary
- Exploration Feeling in Spyro the Dragon’s Level Design by David Bailly - https://david-bailly.com/portfolio/exploration-feeling-in-spyro-the-dragons-level-design/
- Blender Tip: Fix Your Extrusion Angle (The Right Way) - https://www.youtube.com/shorts/13PdfUES_lw
The Adventure Template
If you're a beginner, I strongly recommend using the Adventure Template which greatly simplifies things to get your level up and running. It already helped multiple people getting started with Spaghetti Spyro Framework. The template also includes all sorts of helpful Blueprints
- Download Spyro Game Template.7z from this link - https://drive.google.com/drive/folders/1R6G42xg4bzvv82evRm1qTZEcT5WV7oAn?usp=sharing
- Unzip Spyro Game Template.7z using 7-Zip (Direct Download Link)
- Place ExampleAdventure folder in Content folder using the File Explorer

If you wish to proceed with importing your level, skip to Level Import and Set-up section
Utils
BP_Whirlwind_Spawner:
- Place BP_Whirlwind on the scene
- Place BP_Whirlwind_Spawner on the scene
- Pick the BP_Whirlwind in the Whirlwind variable pictured on the screenshot
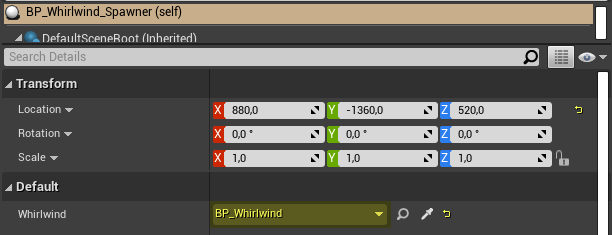
- Move the blueprint to where you want the spawning trigger to be. You can also rotate and scale it
- 🛈 The transparent box is the visualization of the spawning trigger
The blueprint doesn't actually spawn the whirlwind, it just toggles the Active variable and visibility of whirlwind particles
BP_Yeetwind_Spawner:
Same as above but for hurlwinds
BP_Open_Banana_Plants:
- Place two banana plants first (Banana_Plant_BP)
- Pick them in Banana Plant 1 and 2 variables
- Select Box component and place it where you want
BP_Total_Gems:
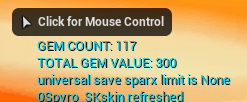
Tallies the total gems and displays both value and count of all gems in the level
- Drag & drop into a level
- Play the level
- The count and value of the gems will be printed to the screen
Treasure Containers
The template contains inherited blueprints of every treasure container with every gem pre-selected. Simply choose one and drag & drop it into the scene
They save a massive amount of time since there's no need to select the Item Drop component and picking a other gem blueprint here

Enemy Templates
The Enemy Templates are blueprints that allow you to quickly create and customize enemies without any hassle. They're also separately available to download - https://drive.google.com/drive/folders/1D4URfB8o1y0kk4BY0ThzQaSjUww0csiN
List of currently available enemy templates:
- Coward
- Coward (taunting variant)
- Club attack
- Charge and attack (like Pickaxe Rhynocs from Sheila's Alp)
- Charging attack (like Spear Rhynocs from Charmed Ridge)
- Projectile attack
- Shielded
- Bonus NPC and fodder templates are also included
I recommended to watch the video tutorial especially if you're a beginner
https://www.youtube.com/watch?v=pjp05D-XrBQ
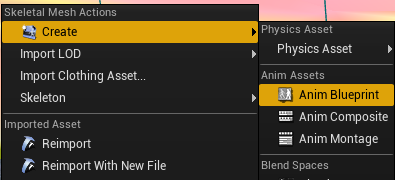
Step 1 - Creating Animation Blueprint
- Right click on your Skeletal Mesh
- Open your created Animation Blueprint
- Open the Animation Blueprint of the enemy type you want to create (in ABPs folder)

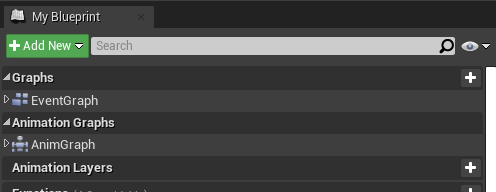
- On the left side you can open EventGraph and AnimGraph
- Copy all nodes from the Event Graph to the Event Graph of your created Animation Blueprint
- Right click -> Create variable on all marked and greyed-out nodes
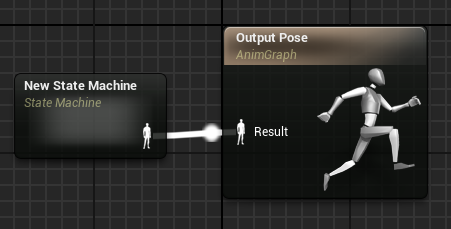
- Copy the New State Machine node from the Anim Graph to the Anim Graph of your created Animation Blueprint
- Connect it to Output Pose node
Replacing Animations:
- Open New State Machine node
- Open every single state node and replace the animations
- Click on the node that says Play animation_name
- On the right sidebar replace the animation in Sequence variable

Step 2 - Adding Animation Notifies (if necessary)
Some animations need animation notifies for enemies to function correctly
- Open your animation asset
- Right click on the 1 track
- Add Notify...
- New Notify...

- Attacking animation:
- Finished Attacking
- Projectile attack animation:
- Spawn Projectile
- Laughing animation:
- Done Laughing
- Attacking animation of charge and attack enemies:
- Started Attacking
- Weapon Hitbox Active
- Finished Attacking
- NPC recovering animation:
- NPC_Recovered
- Fodder idle animation:
- Idle Done
Step 3 - Creating the Blueprint
- Duplicate and rename one of the blueprints here depending on the enemy type you're adding

- Open your duplicated blueprint
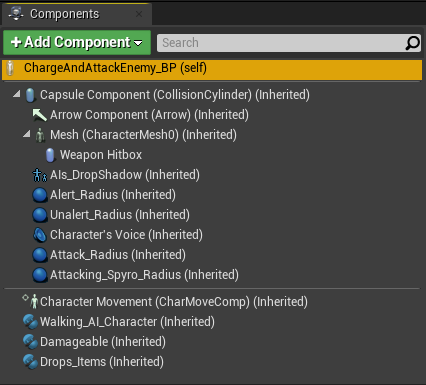
On the left side, you'll see a list of components
- On the right side you might wanna take a look at following things:
- Damage Type and Super Damage?

- In case of projectile attack enemies:
- Projectile Attack Type

- Laughs After Successful Attack
- Uncheck if the character does not have a laughing animation
- Scroll down to Difficulty section. There's a lot of variables you can adjust
- Select Mesh (CharacterMesh0) component
- On the right sidebar:
- Swap Skeletal Mesh
- Swap Anim Class for your created Animation Blueprint
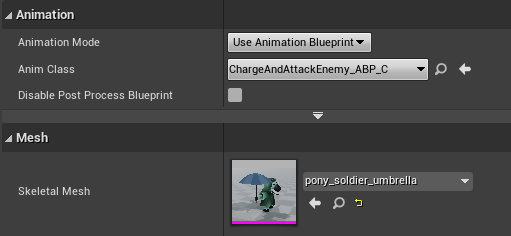
- You may want to adjust the position and scale of your skeletal mesh
- Select Weapon Hitbox component
- Change the socket hitbox is attached to by clicking the magnifying glass icon
- Modify shape of the hitbox by adjusting Capsule Half Height and Capsule Radius variables
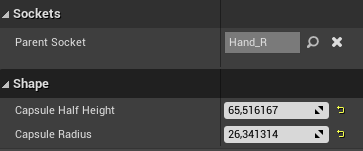
- In case of Shielded enemy, do the same with Shield Hitbox
- Select Capsule Component (CollisionCylinder)
- Adjust the shape to fit your enemy mesh
- Select AIs_DropShadow component
- Set it to appropriate scale

Step 4 - Other adjustments
- Select Damageable component
- Set-up the Damage Resistances array

- Other variables worth adjusting:
- Bonkable
- Supercharge Doesnt Bonk
- Dies To Ice
- Dies To Fear
- If your enemy is metallic/has metallic parts:
- Scroll down to Metal section
- Set the Metal Material Indexes array to include the ID's of metallic materials on your skeletal mesh. This will cause them to heat up when Spyro flames the enemy

- Additionally you need to have following setup in the blueprint:
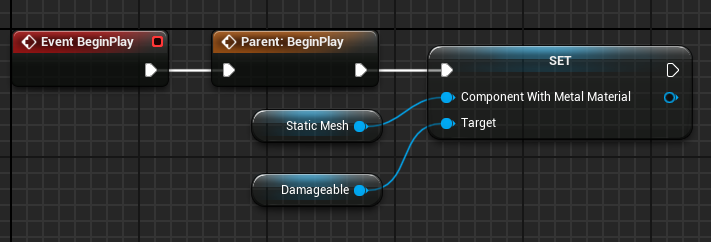
- Drag & drop Damageable component onto Event Graph
- Drag out the output pin from the Damageable node
- Type "set component with metal material" and add the node
- Drag & drop Mesh (CharacterMesh0) component
- Connect it to Component With Metal Material input pin
- If you know what you're doing you can duplicate and modify the base blueprints in Base_BPs folder to program any custom behaviours
Adventure Set-up
This section will focus on things in Adventure Info and Save Data Blueprints that you need to adjust. If you wish to customize your adventure further look at Customizing the Adventure section
Save Data (EX_SaveData)
- The variables in this Blueprint don't need to be modified in any way
Adventure Info (AdventureInfo_EX)
- Max Collectables
- Set the maximum amount of collectables available in your adventure
- Save Data
- Save Data Type
- You can change this to EX_SaveData_S1 if you wish for your game to have Spyro 1 moveset and treasure skins
-
Important
You need to set Save Slot Names variables to unique names or else your and everyone else's adventures will overwrite each others savedata
- Save Data Type
- UI
- Homeworld Names
- Adjust the name of your homeworld. Type in all caps
- Homeworld Names
Construction Script of Adventure Info
This is an array that defines bunch of stuff about the levels in the adventure. Find the two nodes below and modify accordingly
In Make LevelItem_Inventory_Info node adjust the Hint Text variable

In Make Level_InventoryInfo node adjust Level Name and Number Of Gems variables
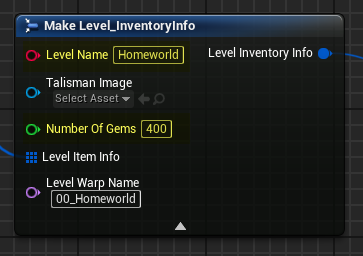
Level Blueprints
- Click Blueprints icon near the top in the middle
- Click Open Level Blueprint
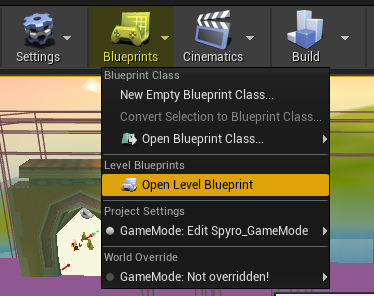
- In the Unified Level Setups node adjust:
- Current Level Name
- Level Music
Adjusting the Adventure Template
Changing adventure name in Title Screen
- Open EX_TitleScreen
- Open the Level Blueprint
- Adjust the Gold Text variable in the last node (Set Text)
Adding the adventure to Adventure Select Screen
- Open Adventure_Select_Screen
- Open the Level Blueprint
- Choose Adventure_Select_Example in second to last node (Create Adventure Select Widget)

Changing adventure title in Adventure Select Screen
- Open Adventure_Select_Example widget in UI folder
- Choose Button_EX in the menu on the left
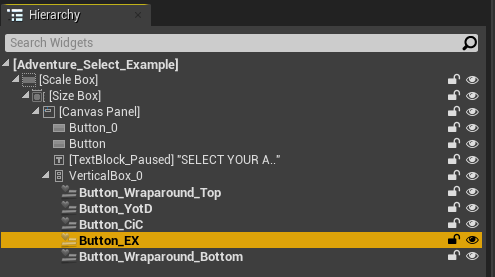
- Type your adventure's title in Button Text variable in the menu on the right

- Compile and Save
Custom loadscreen
- Open EX_Loadscreen in UI folder
- Pick Image_0 from Hierarchy menu on the left
- Pick a different image in Appearance section on the right
Level Import and Set-up
Note
This section assumes you're using the Adventure Template linked above
- Open 01_Level1 map in Levels folder
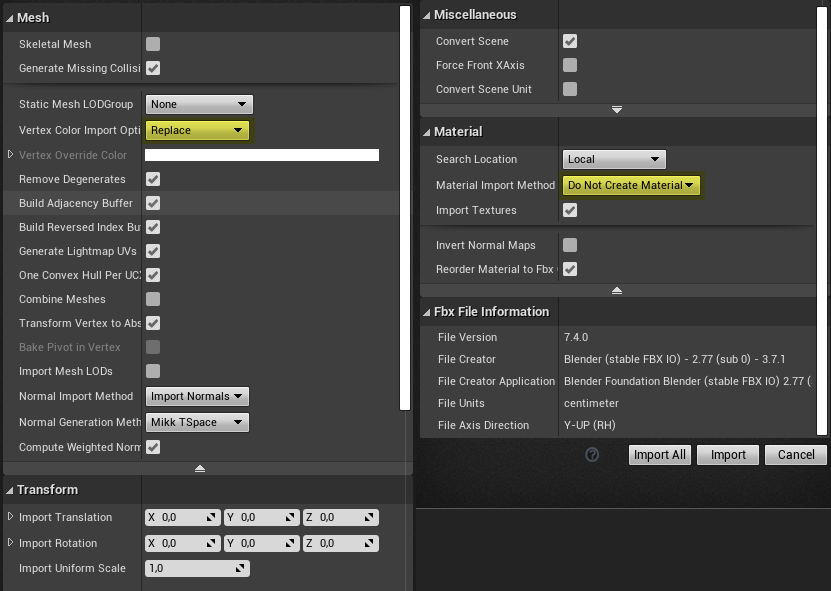
- Import the level mesh (use .fbx format) with these settings:
- Vertex Color Import Option - Replace
- Material Import Method - Do Not Create Material
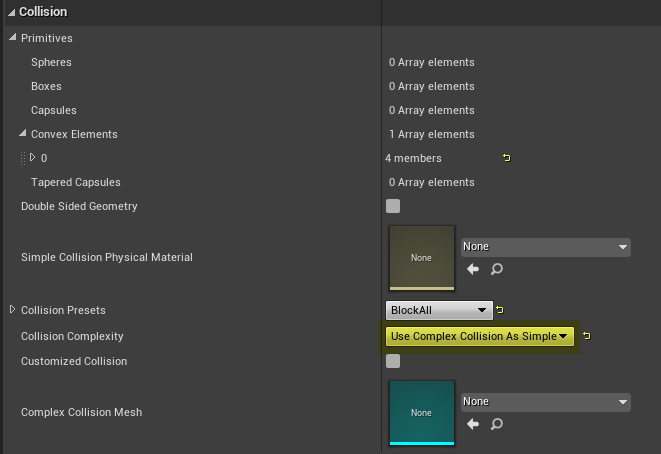
- Open the level mesh and set Collision Complexity to Use Complex Collision as Simple
- Place the mesh on the scene. Make sure the spawn point is aligned to Spyro - https://imgur.com/a/ZvAagz1
- Import your level texture if it wasn't imported together with the mesh
- Open the texture and set Texture Group to 2D Pixels (unfiltered) in the second to last Level of Detail section

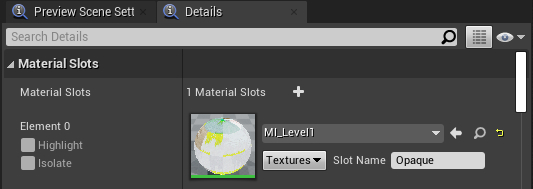
- Open MI_Level1 material in Materials folder
- Assign your level texture

- Assign MI_Level1 material to material slot of your imported level mesh
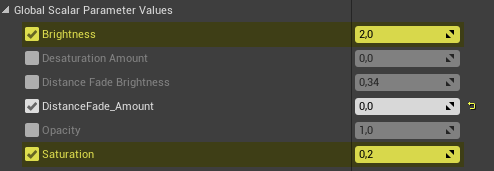
- 🛈 You can adjust the Brightness and Saturation parameters on the material to your liking
After these steps you're free to place and setup entities such as treasure, collectibles, enemies, fodder and NPCs. Detailed instructions are in Getting Started section
If you use the Adventure Template
- If you want to add more levels to your project simply open the 01_Level1, 02_Level2 maps etc. and repeat the previous steps
- If you have a map that can work as a homeworld you're free to replace the placeholder Gnorc Gnexus style hub
Texturing tips
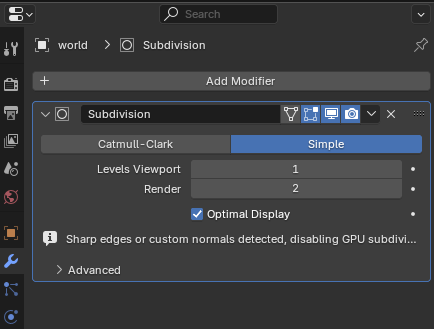
To avoid exaggerated affine warping effect, create a Subdivision Surface Modifier on the mesh in Blender (1 square to 4 squares). This roughly approximates the subdivision the original games do at runtime to geometry that's near the camera
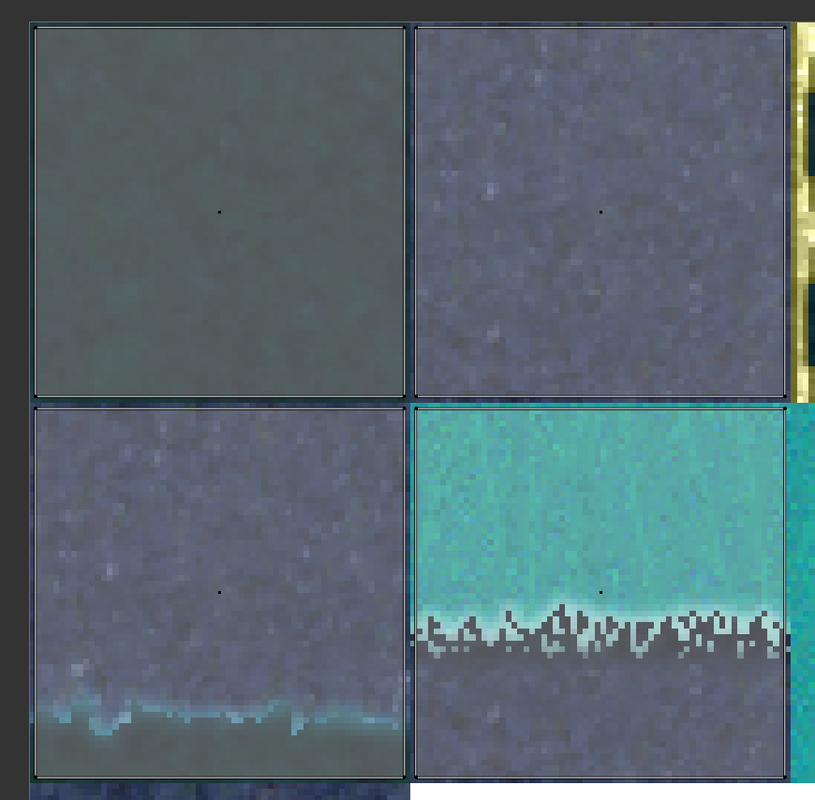
Leave a tiny bit of space on your UVs to avoid texture bleed. See the video tutorial - https://imgur.com/iwDyHIq
Mesh Settings Cheat Sheet
| x | Collision Presets | Collision Complexity | Double Sided Geometry |
|---|---|---|---|
| Main level geometry | BlockAll | Use Complex Collision As Simple | ❌ |
| Wooden surface | BlockAll | Use Complex Collision As Simple | ✔️ |
| Swimmable water | Custom... | Use Complex Collision As Simple | ✔️ |
| Drownable water | BlockAll | Use Complex Collision As Simple | ❌ |
| Acid | Custom... | Use Complex Collision As Simple | ✔️ |
| Lava | BlockAll | Use Complex Collision As Simple | ❌ |
| Skybox | NoCollision | Project Default | ❌ |
Skybox Import and Set-up
- Import and open the skybox mesh
- Assign Untex_Vertex_Color material

- Set Collision Presets to NoCollision

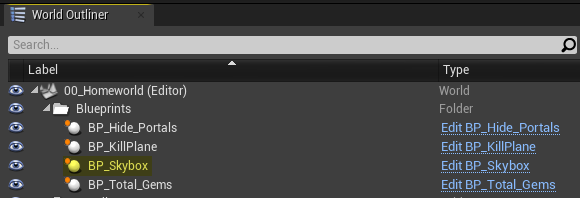
- Select BP_Skybox in the World Outliner (top right)
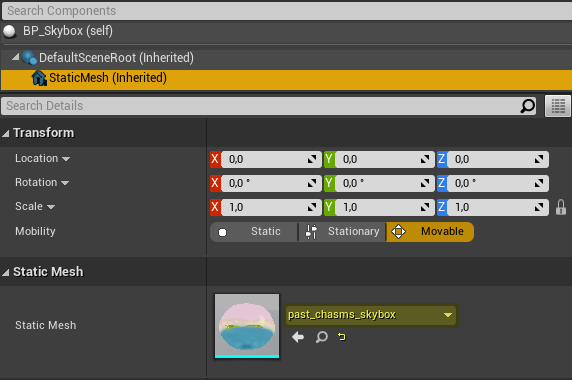
- Select StaticMesh component
- Replace the skybox mesh with the one you imported
If your level is not a homeworld
- Inside homeworld, select a portal leading to your level

- Replace the skybox mesh here:

- Do the same in BP_Portal_ReturnHome inside your level
Import and Set-up of Swimmable/Drownable Water, Acid and Lava
The geometry of whatever liquid you have in the level needs to be separate from main one. If you have for example both swimmable and drownable water in the level you need to import 3 separate geometries in total:
- Main level geometry (the one Spyro walks on)
- Swimmable water geometry
- Drownable water geometry
- Import and open the static mesh of the liquid surface
- Create a material instance of M_PSX_Water and assign it to the mesh
- Tip: In case of Swimmable Water just assign one of pre-made M_PSX_Water material instances. Though, if you wanna customize it, create an instance first!
- Set Collision Complexity to Use Complex Collision as Simple
- In case of Swimmable Water and Acid tick Double Sided Geometry

- Set Collision Presets to:
- Swimmable Water - Custom
- Drownable Water - BlockAll
- Acid - Custom
- Lava - BlockAll
- Custom collision preset for Swimmable Water and Acid:
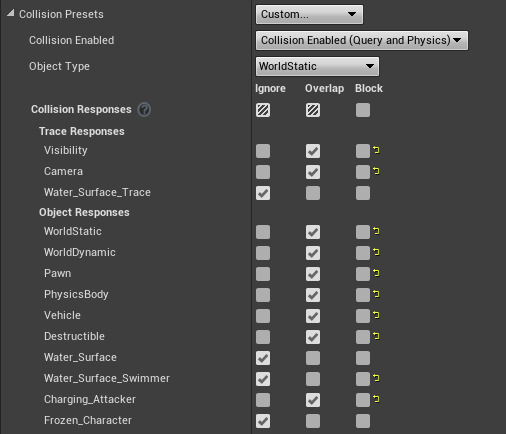
Tip: Select OverlapAll then Custom. It will save you some clicking - Drag and drop a blueprint into the map:
- Swimmable Water - Swimmable_Water_BP
- Drownable Water - Drownable_Water_BP
- Acid - Swimmable_Water_BP with Acid variable set to ✔️
- Lava - HotLava_BP
- Select the component
- Swimmable Water - Water_Mesh
- Drownable Water - Hitbox
- Acid - Water_Mesh
- Lava - Hitbox
- Replace the Static Mesh
- You can modify the material instance to your liking. Assign the liquid's texture and play with the parameters until you get desired result. Take a look at following materials:
- Drownable Water - Past_Chasms_Drownable_Water_mat
- Acid - Red_Acid_Mat
- Lava - cauldron_acid_mat
Import and Set-up of Wooden Surfaces
Same story as above, the geometry of wooden surfaces needs to be separate if you want the sound effect to play when stepping on them
Import the mesh, assign the material, tick Double Sided Geometry and set the collision complexity to use complex, then:
- Drag and drop Wooden_Surface_BP
- Select both Collision and Hitbox components
- Replace the Static Mesh with your geometry of wooden surface
Import and Set-up of Sound Files
Note
Unreal support only .wav format for sound files. You can convert sound files using Audacity, foobar2000 or FFmpeg
Open the sound file once you imported it and set the Class variable in Sound section to:
- SpyroSound_Music in case of music
- SpyroSound_SFX in case of SFX
- SpyroSound_Dialogue in case of dialogue
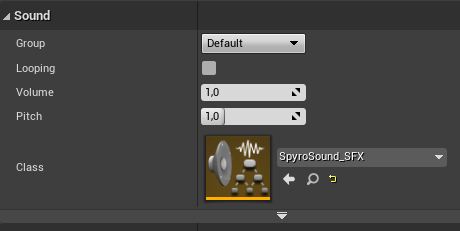
Adjust the Volume variable if sound is too loud or too quiet
Additionally, in case of music:
- Tick Looping variable
- Scroll down to Priority section
- Set Priority to 100

- This will prevent music from restarting if there are too many sounds trying to play at once
Customizing the Adventure
Once you have done setting up your adventure whether simple way or hard way you'll probably want to customize it. This section details every single variable in relevant blueprints that allow you to modify your Spyro game out of the box
Save Data Blueprint
(EX_SaveData in the Adventure Template)
Default
- Save Slot Icon - do not alter this variable!
- Incoming Cutscene - the cutscene that plays when player travels through portal for the first time
- Current Save Icon - do not alter this variable!
- Lives - amount of lives game starts with
- Skill Level - skill level at the start of the game
- Players Breaths - default breath
- For example, setting it to 0000100000000000000 will cause wind to be default breath
Skins
- Players Current Spyro Skins - default Spyro skin
- For example if you want to make a game with Cynder as a main character, set all 5 variables to Cynder skeletal mesh
- Players Current Sparx Skins - same as above but for Sparx/dragonfly companion
- Head 0 Normal 1 Big 2 Small - default size of the player's head
- Wings 0 Normal 1 Big 2 Small - default size of the player's wings
- Players Current Sunglasses - default sunglasses
- 0 - None
- 1 - Trans Pride
- 2 - Gay Pride
- 3 - Lesbian Pride
- 4 - Ace Pride
- 5 - Bi Pride
- 6 - Pan Pride
- 7 - Demi Pride
- 8 - Classic
- Players Tints - default tint of the player
- Unlocked Spyro Skins - controls which Spyro skins are unlocked. Add new elements to array and tick the appropriate checkboxes depending on which skins do you want to be unlocked at the start of the game
- Unlocked Sparx Skins - same as above but for Sparx/dragonfly companion
- Spyro Has Angry Eyes - angry expression from Spyro 2: Ripto's Rage/Gateway to Glimmer
- Players Flat Mode - flat Spyro inspired by cheat codes from original trilogy
- S1 Treasure - this turns on Spyro 1 skins for gems and treasure containers
Cheats
- Cheats Menu Unlocked - unlocks cheat menu for the player without a need to enter cheat code
- Levels Cheat - unlocks all levels
- Level Warping - unlock warping to levels from Inventory menu
- Fairy Breath Lock - locks Spyro's breath when he gets kissed by elemental fairies
- Players Cheat Supercharge - Supercharge cheat
- Players Cheat Invincibility - Invincibility cheat
- Players Cheat Superfly - Superfly cheat
- Players Extra Min HP - extra minimum hit point. Sparx will turn red when he's at minimum hp
- Players Extra MAX HP - extra maximum hit point. Sparx will be glowing when he's at maximum hp
Number of Collectibles
- Do not alter any variables there! Adjust total collectibles in AdventureInfo instead!
Levels
- Current Level - a level the adventure begins with. It can be either a homeworld or intro level like Glimmer in Spyro 2
- Do not alter any other variables!
Adventure Settings
- Players Disable Double Jump - if unticked, Spyro will have double jump glitch from Spyro 2: Ripto's Rage/Gateway to Glimmer
- Players Hover - controls whether Spyro has hover ability
- Players Charge Air Cancel - if unticked, charge in the air will not be able to be canceled like in Spyro 1
- Adventure Settings Unlocked - unlocks adventure settings menu for the player without a need to enter cheat code
- Players Supercharge Style - controls the default supercharge mechanics
- Spyro 1 Style - gain speed when moving down and lose speed when moving up. The smoke progresses from white to yellow to orange to red as the Supercharge gets faster. Lose too much speed, and it becomes a regular charge
- Spyro 2&3 Style - always stays at a consistent speed, even when going uphill or downhill
- Reignited Style - gain speed as time passes. The smoke progresses from white to yellow to orange as the Supercharge gets faster
- Players Fast Glide - fast gliding mechanic from Spyro 1
- Players Charge Air Boost - when enabled, if Spyro charges in the air, he gets boosted forward like in Spyro 1
- Players Floaty Charge Jump - if unticked, Spyro will have charge jump mechanics from Spyro 1
Spyro moveset and abilities table
Refer to the table below if you want to re-create how things are set-up in each game of Spyro trilogy
| x | Spyro 1 | Spyro 2 | Spyro 3 |
|---|---|---|---|
| Players Supercharge Style | Spyro 1 Style | Spyro 2&3 Style | Spyro 2&3 Style |
| Players Fast Glide | ✔️ | ❌ | ❌ |
| Players Charge Air Boost | ✔️ | ❌ | ❌ |
| Players Floaty Charge Jump | ❌ | ✔️ | ✔️ |
| S1 Treasure | ✔️ | ❌ | ❌ |
| Spyro Has Angry Eyes | ❌ | ✔️ | ❌ |
| Players Disable Double Jump | ✔️ | ❌ | ✔️ |
| Players Hover | ❌ | ✔️ | ✔️ |
| Players Charge Air Cancel | ❌ | ✔️ | ✔️ |
Adventure Info Blueprint
(EX_AdventureInfo in the Adventure Template)
Skins
If you made a new skin, you can add it here
- Add a new element to Spyro Skins Struct
- Mesh - the Skeletal Mesh of your skin
- Name - name of your skin
- First Appearance
- If it's some character from game, type for example First Appearance: Spyro the Dragon (1998)
- If it's an OC, type Original Character of JohnDoe
- Lore - the lore behind your skin
- Sunglasses Transform - adjust the transform of sunglasses here so they're correctly positioned
- The same goes for Sparx skins
Max Collectables
Adjust the maximum amount of collectables player can get in your game
- Max Gems
- Max Primary Collectables
- Max Secondary Collectables
- Max Tertiary Collectables
- Max Skill Points
Collectibles
- Primary Collectible HUD Icon - the main collectable icon displayed in the HUD
- Primary Collectible Black Background - same as above but displayed in level completion HUD
- Primary Collectible Actor Type - main collectable in your game
- Secondary/Tertiary/Quaternary Collectible Actor Types - pick your other collectibles here if you made them
- Levels Inventory Info - do not alter this variable!
UI
- Title Screen Logo - a static image of your title screen logo
- Load Screen Type - the load screen widget
- Pause Menu - the pause menu widget
- Inventory Menu - the inventory menu widget
- Homeworld Names - array defining the names of homeworlds. Type in all caps for example SUNRISE SPRING
Tip
If you know what you're doing you can customize the widgets to your needs. Simply duplicate the LevelTotals_Widget, PauseMenu or Loadscreen widgets and pick them here
Save Data
- Save Data Type - a reference to save data blueprint. No need to change this once you've setup the adventure
- If you use the Adventure Template, you can set it to EX_Savedata_S1 to have a game with Spyro 1 moveset and treasure skins
- Save Slot Names - the names that the save slots use. As a reminder, these need to be set to unique names
Maps
- Title Screen Map
- Intro Cutscene - the cutscene that plays after player starts the game
- Game Over Map
Level Totals
You can customize the appearance of Inventory Menu here
- Static Level Totals Background - a static image of your inventory menu
- Skill Points Requirement Text - the text that displays when player tries to go to epilogue but didn't collect all skill points yet
- Level Totals Name - name of inventory menu for example Atlas, Guidebook, Diary etc.
- View Epilogue Text - a prompt that instructs player how to view the epilogue
If you want to re-use the diary pick the PageX_to_PageY flipbooks in Level Totals Page X to Y variables
Universal Save Data Blueprint
Warning
The Universal Save Data is not modular and any changes you make here apply to every adventure in your build.
Most variables are pretty self-explanatory or should be left at default so only a few of them will be detailed here.
- Open Spyro_Universal_Save_Data Blueprint
Default
- Gem Behaviour
- Classic - Player will always keep the gems you collect, even when they lose a life, Game Over, or exit level from the Pause Menu.
- Fairy Frenzy - When player dies or exits level from the Pause Menu, all the gems they collected in the current level return to their original locations. They can permanently save gems by having a fairy save their progress or by entering a portal.
- Soulslike - On death, player drops their bag of gems collected in this level. Return to the last valid ground you had stood on to get them back, but if they die again before that (or exit level from the Pause Menu, or ever Game Over), the gems return to their original locations. Player can save their gems by entering a portal.
- Hardcore - When player dies or exit level from the Pause Menu, all the gems they collected in the current level return to their original locations. Player can permanently save their gems by entering a portal.
- DPad Breaths - allows player to change the breaths on D-Pad
- Hide Adventure Select - Uncheck this if you have more than one adventure in the build
- Current Permadeath Setting
- Disabled - Dying will not have any consequences.
- Only on Game Over - If Lives are enabled in the Difficulty menu, and player Game Overs, they'll be returned to the title screen and their save file will be deleted!
- Any Death - If player dies, they'll be returned to the title screen and their save file will be deleted!
Difficulty
- Retro Lives - When enabled, player gains lives from blue butterflies. If they lose all lives, it's Game Over! When disabled, player can't Game Over.
- Fairy Fall - When enabled, if the player falls into a bottomless pit, drown, or burn in lava, they'll be returned to the last valid ground they had stood on.
Advanced
This section assumes user has at least intermediate knowledge/experience with Unreal Engine and knows what they're doing
Advanced Adventure Set-up
If you don't want to use the Adventure Template, here you'll find the steps that will allow you to get started. Anything detailed here is the bare minimum to get a functional game. If you want to adjust things further, go to Customizing the Adventure section
Save Data Blueprint
First, you need to create a save data blueprint
- Create a child blueprint from Spyro_SaveData
- Right click -> Create Child Blueprint Class
- Open your created Blueprint
Default
- Incoming Cutscene - set to CiC_Cutscene_01_Meet_Malgam or else game will crash on portal transition with this error:
PIE: Warning: TravelFailure: ClientTravelFailure, Reason for Failure: 'Failed to load package '/Game/SpyroContent/S3_YearOfTheDragon_Assets/S3_Levels/Home_01_SunriseSpring/01_SunriseSpring/01_SunriseSpring''. Shutting down PIE.
- Workaround - place this in the Level Blueprint of your homeworld after Unified Level Setups node:

Levels
- Current Level - set this to the level your adventure begins with. It can be either a homeworld or intro level like Glimmer in Spyro 2
Adventure Info Blueprint
The second step is to create adventure info blueprint
- Create a child blueprint from AdventureInfo_Base
- Right click -> Create Child Blueprint Class
- Open your created Blueprint
Save Data
- Save Data Type - pick your created SaveData blueprint here
- Save Slot Names - change these to unique names
Maps
- Title Screen Map
- Duplicate CiC_TitleScreen
- Set the adventure info to your adventure in the Level Blueprint of duplicated CiC_TitleScreen
- Pick the duplicated CiC_TitleScreen here
-
Tip
You can alternatively download EX_TitleScreen from there - https://drive.google.com/drive/folders/1k-_cEkel62uOiBY8pKNifs28WZ7EU5Z8
It's a barebones title screen with no cutscene which you can easily customize
- Game Over Map
- Pick CiC_GameOver or duplicate it and customize it to your needs
UI
- Load Screen Type
- Pick CiC_Loadscreen
- Download EX_Loadscreen if you want a YotD-style load screen - https://drive.google.com/drive/folders/1k-_cEkel62uOiBY8pKNifs28WZ7EU5Z8
- Inventory Menu
- Pick LevelTotals_Widget
Collectibles
- Primary Collectible HUD Icon - pick Dragon_Candle_Flipbook_Mat
- Primary Collectible Black Background - pick Dragon_Candle_Flipbook_Black
- Primary Collectible Actor Type - pick Dragon_Candle_BP
Adventure Info Construction Script
Tip
Copy the Construction Script of AdventureInfo_CiC. It will be faster to modify it rather than create all the nodes from scratch
This is where you need customize the adventure for the diary/atlas/guidebook to work properly
Basically there's a bunch of arrays listing the available items in each level
If you want to adjust the number of items, right click on Make array node and click Add array element pin or Remove array element pin
The Make LevelItem_Inventory_Info node defines the type of collectable and it's hint message to show in the diary

In Make Level_InventoryInfo node adjust Level Name, Number Of Gems and Level Warp Name variables

Level Blueprints
- Click Blueprints icon near the top in the middle
- Click Open Level Blueprint

- Put the Unified Level Setups node after Begin Play and adjust things such as:
- Current Level Name
- Player Spawned From This Map:
- Place BP_Spyro in the level
- Drag the BP_Spyro from the World Outliner to the blueprint graph and connect it to this variable
- World Context Object:
- Drag out the pin
- Type self
- Choose Get a reference to self
- Incoming Skybox
- Place BP_Skybox in the level
- Drag the BP_Skybox from the World Outliner to the blueprint graph and connect it to this variable
- Homeworld
- Tick if your level is a homeworld
- Current Adventure Info
- Pick your adventure info blueprint
- Level Music
- Start Level Underwater?
- Tick if your level starts underwater
- Homeworld Index
- Level Index
Controlling where Spyro arrives in the level
Note
You don't need to do that for homeworlds
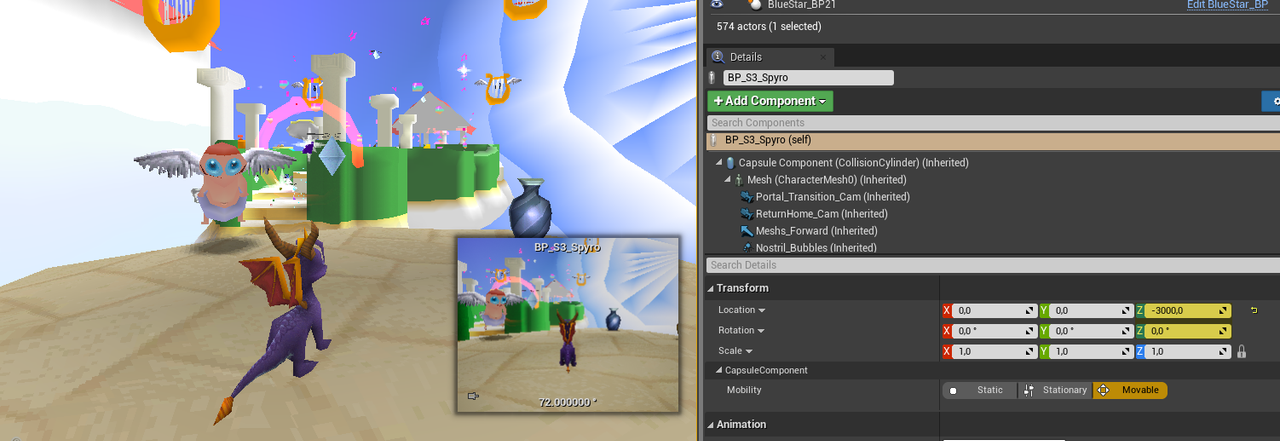
- Place BP_Spyro at coordinates of X 0 Y 0 Z -3000
- Align your level mesh so the spawn point is at these coordinates and points the right way
Note
You can do it either in-editor or Blender. It is best to do so before you place any entities. If you already did select every actor in the level and drag them. The editor will lag a bit, though
- I'm providing screenshot from Astral Utopia as example:
Distance Fade Effect
There are three methods to achieve the effect. For now only one will be detailed
Fade to low LOD texture
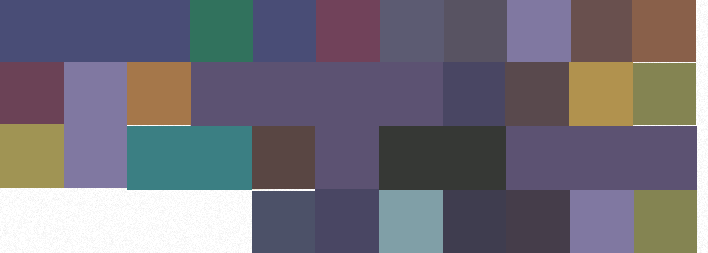
- Create a lower level of detail version of your texture like in provided example
- Before:
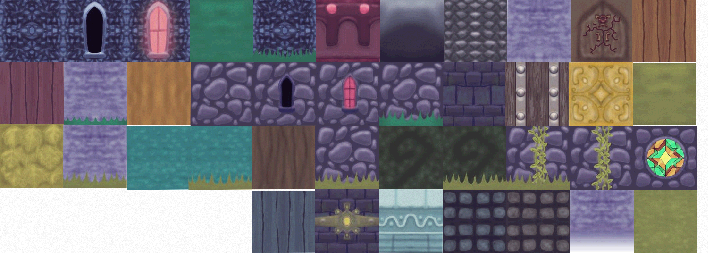
- After:
- Before:
- In the instance of Level_Geometry_Mat tick:
- Fades to Texture
- Fades to texture AND vertex color
- fades to the same UV map
- Pick your LOD texture in Faraway Color Texture variable
- Make sure DistanceFade_Amount is set to 1
Adding a custom collectable
- Open Basic_Collectable_BP
- The comments made by developer in the Event Graph should tell you anything you want to know
Adding a custom talisman
- Duplicate and rename BoatPart_Base_BP
- Open your duplicated blueprint
- Delete connection from Save a Collectible node and connect it to NPC Reward Process:
- Before:
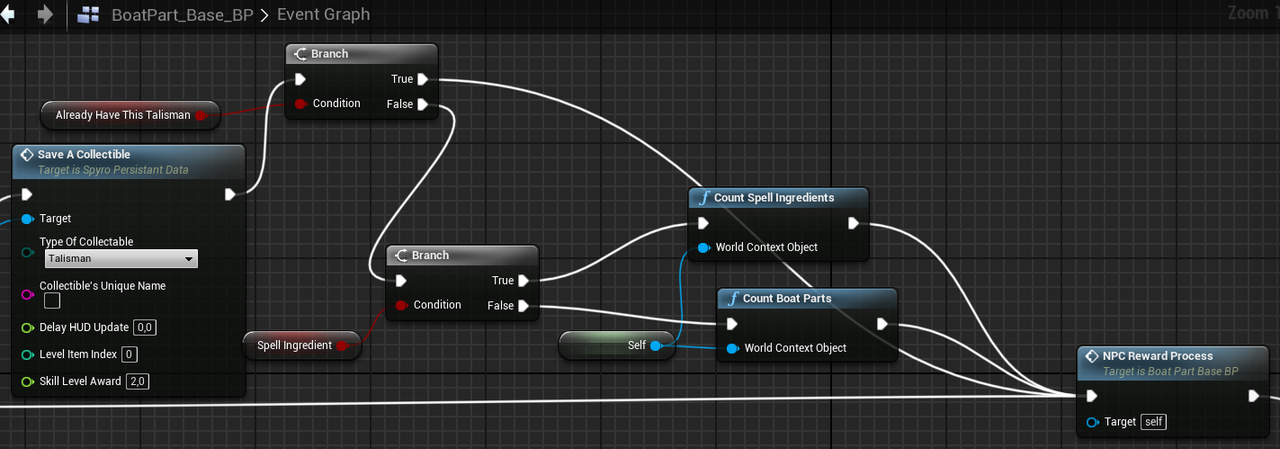
- After:
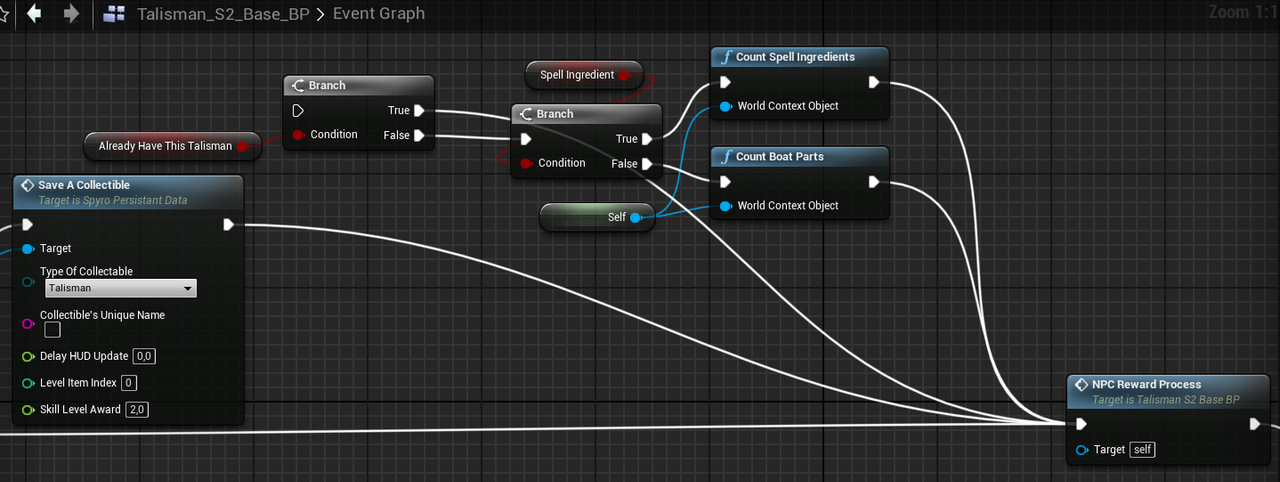
- Before:
- Make a child blueprint of your talisman and open it
- Select StaticMesh component (on the left sidebar)
- Replace the static mesh (on the right sidebar)
Rewarding the talisman
- Select the NPC which you want to award the talisman to player
- Assign your talisman blueprint to Award Item variable
- Tick Awards An Item

Adding a talisman to the UI
- Open the Adventure Info blueprint of your game
- Find Make Levels_InventoryInfo node
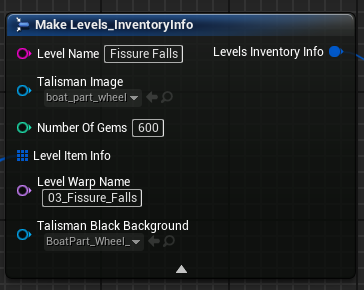
- Talisman Image
- Pick the image texture representing your talisman
- 🛈 This is shown in the guidebook/atlas/diary
- Talisman Black Background
- Create a material inherited from Dragon_Candle_Flipbook_Black
- Open it and replace the Flipbook Texture
- Set the parameters like that if the texture is not animated:
- Finally, assign your created material to the variable
- 🛈 This is shown in the Level Completion UI
Compiling your fangame
Before you compile
- Click Edit
- Select Project Preferences...
- Select Maps & Modes
- Set Game Default Map to the title screen of your game
- If you're using the Adventure Template, pick EX_TitleScreen

To compile your game, you need to have Visual Studio 2022 installed with the required Workloads and Components
The following tutorial from Epic Games will guide you through the steps you need to take - https://dev.epicgames.com/documentation/en-us/unreal-engine/setting-up-visual-studio-development-environment-for-cplusplus-projects-in-unreal-engine
Once you installed Visual Studio:
- Click File
- Select Package Project
- Select Windows (64-bit)
What to do if you can't install Visual Studio or packaging process is failing
- If you kept your work outside of SpyroContent folder:
- Zip the folders in Content folder where you keep your work using 7-Zip
- Upload to Google Drive and share on the Discord server and someone will compile the project for you
- Alternatively you can zip the whole project folder if you're not sure or have a fast internet
Directions
Info
These are general pointers on how to do some things rather than step by step tutorials
Adding a new projectile type
- Locate Superflame_BP and create a child blueprint
- Tip: Use Brute Force Scanning option in Spyro Model Extractor if you want to extract any projectile models/animations
Music
- Spyro Soundfont Collection v.2.2 - https://www.youtube.com/watch?v=2lWhSnuLLjU | https://mega.nz/folder/EPAFSDhA#7UoE3AvCUgB4J86GFVCe6g
Note
Ticked checkbox means the artist granted explicit permission for usage of their music in Spyro/Crash fangames. Generally speaking, artists don't mind if their music is used in fangames especially if they're credited, but try to reach out to them if you want to use the tunes they made
- Alphabetical list of artists creating Spyro-style music:
- Cope Land - https://www.youtube.com/@CopeLandSpyroMusic/videos
- Createology - https://www.youtube.com/playlist?list=PLLZ62NPHNa9-paJgkt_eM8mc61G8SRB_F
- DoofenSpyroDragon16 - https://www.youtube.com/@DoofenSpyroDragon16/videos
- Greg Keogh - https://www.youtube.com/@starttofinish42/videos
- Klark Rhodes Music - https://www.youtube.com/@KlarkRhodesMusic/videos
- Manuk Music - https://www.youtube.com/@manukmusic1458/videos
- MistyRockandRoll - https://www.youtube.com/@MistyRockandRoll/videos
- MrModez - https://www.youtube.com/@MrModez/videos | https://soundcloud.com/mrmodez
- Mr.Spyro98 TheDragon - https://www.youtube.com/@mr.spyro98thedragon24/videos
- MightyEight Music - https://www.youtube.com/playlist?list=PL9Z7Edc79ouGBKKPW1ETBnFHPlhpCIetc
- Nanashima - https://www.youtube.com/@Nanashima/playlists
- Paracosm - https://www.youtube.com/@deadendwaterfall/videos
- Spyrit95 - https://www.youtube.com/@Spyrit95soundtracks/videos
- Spyro Soundfont Collection - https://www.youtube.com/@SpyroSoundfontCollection/videos
- Stephen Bereznicki - https://www.youtube.com/@stephenbereznicki7506/search?query=spyro
- tape - https://www.youtube.com/@Dr_Tapeworm
- Toasty - https://www.youtube.com/@Toasty1567/videos
Crash:
- Soundfonts:
- Artists:
- Airumu - https://www.youtube.com/@airumu/videos
- aRBee - https://www.youtube.com/@a_RB_ee/videos
- B13CW - https://www.youtube.com/@b13cw53/videos
- DSpeed - https://www.youtube.com/@dspeedYT/videos
- JayWARPED - https://www.youtube.com/@JayREEZYsays/videos
- Joeli - https://www.youtube.com/@Joeliii/videos
- Logan Palmer - https://www.youtube.com/@Logan912/videos
- Pikachu4352 - https://www.youtube.com/@Pikachu4352/videos
- Manuk Music - https://www.youtube.com/@manukmusic1458/videos
- MightyEight Music - https://www.youtube.com/playlist?list=PL9Z7Edc79ouG8xm31d4pLZFVuAQencGde
- Stephen Bereznicki - https://www.youtube.com/@stephenbereznicki7506/search?query=crash
- Tremendouz - https://www.youtube.com/@Tremendouz/videos
- Twindicoot 'CrashTWNDCT' - https://www.youtube.com/@CrashTwindicoot/videos
Asset Index
Info
Here you'll find all kinds of assets that will help you make your stuff
In-engine assets
Info
These assets go inside the project's directory inside Content folder. The name of folder you need to place is mentioned in bold letters
- The Adventure Template - https://drive.google.com/drive/folders/1R6G42xg4bzvv82evRm1qTZEcT5WV7oAn?usp=drive_link
- ExampleAdventure
- Enemies, NPCs, Objects from PS1 trilogy - https://mega.nz/folder/JA4QwCzZ#sbMdFGPukG2qUL6ewgu3UA
- OT_Ports
- Note: Requires The Adventure Template
- Spyro Blocks V2 - https://mega.nz/folder/4cZABRIS#Qs2Hs03QwjrOiRSwJifMxA
- Spyro_Blocks_V2
- Allow you to make your level without using blender
- Topple and Linked Chests - https://drive.google.com/drive/folders/1hCZssVyh1VRR6-iJCZpIdDV59hlORzQ_?usp=sharing
- CyContent
- (Deprecated) Spyro Blocks V1 - https://mega.nz/folder/VdxQHKLA#h1jpPtT0dWNX_LE80WuzqA
- Spyro_Blocks
Source assets
Info
Do not place these assets inside Unreal's project directory!
- Spyro PS1 Trilogy Asset Dump - https://mega.nz/folder/ldwixKjC#eYJETuxQFR_0nL8czECBDQ
- Details in README
- Crisis in Chronolia Source Assets (download Source_Assets zip) - https://drive.google.com/drive/folders/1IV8n-DEH9qD92nHu3InQJuvSf7f6bqxs
- Crash PS1 Trilogy Asset Dump - https://mega.nz/folder/8dwzHBwK#h7_GhWNB_sOUBbZIYCz1Pg
- Details in README
Tips
- Remember to save and backup your work often!
- Asset organisation:
- In Content folder, create a folder named YourNicknameContent
- Keep whatever you make inside of that folder
- When you want to upgrade to newer Spaghetti version, just copy the aforementioned folder into it
- If you want to modify something in SpyroContent, create a child blueprint or make a duplicate and put it into YourNicknameContent
- Sometimes, it's not practical to do this so here's a few tips for managing a fork:
- Mark any changes inside blueprints with a comment (Right click -> Add a comment)
- Keep a list of changes inside easily accessible text file you won't forget about
- When you'll want to migrate the changes, open an instance of both the older and newer project, put them side by side and copy the blueprint nodes
- To find the changes click CTRL+SHIFT+F and type whatever text you marked your alterations with (for example in my Crash fork they're marked with Bandicoot Mode)
- In Content folder, create a folder named YourNicknameContent
- If you're lacking inspiration for Spyro levels, take a look at These Spyro Worlds Do Not Exist profile on Twitter
- Programming socks might improve your coding performance. Consider getting a pair to try for yourself
