Spyro Original Trilogy Community Remaster Guide
This guide assumes that:
- Have basic computer skills like operating on files, navigating folders & interfaces
- Have Spaghetti Spyro and Unreal Engine downloaded & installed
- You're familiar with Spaghetti Spyro Framework Guide available here - https://rentry.co/SpaghettiSpyro
- Relevant sections will be linked to help you look up the necessary information
- The guide can't cover every single thing you'll need to do. If you have questions, don't hesitate to ask in the project's thread in the discord server
Getting Started
- Download and unzip the asset dump available here - https://mega.nz/folder/ldwixKjC#eYJETuxQFR_0nL8czECBDQ
- Download and unzip the source code of the project - https://mega.nz/folder/JA4QwCzZ#sbMdFGPukG2qUL6ewgu3UA
- Place OT_Ports inside Content folder (alongside SpyroContent) using the Windows File Explorer
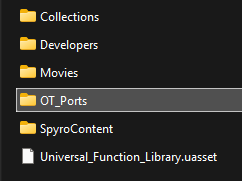
The Adventure Template is required for project to work
- If you don't have it, download it here - https://drive.google.com/drive/folders/1R6G42xg4bzvv82evRm1qTZEcT5WV7oAn?usp=sharing
- Unzip and place ExampleAdventure inside Content folder alongside OT_Ports

- Choose a level you want to work on - https://docs.google.com/spreadsheets/d/1iDZgkx0MO-OnxS4-XkfhdtKiPjLT5y9sGwbuLsCSof4
Note
You don't need to do every single thing while working on a level. One person can take care of importing the geometry into the engine, another places the treasure, the third extracts the sounds etc.
Importing & processing the level in Blender
Installing the terrain import add-on
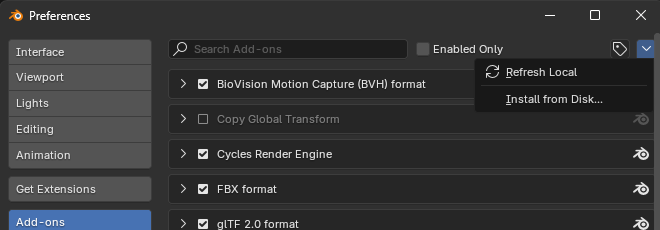
- From the asset dump install spyro_terrain_import_export.py add-on in Blender
- To install the add-on, follow these steps:
- Edit > Preferences
- ˅ > Install from Disk...
Importing the terrain
Step 1
- File > Import > Spyro Terrain (.sterrain/.s1terrain)
- Navigate to .sterrain file. They're stored in S1/S2/S3 > Levels
- In the top right corner of the Blender File View window, tick HQ Terrain UVs

- Click the blue button that says Import Spyro Terrain
Step 2
- Select all Near region meshes
- Utilize Shift+Left Mouse Button hotkey to quickly select them
- Join them by clicking Ctrl+J. Note: Your mouse cursor needs to be over the viewport, not the sidebar, for the hotkey to work
- Do the same for Far region meshes
- See the video - https://imgur.com/28GzzDv
Step 3
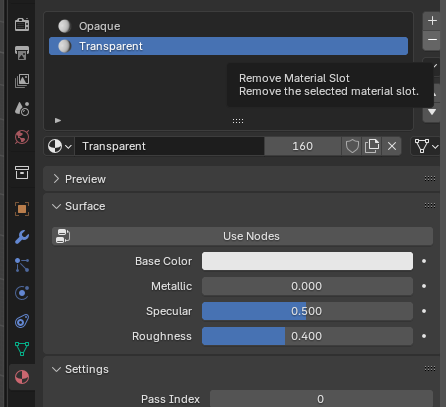
- Select the Near Region mesh
- Select Material icon on the sidebar (red sphere with checkerboard pattern)
- Remove Transparent material slot
Step 4
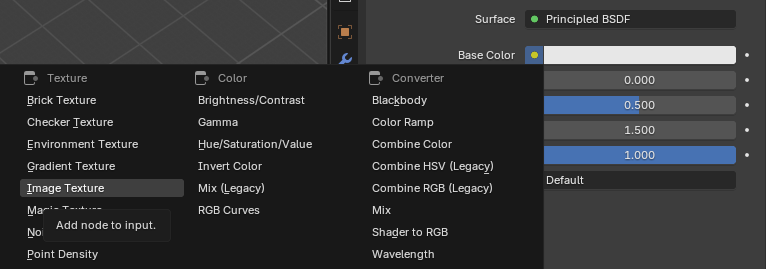
- Click Use Nodes button
- Click yellow dot near Base Color
- Select Image Texture
- Click Open
- Navigate and select the HQ texture .png file for example Glimmer_HQ.png
- Click Linear
- Select Closest

- In the viewport in the top right corner set Viewport Shading to Material Preview

Step 5
- Select Modifiers icon on the sidebar (blue wrench)
- Click Add Modifier
- Select Generate > Subdivision Surface
- Select Simple

Separating the level geometry
Some stuff in the level needs to be separated into it's own geometry. Here's the list:
- Liquid surfaces - Swimmable/Drownable Water, Acid, Lava
- Still/flowing/waterfall liquid surfaces also need to be also separated
- Breakable walls
- Wooden surfaces
- Moving surfaces (like a Sunny Flight door in Artisans)
- Ice surfaces
- Slide surfaces (in Crystal Islands/Haunted Tomb)
Please see the video - https://imgur.com/nyyz73r
- Enter Edit Mode
- Select the faces which make up the surface
- Tip: Click C for brush selection tool. Right click to exit the tool
- Click P and choose Selection
As seen in the video you can do that in parts, then merge the meshes with CTRL+J
If it's Swimmable Water:
- Go to UV tab
- Select all faces in both viewports
- Click UV > Reset
- Video - https://imgur.com/POKLHmt
Exporting the level
Tip
Export each surface separately
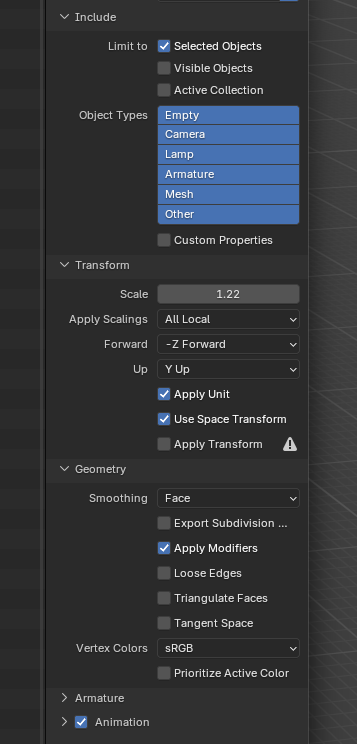
- Click File > Export > FBX (.fbx)
- Settings:
- ˅ Include
- Limit to ✔️ Selected Objects
- ˅ Transform
- Scale - 1.22
- ˅ Geometry
- Smoothing - Face
Importing the level in Unreal Engine
- Open the level file of the level you're working on
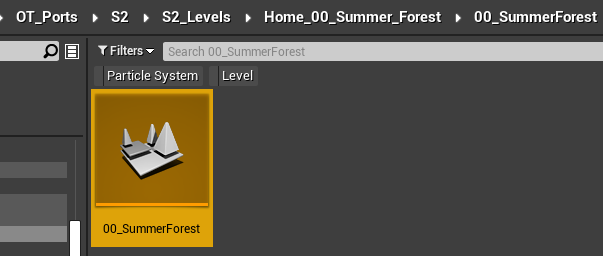
- Create Meshes, Materials and Textures folders in the folder with the level
- Import the geometries to Meshes folder with following settings
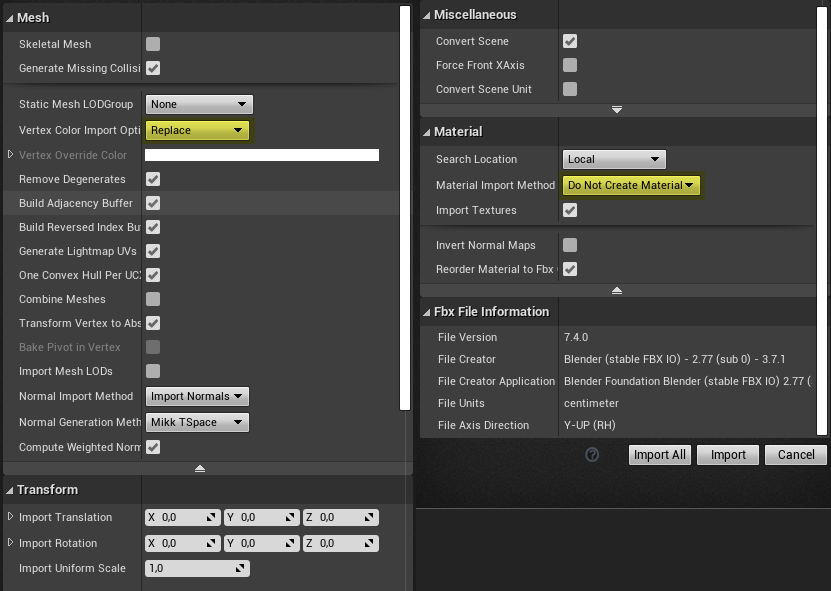
- The relevant section of Spaghetti Guide - https://rentry.co/SpaghettiSpyro#level-import-and-set-up
- Open the level mesh and set Collision Complexity to Use Complex Collision as Simple
- Import the texture which the level uses for example Glimmer_HQ.png
- Open the texture and set Texture Group to 2D Pixels (unfiltered) in the second to last Level of Detail section
- Create a duplicate of Level_Geometry_Mat_Inst present in OT_Ports/Global/Templates
- Name it LevelName_Mat for example Glimmer_Mat
- Move it to Materials folder
- Open the material
- Assign the texture
- Assign the material to the mesh
- Place the mesh on the scene. Make sure the spawn point is aligned to Spyro - https://imgur.com/VfIxgg3
- Delete the placeholder purple plane
After that you can import and set-up other surfaces if the level you're recreating has any. Follow this section of the guide - https://rentry.co/SpaghettiSpyro#import-and-set-up-of-swimmabledrownable-water-acid-and-lava
Tip
Right click where it says "Location" under Transform to copy the location of the level mesh and apply it to other surfaces

Importing the skybox
- Skyboxes are located in Skyboxes (Ripped by Bunbaroness) folder in the asset dump
- Follow the instructions in the Spaghetti Spyro Guide to import the skybox - https://rentry.co/SpaghettiSpyro#skybox-import-and-set-up
- Remember to set the collision properly and replace it both inside BP_Skybox and BP_Portal_ReturnHome blueprints
- You may want to open the skybox mesh and adjust these settings in Import Settings section then re-import the skybox (Right click > Reimport)

Placement of treasure and other entities
You can delete the placeholder magenta gems. Do not delete any other entities!
Getting Started
Now before we get started, there are two ways in which you can recreate the placements
- Simple - play the game on emulator or console and replicate positions of stuff as you go. Save states come in handy for this so the former option is recommended
- Advanced - use ePSXe 2.0.5 along with Unofficial Spyro Scope by FranklyGD https://github.com/FranklyGD/Spyro-Scope/releases
- In ePSXe select Options > CPU Mode > Interpreter (Slow)
- Navigate to Config > Plugins > Video
- Set plugin to Pete's OpenGL2 GPU core 2.0.0
Download Spyro saves by Arenovas - https://drive.google.com/drive/folders/1RjFIJ9g0TY4nS3xgeMM4yj3WHYkf83CU
The saves start from each homeworld in each game. For example, if you're working on level that is accessed from Autumn Plains:
- Copy Autumn Plains epsxe0002.mcr
- Rename it to epsxe000.mcr
- Backup the original epsxe000.mcr in memcards folder (if you have any saves on it)
- Put the renamed epsxe000.mcr into memcards folder
For general info about placing various entities you might want to take a look at Getting Started section of the Spaghetti guide - https://rentry.co/SpaghettiSpyro#getting-started
Gems & Treasure Containers
Tip
Type "gem_" in Search Classes field in top left corner
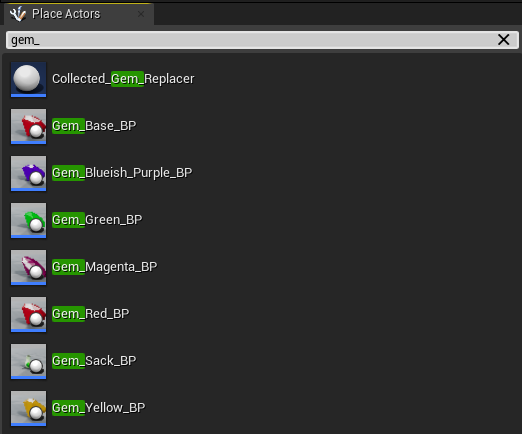
When it comes to treasure containers, use the ones in ExampleAdventure/TreasureContainers
Collectibles
Remember to not delete the collectibles already present in the level
Drag them to the correct places in the order they appear in the inventory menu. The collectibles in placeholder levels are ordered from left to right
Portals
If you're working on a homeworld, do not delete the portals as they're difficult to set-up. Simply drag them to the appropriate places. The same applies to the return home portal in non-homeworld levels
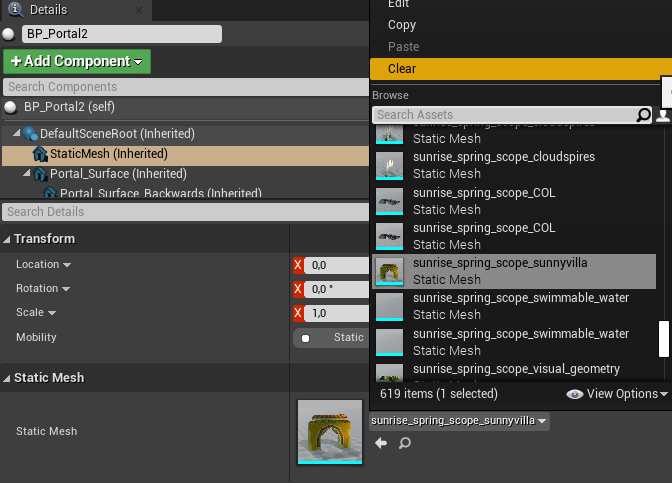
If the portal geometry is modelled in the level geometry, select StaticMesh component and clear the variable
NPCs, Enemies, Fodder & Environmental Assets (Mobys)
A lot of the dumped mobys especially animated ones have quirks that make them difficult to put in the engine for the beginner and require expertise with blender and UE to fix. So here's what you can do if you're a newbie:
- In the project's thread, tell me which level you're implementing and provide the sound effects for the mobys. Details here - https://rentry.co/SpyroOTCommunityRemaster#extraction-of-sounds
- After I implement the mobys, download and unzip the source code of the project again
- Put OT_Ports in Content folder without overwriting the files, especially if you already done some work on the level like placing geometry and treasure around
- Proceed with placing the mobys in the level
Here are some of the problems with mobys:
- Straight up broken (missing polygons, broken animations)
- Clipping of the eye(s) into the body
- Corrupted textures
- Broken UVs
- Different meshes used for different animations
- Animation play rate being all over the place
- Animations not looping correctly (less noticeable on some)
- Minor geometry issues
If you'd still like to try to import enemies, then:
- Download Blender 2.79
- Download blender-2.79-windows64.zip from this link - https://download.blender.org/release/Blender2.79/
- The newer Blender (I tested 4.4.3) only imports the first animation properly for some reason
- Import the fbx file of the moby
- Assign a material to each of these components (if you don't do this, Unreal will make a single material slot for a whole mesh while it needs a material slot for each component)

- Export with Smoothing set to Face and Add Leaf Bones unchecked
- The texture needs the black parts made transparent. Example:
- Before:

- After:

- Before:
- Follow this tutorial to implement the enemy in-engine - https://www.youtube.com/watch?v=pjp05D-XrBQ
Music
- Download this dump of music from Original Trilogy by EBrinchJ - https://drive.google.com/drive/folders/1AACAjBl3UavdbGiXbUwWovsPqe5bOOWu
- Convert the file to WAV. I personally recommend foobar2000 for this:
- Download foobar2000 - https://www.foobar2000.org/download
- Drag & drop the music file into the app
- Right click > Convert > Quick convert
- Select WAV
- Click Convert
- Import the WAV file into the project
- Open the imported WAV file (inside Unreal Engine)
- Set Looping to ✔️
- Set the Class to SpyroSound_Music
- Open Level Blueprint
- Inside Unified Level Setups node pick the WAV file in Level Music variable
Enhancements
Distance Fade Effect
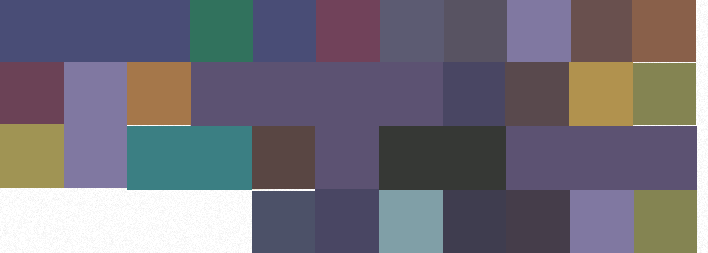
Like in the shown example, you need to replace texture tiles with a single color or gradient. You can do this in your favourite painting program like Krita. Example:
- Before:
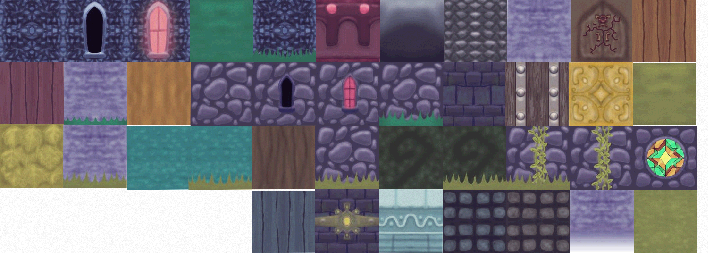
- After:
Tip
To replicate the effect as close as possible to original game import the Far region mesh into the engine, assign the Untex_Vertex_Color material to it and compare the effect
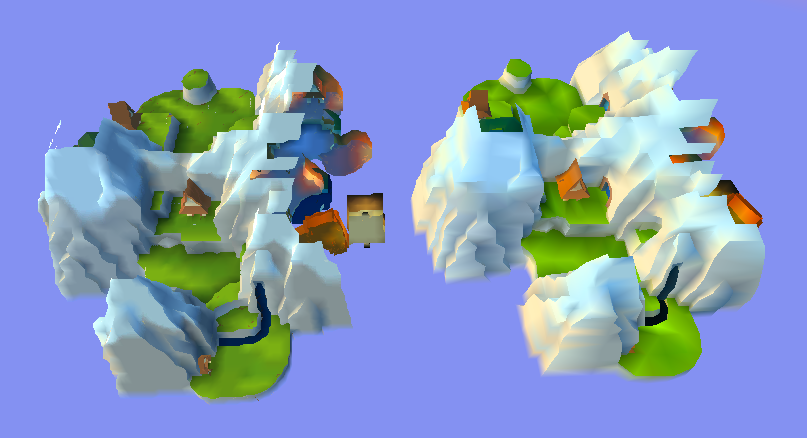
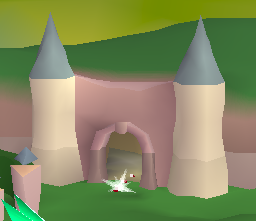
You can see the result using this method on the left, while on the right is our target. It may take some trial and error. Note that getting identical result is not required
Tip
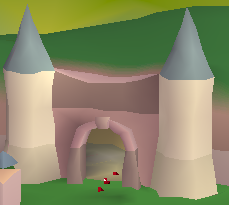
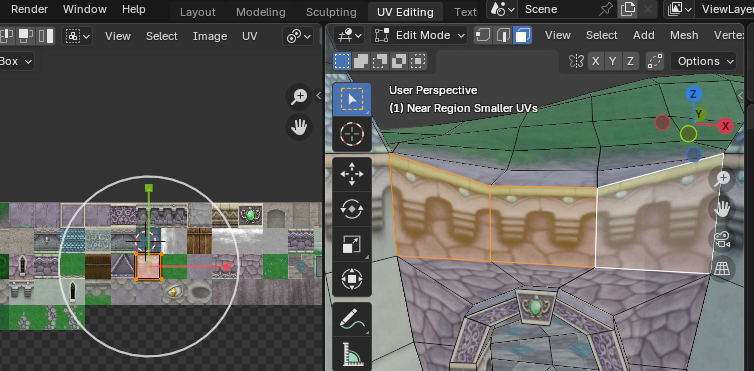
To identify the off-color tiles like in the image:
- Navigate to UV Editing tab in blender
- In the right viewport, select the faces
- In the left viewport, you'll see which tile to adjust
- After the fix:
No Texture Bleed
To prevent texture bleed, you need to slightly scale down the UVs on the level mesh in blender
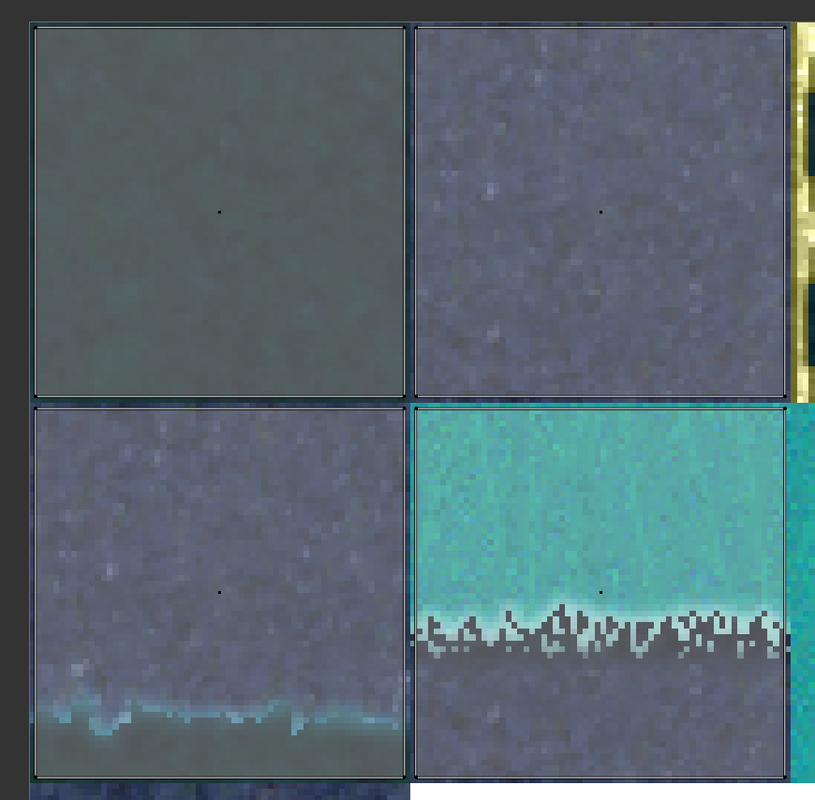
- Create a duplicate of Near region mesh in blender
- Select the mesh in Outliner
- Press Shift+D
- Press ESC
- Navigate to UV Editing tab
- Follow the video for the next steps - https://imgur.com/iwDyHIq
Distance Fade (Advanced)
Warning
Expert level knowledge of blender required!
The proper way to achieve distance fade effect is bake the Fade vertex colors from the mesh to the second unwrapped UV set of the level mesh
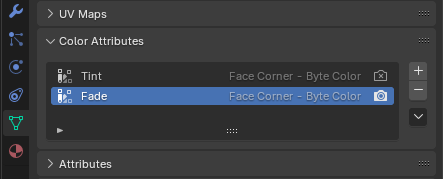
- Add a second UV map here:

- Navigate to UV editing tab
- Select the second UV map and carefully unwrap the mesh
- Bake the vertex color to the texture. I'm not 100% sure how to do it right so you'll need to figure that out
- Once you have the baked texture, import it into Unreal, assign it to Faraway Color Texture variable in material instance and set the parameters like this:

Sharing your work
- Zip the folder of the level you're working on and share it on the discord server

- Also share the .blend file with the level and source file for the distance fade effect texture if you made one
Extraction of sounds
Method A
- Set the music volume to 0
- As you go through the game, record short clips of various sounds and dialogue
- Use video editing program to cut and export the audio
Method B
- Download this dump of unlabeled sounds from the trilogy - https://mega.nz/folder/5dwAAQ5B#r59Ts8LhgNc974vSYnX6VA
- Go through the audio files and label them in this sheet - https://docs.google.com/spreadsheets/d/1mgXsQCdPKUTVKc01fbwGGWhLFNenl3vtdQn3JZMyr_I/edit?usp=drive_link
- Contact me on the discord to get edit access to the sheet
Tips & Directives
- The engine doesn't have these mechanics implemented yet:
- Ladder climbing - place hurlwinds and whirlwinds nearby
- Slides - place a supercharge fairy at the start of the slide, making it a supercharge course
- In YotD to navigate to sub-level inside UE viewport, double click any actor in Outliner
